Showing posts with label how to sew a dress. Show all posts

Friday, May 24, 2013

New Retro Dress Patterns from Butterick: 5920 & 5930

Have you seen the latest retro dress patterns from Butterick?  I especially love Butterick 5920 and 5930 for sewing vintage fashion styles .   These two dresses have great details and nice vintage silhouettes. What is even more fun? The model for pattern #5930 is a real girl with curves, so we get a chance to see what it will look like on many of us out here who sew for ourselves.

When it comes to making alterations, I think that either bodice will modify easily without distorting the style.  Model #5920 is a very simple design with few pattern pieces.  The bodice is darted to fit, without sleeves or other details that might add more difficult details to the sewing process.  The skirt is 'A' line with a smooth back and gathers only in the front.  This is an easy skirt to modify into full gathers or other shapes.  This fitted bodice can be made to fit tight or loose, depending on your style.  I also think it would be adorable in a summer cotton such as gingham, cut short and sweet.

The princess seamlines in the bodice of #5930 will help to create a great fit, regardless of the body type.  The gored skirt has fullness in the hem without the bulk of gathers at the waistline and hips, so it should be a very flattering design to wear.

If you have an event this summer, these patterns could be what you are looking for!


Tuesday, February 12, 2013

A Closer View: Navy Silk Sheath, c. 1955


One of the best ways to learn fine dress making is to study examples of the craft. This silk sheath dress from the mid-1950's is a great example. It is clearly a custom made dress, with many hand sewn details. By looking at it in detail, we can learn more about the design and drape of this wrapped 'sarong style' dress, along with tips on how to sew a feather weight dress like this that holds its shape well when worn.

This gorgeous navy dress of silk twill has a blue floral pattern that is probably Italian silk. It is backed by lining that is sewn 'in one' with the outer fashion fabric. I use the term 'flat lining' for this process. The lining is also used as a base to hold the drapery in place. It is probable that the customer had a fitting wearing the lining, while the dress designer wrapped the silk fashion fabric around the body, pleating it into the side seams as shown below.

The right and left sides are patterned and sewn differently, creating the signature sarong effect. This sarong skirt is sewn into the sheath side seam on the right, but it wraps around the left without a side seam, hanging open at the center back.


Looking inside the dress we can see the construction techniques. These are classic points. The scarf weight fashion fabric was 'backed' by a lining. The two layers were stitched together, then cut with pinking shears. When pressed open, the stitching shows clearly that this was 'flat lined'.

The transfer marks used to place the darts shows as little white dots. These would have been part of the custom or couture process. Seam tape is sewn along the waistline seam to stablize it and keep it from ripping apart. This tape was also used to edge the hem. Using hem tape is an easy way to provide a clean edge that is easy to sew through.

The bodice of this dress was cut with princess seam lines in the back, while the front had conventional darts. The fashion fabric was draped on top of this and sewn in place. This same lining was used in the skirt, but only to the knee level. This would keep the hips smooth, but allow the hem area to drape nicely.


This wonderful dress is listed in my shop on Etsy where you will find more photos of it. If you like this style, look for designs by Dorothy O'Hara, Helen Rose, and Peggy Hunt among others from that era who specialized in draped dresses. (this dress does not have a label)

Saturday, November 17, 2012

A Closer Look: 1960's Sheath Dress with Cape Drape


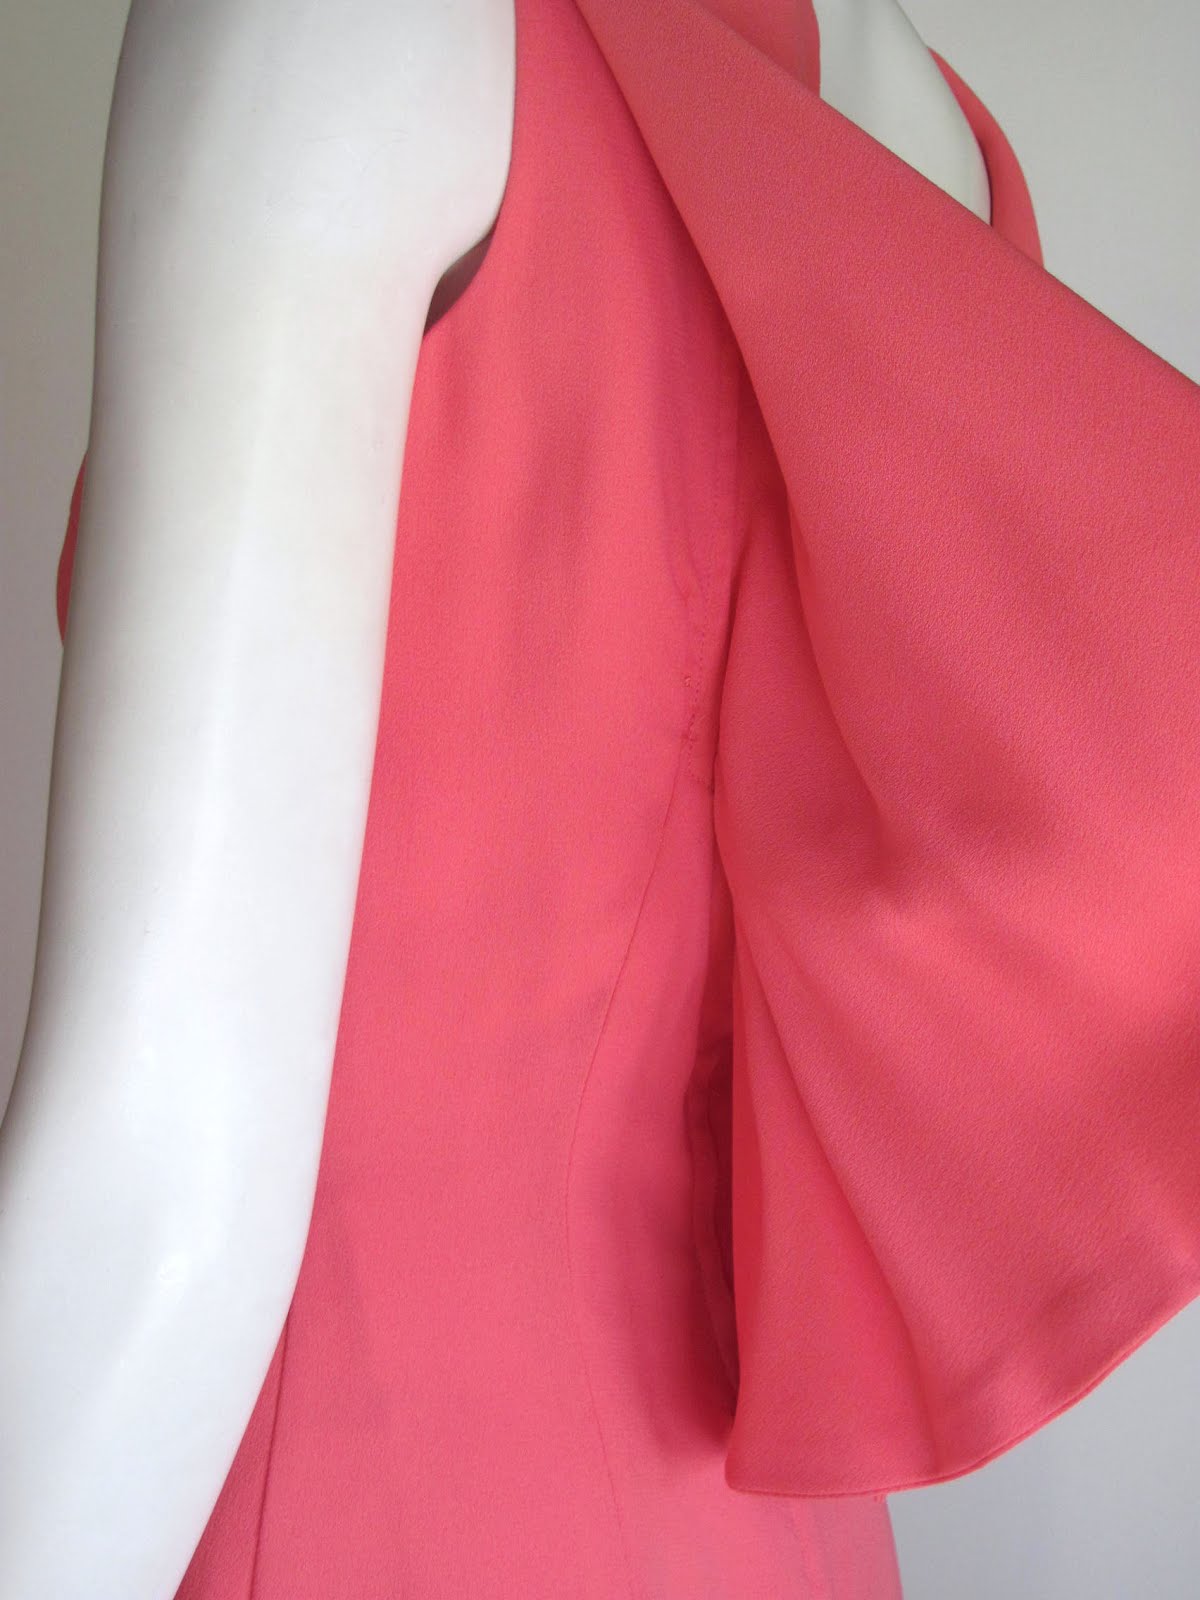
I thought it might be fun to take a closer look at this Mad Men era sheath dress with a great cape drape around the neckline. The back view really makes the dress, while the front view has a classic silhouette.

It looks like a circle cape is sewn around the neckline, that plunges to a deep "V" that is squared off at the point with a wide bow in back. This cape was then folded up at the neckline in front (see detail), and arranged over the shoulders in a fold, while the back floats open.

I include here a view that shows me lifting the back drape so you can see how it is sewn to the dress.

And finally a few close-up views to show more details.

This pink crepe cocktail dress was designed by Anita Modes (I'm guess it was sold at the popular Anita shops). It is fully lined with a center back zipper that has the cape floating open over that zip. A wide bow covers this opening. The sheath dress design has darts to fit and is very simple.

Isn't this inspiring? This style of cape could be added to an existing simple dress for a great holiday look. It flows nicely in crepe here, but a soft satin or even a soft lace could be gorgeous over a simple dress you already own. I would love to try draping this kind of cape collar sometime. If you try it, let me know how it goes!

Friday, October 5, 2012

Sewing Tip: Dart Marking & Sewing


Cutting out and transferring dart markings can take up an entire evening. This method uses a minimum of fussing with the paper pattern and fabric layers.


To start, immediately after cutting out the pattern piece, stop and 'stab' a pin through all layers at each dot on the paper pattern that you want to transfer. Push the pins in straight (not slanted).

When all dots have pins in them, flip open the two fabric layers (step 2). You will see the pin passing through both fabrics. While the pin is in place, RUB a chalk (or fabric pencil) over the pin just where it enters the fabric (step 3). This will leave a tiny mark that is easy to see.


After marking the pins, remove the pattern from your fabric. Open the pattern piece flat on the work table. For each dart, mark the dart point with a + so you can see exactly where the point should be and the stitch line will stop. Fold through this +, creasing down the center length of the dart to the bottom edge where the notch clips can be matched.

Once the dart is folded, it's time to pin the dart together. Align the dots by weaving a pin in at one mark and out through the other mark. Then pull the dart together along the fold (step 5). This will be certain that both dots are aligned and match up. Use a second pin to pin both layers together, then remove the first pin.

It helps to be sure all pins are perpendicular to the sewing line. This will allow the sewing machine can sew across those pins easily. When you sew a fitting garment, be sure to use the largest stitch length, and contrast colored thread so you can easily remove the stitching if needed.


Sunday, September 16, 2012

1960 Dress Style: How to Get That Look


Aren't these classic dresses from 1960 cute? They are from a Penney's department store advertisement. The dresses are cotton and use a black and white gingham check. What makes each one special are the details: pockets, borders and banding trims.

When you plan to sew a dress like this, designing the details are half the fun. This ad has very simple dresses when you look at the cut and style, yet the details make each one seem interesting and stylish. All of these elements would be easy to copy using a pattern that has the basic fit.


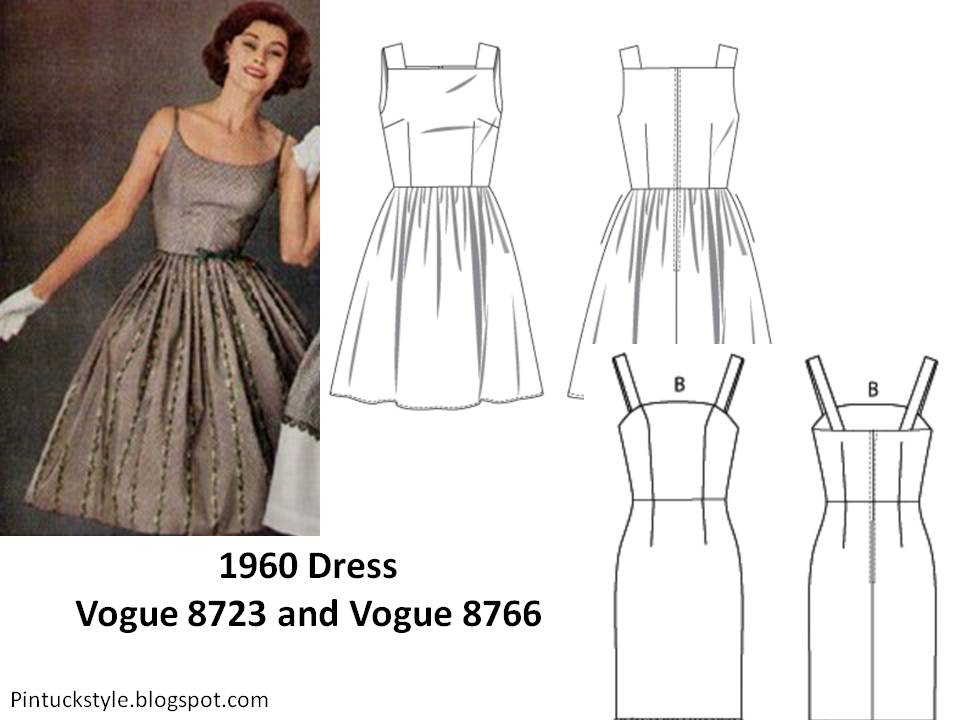
1960 Dresses: I found some current fashion patterns that could be used to sew up your own dress in this early 1960's style. What I looked for were fitted bodices with either simple darts or princess seam lines. For a curvy figure, those princess seams are best, since a clean fit can be shaped down the bodice dart in front. More slender figures can use the simple darted bodices.


It isn't easy to find a current dress pattern with a fitted bodice and gathered skirt. You may want to make your own full skirt. Many of the best full skirts are about 3 yards around, or 108". This was probably due to the fact that their cottons were sold in 36" widths. They would cut 3 panels that were the full fabric width and sew them together down the selvage edges for each skirt.

Some skirts are gathered, others are "knife pleated". These are the small pleats you see in dresses that tend to 'flatten' the skirt around the waistline. For many, this results in a more slender look at the waistline.

Yardage: How much fabric do we need for a full skirt?
1. Measure your length from waistline to hem.
2. We want about 108"(36" x 3)around for this skirt. If we use current 42" wide fabric, we need 3 panels. Two would be the full fabric width, but the third panel is going to be only 24" wide. If your fabric print is large, you may need to make adjustments to plan for the motif.
3. For each panel, add 2" for the hem and 1/2" for the seam allowance around the waistline. This means that yardage for a skirt with three panels would require: 3X length + 7.5".

Next we will look at how to get our details and trims to have the same cute look!

Wednesday, August 1, 2012

Easy to Sew: Make your own Dress


Do you want to try sewing a dress that is easy to sew and looks great, but don't know where to start? Here's a few ideas to start with. The first two patterns are vintage, and the third is a modern take on vintage styles. All are easy to sew up in this gorgeous pink cotton floral print. All are available in the shop this week.

On the first pattern, the "A" line shaping just skims over the figure. This pink dress with the bias cut collar is a silhouette that is very flattering on figures with curvey hips. It is a vintage pattern by Simplicity 7625 from 1968. When finding patterns, look for "A" line shift styles like this that have simple darts and 2 main pattern pieces.

Hate to sew zippers? This second pattern is a super straight shift style that has only side bust darts. Chances are you may be able to get away without sewing in a back zipper if the dress slips on over your head! Look for vintage pattern Simplicity 4471 from 1964.

For a modern fit, I like this third pattern, a discontinued McCall's 4768. Although it has only 2 main pattern pieces, the upper body is shaped by princess seam lines. Princess seams are the best way to fit a curvey bustline because you can make adjustments for a perfect look. The flutter hem detail is optional, so this pattern is perfect for a slender sheath dress project.

When it comes to sewing, this pink floral fabric is an easy to sew cotton sateen that has a smooth finish. This is a recent textile with a vintage look, and it would be perfect for sewing any of these dresses.

You may have noticed that I selected sleeveless styles for this group. That will save you time and energy spent sewing in sleeves. When fall arrives, just throw on a cardigan and tights, and you'll wear your dress into the cooler weather.

Monday, March 5, 2012

Sewing Tips for Retro Patterns: Butterick 5748 and Butterick 5747

how to sew retro patterns
What we have here are tow popular "Retro" Butterick patterns: 5747 and 5748 with some tips for sewing these vintage style patterns.

The first pattern, Butterick 5747, is from 1960, and has it comes with two great skirt options. We love the wide shawl collar with notches. This pattern should be easy to sew. It has only 4 main pattern pieces: bodice (front and back) and skirt (front and back). The simple bodice is darted for fit, and doesn't have set in sleeves. Either skirt is basic, and both styles button down the center front.


This second pattern, Butterick 5748, is also dated 1960. A "Retro" pattern  with a classic fit bodice with circle skirt. Nothing complicated about it, and there are so many ways this style can go. In the meantime, there's no reason why a narrow fit straight skirt couldn't replace that circle skirt that comes with the pattern, if that is what you want (or a simple gathered skirt as well).

My blog post on FLAT LINING could come in handy when sewing these styles, since either dress would look great with flat lining.

I have another blog post on ”S” DARTS AND FLAT LINING that looks into flat lining in detail, and shows a technique for making well fit bodice darts. The demo dresses are similar to the #5748 dress pattern.

I think you'll find these dresses a good addition to your sewing stock. I look forward to trying these out soon myself!


Friday, February 24, 2012

Dress Patterns for Beginners: Easy to Fit and Sew

McCall's 3129 This is the third part in a series on easy to sew dress patterns. This post looks at a princess pattern that can be easily fit using gingham. The second pattern has mock sleeves for a fast and easy to sew dress style.

In locating dress patterns for curvey fit or larger sizes, McCall's 3129 shown above is a princess dress style that has a great 'fit and flare' silhouette. It skims the upper body, then flares out. If you want a short sleeves, you can have that too.

Don't let the fact that this dress style has four main pattern pieces (front, side front, back, side back) stop you. Once you machine baste those pieces together, have a fitting and you will notice how nicely the final fit can be achieved.

Fitting sample? If you really want to know: Woven, cotton gingham check is the preferred fabric to use when making a fitting sample. It is the easiest way to see if the grain line falls straight, that horizontals aren't crooked and that your pattern pieces are balanced.

Fitting? Make it easy by adding to the dress pattern seam allowances at the side and back seam lines to equal 1" (+ 3/8"). That way you can play with the extra fabric if you need it. Once you get a good fit, go back and make marks on your paper pattern that match your new seamlines. This way your paper pattern can be used again.

Fabric fitting pattern:
step 1: Add to pattern seam allowances so that side and back seams = 1" wide.
step 2: Use gingham for the fitting garment.
step 3: Cut only the dress, don't include facings or zipper.
step 4: Machine baste in the largest machine stitch using contrast color thread.
step 5: Wearing best bra and shoes, have a friend make the alterations. They can see the back, you can't.
step 6: After alterations are complete, remove dress and use pencil to mark the stitch line or pin line. Add horizontal marks on both sides of the seam line, so you know where to match up the pieces when you sew them together again.
step 7: Transfer the alterations back onto your paper pattern and add a new 5/8" seam allowance.
You could press your fabric pattern and use that. If you plan to do this, be sure fabric has been pre-shrunk. Also take care not to pull this fabric pattern off grain. Usually it's easiest to trace a new pattern from the fabric fitting pieces and add back the 5/8" seam allowances.
Butterick 5211Looking for something easier to fit and sew? With only two main pattern pieces (front and back), Butterick 5211 is easy to lay out, cut and sew. It is a nice summer look with a mock sleeves. This is a tunic dress that can be belted too. The extended shoulder make the sleeve look a breeze to sew (it's just a wider shoulder seam line). There is a 'key hole' slit in back, rather than a zipper. A zipper could be added instead.

When choosing your fabric, both of these dresses will make up in simple woven summer fabrics very easily. The princess seam line style should have patterns of moderate size or smaller, so that the pieces don't cut up the print. The tunic dress would be great for larger, graphic or abstract prints.

I hope this series has helped you find the dress pattern that best combines your sewing ability and figure type. With the right combination, sewing a dress can be easy to do!

Here are a few more blog posts that also talk about sewing dresses:

7 Best Sheath Dress Patterns with Vintage Style: Easy to Sew

9 Best Dress Patterns for Beginners: Easy to Sew

6 Easy to Sew Shift Dresses

If you liked this blog post, follow me on Bloglovin to keep up with my most current articles,

You can also find me on:
Facebook - Pintucks
Pinterest - Pintuckstyle
Instagram - Pintuckstyle
Twitter - Pintucks

Tuesday, February 21, 2012

Sheath Dress Patterns for Beginners: Easy to Sew, Part 2

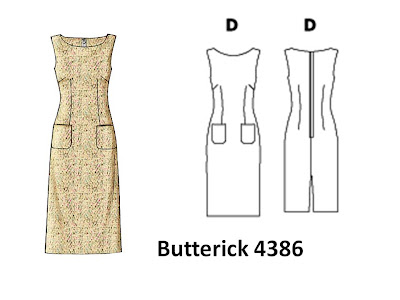
Butterick 4386This is a second post on easy to sew dress patterns. The first post looked at loose fitting shift dresses. After mastering the super easy shift style dress, it's time to sew a classic sheath dress.

This very popular post has been recently updated in: 7 Best Sheath Patterns with Vintage Style: Easy to Sew, so you may want to go there to find more recent patterns to choose from and some updated sewing tips HERE.

What makes the sheath dresses shown here easy to sew?

1) no waistline seam, and they look great if belted

2) dress skims the body, but isn't super tight or super loose (like a shift dress)

3) no set in sleeve (but I found a great raglan sleeve instead)

4) most are still 2 main pattern pieces: front and back

The first dress shown above is Butterick 4386. This dress has a classic darted torso. It can be sewn into so many great styles, from a "little black dress" to a tropical summer dress, the fit will be slender. There is a back zip and hem vent.
Butterick 5638 Curvey fit? This is the best pattern style for getting a good fit. Butterick 5638 has well placed 'princess seam lines'. Those long seam lines provide an opportunity to fit the bustline, torso and hips. There are six seam lines to work with, and each one can be let in or out only a little bit to affect the fit.
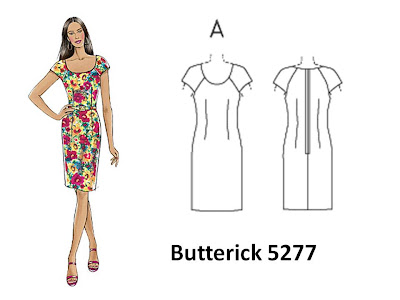
Butterick 5277Want Sleeves? Butterick 5277 is a short sleeved silhouette that is easy to sew, since raglan sleeves are used, rather than the more difficult 'set in' sleeve style. Long torso darts fit the body and there is a zipper down the back.
For a looser fitting dress, here are two styles. New Look: View A is available in two patterns, 6049 and 6095 (they seem to be identical). This dress has back darts to create a smooth fit. Side seams create the torso fit, if you don't want a close fit across the midriff. There is an optional back zipper.

New Look 6021, View B shows French darts. These are long tapered darts that fit the midriff nicely. French darts were popular during the 60's. This type of dart is also a good look if the fabric pattern is large and would be distorted by front darts or princess seam lines.

Fabric selection: In addition to the simple cottons mentioned for shift dresses (quilting cottons, cotton gingham, woven cotton plaids and stripes), we can add stretch wovens to our list. Keep your stretch manageable, don't select anything too 'wiggley' and out of control. When using a stretch, lay out the fabric so the stretch goes around the body (not 'up and down' or it will bag at the rear!).

Obviously, the classic sheath dress is a vintage look that an experienced sewist can whip up in almost any fabric, from wool flannel to brocade.

Fittings are more essential with the semi-fitted sheath style. Plan to do a trial fit before sewing your final seam lines. I suggest when cutting to making 1" wide seam allowances down the side and back seams lines. This will give room to alter for fit.

Slender fit: Look for slender darts. Don't take up extra width in the darts. Do your fitting from the side seams.

Curvey fit: These darts are wider and may be shaped towards the dart point. This fit may also need side and back seam line adjustments. Traditionally, the back seam was cut 'on grain' or very straight, but now it is common to use that seam line to fit the rear nicely.

Princess seam lines make curvey fittings much easier. Just distribute any alterations through the several seams, and you will notice that the fitting process is actually easy to achieve.

Zipper: Take note to make your zipper seam allowance (the back seamline) 1" wide. You will be soooo happy you have the extra fabric when you sew in your zipper. It sure helps to have the extra width.

Math: get a 1" wide seam allowance by adding 3/8" to your cutting line. Yes, you will have to draft that line onto your pattern tissue first, before you cut.

When sewing a zipper, be sure to clean finish the fabric edges first, so the cut edge won't unravel and get into your zipper. I use an overlock seam or I zig-zag over the fabric edge to bind that over and prevent it from unraveling.

Once you get the sewing of this dress style perfected, it could become your favorite: fast, great fit, and easy to sew.

Here are a few blog posts that also talk about sewing dresses:

7 Best Sheath Dress Patterns with Vintage Style: Easy to Sew

9 Best Dress Patterns for Beginners: Easy to Sew

6 Easy to Sew Shift Dresses

If you liked this blog post, follow me on Bloglovin to keep up with my most current articles,

You can also find me on:
Facebook - Pintucks
Pinterest - Pintuckstyle
Instagram - Pintuckstyle
Twitter - Pintucks

Friday, February 17, 2012

Dress Patterns for Beginners: EASY to SEW

easy to sew McCalls 6117This is the first is a short series on sewing patterns that are EASY to sew or EASY for new sewists (beginners). Because these styles tend to be shift dresses (loose with bust darts) or "A" line in shape, they are perfect for summer. This is the season to best sew for warm weather, the timing is right to make one of these styles.

Since I wrote this post, several patterns have been discontinued, I have an updated version of this same post titled: 9 Best Dress Patterns for Beginners, so you may want to click on this link to find more recent patterns.

What I look for when choosing an easy pattern are several elements that need to come together:

1) seam lines: few seam lines to sew - just the side seams please!

2) pattern pieces: two main pattern pieces - front and back

3) darts: few darts - bust darts are fine

4) zipper: nope!

5) sleeves: nada!

6) neckline: simple and round, I think facing is easier than bias edge, but that's me

7) hemline: machine sewn? yes please

8) fabric: smooth, medium weight cottons: these are easiest to sew - quilter's cottons, cotton gingham checks, cotton shirting plaids and stripes.

Here's a few patterns that would be EASY for a newbie, or FAST for those with experience.

Top View, McCalls 6117 (now discontinued) illustrated the type of pattern to look for with 2 side seam bust darts and a soft "A" line fit.

easy to sew dress
McCall's 9172 (also discontinues) shows a sleeveless style with optional dart or no dart, ‘relaxed fit’, neckline facing.  This does not have a zipper, and is an easy "pull over" style to sew.

Easy Palmer Pletch McCalls 6355
McCall's 6355 (available) is a basic shift pattern by Palmer/Pletch with neck binding and optional fitting darts. This pattern has suggestions for creating a good fit.

easy to sew McCalls 6102
McCalls 6102 (available): View D is a shift style with 2 bust darts.  It is a zipperless pull over style that comes in a wide size range.


easy to sew McCalls 6465
McCall's 6465 (available): view E is also without zipper, a slip over style that is also sleeveless with bias tape around arm holes.

When looking at a pattern page online, look for the front and back views or line drawings (production flats) of the garment showing each seam line clearly. Fabric and notions should also be listed.

If you scroll down further on most websites, you will find the GARMENT MEASUREMENTS. This information can be compared with a similar garment you own and fit, so you know what the results will be. Use this to select hem width, hip and bustline ease (looseness). It is a great way to determine your pattern size, if you feel the size measurements may not be exactly your fit.

Here are a few blog posts that also talk about sewing dresses:

7 Best Sheath Dress Patterns with Vintage Style: Easy to Sew

9 Best Dress Patterns for Beginners: Easy to Sew

6 Easy to Sew Shift Dresses

If you liked this blog post, follow me on Bloglovin to keep up with my most current articles,

You can also find me on:
Facebook - Pintucks
Pinterest - Pintuckstyle
Instagram - Pintuckstyle
Twitter - Pintucks

Wednesday, August 31, 2011

Vintage Detail: Red Silk Dress c. 1960


This dress is fully lined. The hem appears to have been shortened. All beaded has been sewn by hand around the neckline and wrists of the long sleeves. The waistline has piping to match. Small hooks and thread loops are sewn at the neckline and waist of the center back metal zipper.

click on the photos to enlarge themr

Tuesday, August 16, 2011

Sewing Vintage Fashion: Vogue Patterns, April 1960


vintage vogue 9967
vintage vogue 9967
Vogue 9967. Blue eyelet, embroidered with dots, great full sleeves on fitted shirt waist dress

vintage vogue 9991
vintage vogue 9991
Vogue 9991. Floral border on cotton with matching stole wrap, sleeveless bodice with deep "V" back

vintage vogue 4104
vintage vogue 4104
Vogue 4101. Small kimono sleeve bodice with 3.5 yards wide gathered skirt in mauve ribbed cotton

These three vintage Vogue patterns are all sewn in cottons. They appear in "Ladies Home Journal", April 1960 (the Kim Novak cover is so sadly damaged I couldn't include a photo for you). It is interesting to note how easy the dresses would be to sew. The seam lines are classic, so that they might be duplicated today using patterns available.

The slides below show some current sewing patterns from Vogue, Butterick and McCall's that I found online. These could provide the basic garment to work from. Gathered skirts are not common in today's patterns, so that style would need to be improvised (easy stuff to do).


A kimono sleeve bodice is not common today, but there is one vintage styled pattern from Butterick that is similar. This pattern also has a "V" back (remove the bow). Small cap sleeves will also get the 'look'. When sewing a "V" back, that diagonal cut seam will need to be stabilized with twill tape, a strip of interfacing or elastic. That way it won't gap or fall off the shoulders.


The fitted top with deep "V" back on the blue floral dress is very simple. When cutting a "V" back neckline, be sure that the front neckline stays high enough to keep the shoulders in place. If the front is also low cut, the shoulders slip down easily. Dressmakers would add little snaps inside that neckline so the bra strap could be fastened to the shoulder, keeping it in place.

Basic fit patterns are great for classic bodices such as this one. For the vintage sewist, this type of pattern is essential to own. It can be used for many styles once a true fit has been made. All three pattern companies carry a version of this pattern.

An alternative to simple darts is the princess bodice. Those vertical seam lines make for a better fit on curvy bodices. I show a princess pattern for each style.


This full skirted shirt dress with puffed sleeves can be duplicated in two ways: as a dress or as a blouse with gathered skirt (an easier fit for most). Those great gathered sleeves are probably easier to locate in a 1980's pattern, since current sleeves have a slender upper arm. I found a few blouses that might make a fitted bodice, and two have fuller sleeves.