Showing posts with label easy to sew patterns. Show all posts
Thursday, May 7, 2015
New Vintage Pattern Review: Butterick 6212 Pop Over Dress
New retro sewing pattern Butterick 6212 is a super cute 1950's style popover, or pullover dress pattern destined to become a popular model this summer. It has great details in the shaped sweetheart neckline, midriff waistband and double buttons in the skirt back, with an optional back waist tie.
These photos show the how the actual garment looks on a model. At this point, small details are more clearly seen. This pullover style is really a multi-fit house dress, with a mock blouse attached to the mock waistband of a contrast color skirt. The front bodice wraps around to the back where the skirt is buttoned to an 'inner back' panel. This panel can be seen in the gap between the skirt at center back.
In several ways this dress is alot like Butterick 4790, which wraps to the front, rather than the back. The schematic draft for that dress shows how one bodice is sewn to the skirt, while the other side of the body has a plain sheath style design. The sheath is worn to the front with Butterick 4790, while it is worn to the back with this pattern. Both have bodices that wrap around with diagonal edges where it meets: at the front with Butterick 4790, and in the back with buttons in Butterick 6212.
The back view photo above shows where the skirt wraps come together, and there's fabric strain at the waistline where it buttons in back. This view also shows that the 'inner back' is probably a 'sheath' shaped one piece pattern: from shoulders to hem, shaped with 2 vertical darts.
The flat drafts of this garment reveal the seam lines and darts. But the inner back piece of this dress is not shown. It is clear that the front bodice will wrap around to the back, and this bodice and waist band will be held in place by the button rows in back.
Looking closer at the back view, it seems that the 'inner back' sheath piece is not tightly fitted at the waistline, in fact the vertical darts used for shaping this piece are the only means used to create a snug waistline fit in back. Without a tight fight, the front of this dress will shift and hang loose.
The strain along the waistline in back results in horizontal wrinkles as seen in the back photo. This strain may cause the buttons to rip out or tear the fabric of the "inner back" sheath, unless the waistline area has interfacing (which does not seem likely).
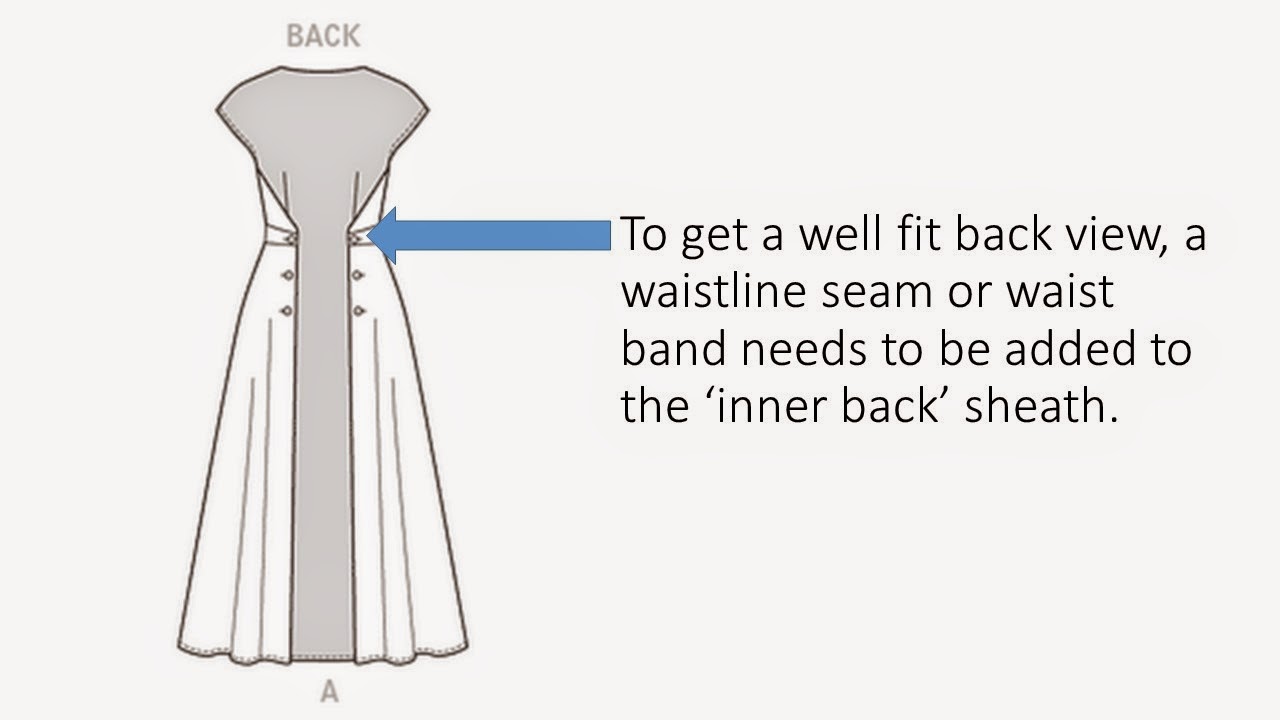
The back can be made into a better fitting piece if that "inner back" pattern has some adjustments. I feel that it should have a true waistline seam across the back. Even better, a waistband could be inserted with the same width that the "outer back" panels have, so it matches across the back, rather than showing a gap between the buttoned skirt panels that are now seen.
A waistline would also make it possible for the "inner back" lower skirt area to be cut from fabric that matches the rest of the skirt (it doesn't match with the current pattern design).
How to add a waistline seam:
Using the top button placement on the back sheath pattern, draw a horizontal line across the back at the waistline button location as shown in the picture above.
Cut along this line.
Using a wide piece of paper or tissue cut into 3" wide strips the length of this cut edge. Tape a 3" wide strip along each edge, then mark a line that is 5/8" from the cut on the newly added strip. This will be the new seam allowance.
There is a tutorial for a similar process that shows an example of cutting apart a pattern, adding seam allowances and sewing it back together HERE from Craftsy that shows this method as used when creating color blocking pieces.
After two pattern pieces have been made, the lower pattern piece will become the 'skirt' and can be cut in fabric to match the skirt front. This will make the back view have a continuous color, rather than the gap between the buttons.
The upper piece can be cut from the bodice fabric.
Baste this seamline together for a fitting. The existing darts may need to be made deeper to shape the waistline and add curves for hips in back.
When sewing this seamline, it can be reinforced with a ribbon or seam tape to keep the seam from 'popping' or breaking when the skirt is wrapped around and buttoned along that seamline.
Other fitting finepoints: The bodice has bust darts that 'end' into the armhole wrap. This shouldn't gap or fall open when wrapped around to the back. If the arm hole seems too loose, the bust dart might need to be taken in more, making the loose armhole tighter.
Style alterations: If you want to see the back of the skirt meet, rather than show a gap, just extend the skirt pattern to meet in the middle of center back with a 1" overlap for buttons. By lengthening the back waistband and skirt, it will be possible for the center back of the skirt to button together, rather than expose the "inner back".
Once this pattern has been fit and any style alterations have been made, this will be an easy dress to sew and wear, especially in easy to sew summer cottons.
Thank you for dropping by. If you liked this post, don't miss my articles on vintage sewing and fashion by subscribing to Pintuck Style blog on "Bloglovin", HERE. I'd love to hear from you too if you have any questions or want to see a blog post on a specific topic.
Tuesday, March 17, 2015
7 Best Sheath Dress Patterns with Vintage Style: Easy to Sew
Ever wanted to make your own Little Black Dress? This article will review fitted sheath dress patterns that are easy to sew. This is a second post on easy to sew dress patterns with vintage style, following "9 Best Dress Patterns for Beginners: Easy to Sew". After mastering the super easy shift style dress, it's time to sew a classic sheath dress. This article is edited from a very popular article from three years ago, so the patterns shown are current and available
What makes the sheath dresses shown here easy to sew?
1) no waistline seam, and they look great if belted
2) dress skims the body, but isn't super tight or super loose (like a shift dress)
3) no set in sleeve (but this pattern does have sleeves if you want them)
4) most are still 2 main pattern pieces: front and back
This is Butterick 4386, a dress with a classic darted torso. It can be sewn into so many great styles, from a "little black dress" to a tropical summer dress, the fit will be slender. There is a back zip and hem vent.
Now that you know what pattern style to look for when you want a smooth fit, here are more sheath style patterns that will create that silhouette. The patterns include New Look: 6261, Butterick, See and Sew: 5235, and two from McCalls: 2401, 7085. All of these patterns have vertical darts to shape the waistline and back views, and most have sleeves as well.
.
Curvey fit? A princess seam line pattern is the best for creating a good fit. Those long seam lines provide an opportunity to fit the bust line, torso and hips more carefully. There are six seam lines to work with, and each one can be let in or out only a little bit to affect the fit. Butterick "Fast and Easy" 5554 and Simplicity "Amazing Fit" 1586 both have armhole princess seams, so a good fit can be achieved with fuller bustlines. Both include sleeves, if that is something you want to include in your dress.
This style of shaping is a vintage feature, having both the angular French dart and the side bust dart. This will create a smooth 'fit and flare' silhouette. A French dart is sewn at an angle, and trims away the waistline without having the usual vertical dart showing in front. This is a good choice for bold patterns that shouldn't be cut up with vertical arts.
Once a good sheath pattern is selected, there will be a few things to consider.
Question: What fabrics are best for sheath dresses?
Answer: In addition to the simple cottons mentioned in the previous dress article for shift dresses (quilting cottons, cotton gingham, woven cotton plaids and stripes), we can add stretch wovens to our list. Keep your stretch manageable, don't select anything too 'wiggley' and out of control. When using a stretch, lay out the fabric so the stretch goes around the body (not 'up and down' or it will bag at the rear!).
If the fabric is soft or thin (like a brocade, lace or satin) I would suggest using a cotton or taffeta to 'back' that fashion fabric using a 'flat lining' or 'interlining' method shown in an earlier blog post HERE.
Obviously, the classic sheath dress is a vintage look that an experienced sewist can whip up in almost any fabric, from wool flannel to brocade.
Question: How can I make the sheath pattern fit me?
Answer: Make a fitting sample before cutting out the fashion fabric. This process is more essential with the semi-fitted sheath style. Plan to do a trial fit sample dress in a 'muslin' or similar cotton test fabric before cutting out your dress pattern.
If you feel you are an easy fit and don't need a fitting muslin, then when you cut your fashion fabric, I suggest using 1" wide seam allowances down the side and back seams lines. This will give room to alter for fit in case you need 'more room'. Math: get a 1" wide seam allowance by adding 3/8" to your cutting line if you are using standard US pattern's 5/8" wide seam allowances. Yes, you will have to draft that line onto your pattern tissue first, before you cut.
Slender fit: For a figure with small curves, look for slender darts. Don't take up extra width in the darts. Do your fitting from the side seams.
Curvey fit: For a figure with larger curves, the darts will be wider and may be shaped towards the dart point. This fit may also need side and back seam line adjustments. Traditionally, the back seam was cut 'on grain' or very straight, but now it is common to use that seam line to fit the back view more closely.
Princess seam lines make curvey fittings easier. Just distribute any alterations through the several seams, and you will notice that the fitting process is actually easy to achieve.
Question: How can I make the zipper easier to sew?
Answer: Add 1" wide seam allowances down the seamline where your zipper will be sewn. You will be soooo happy you have the extra fabric when you put in the zipper. It helps to have the extra width when trying to fold the fabric under. Before your start, be sure to clean finish the fabric edges. Doing that will make sure that the edge won't unravel and snag into the zipper. I use an overlock seam or I zig-zag over the fabric edge to bind that over and prevent it from unraveling.
Once you perfect sewing a sheath to fit, it could become your favorite: fast, great fit, and easy to sew.
Thank you for dropping by. If you liked this post, don't miss my articles on sewing and vintage fashion by subscribing to Pintuck Style blog on "Bloglovin", HERE . I'd love to hear from you too if you have any questions or want to see a blog post on a specific topic.
(This article was first published Feb. 21, 2012)
Thursday, July 11, 2013
Border Patterns: Fabric Designs with Style
Border patterns have been popular on skirts and dresses over the past decades. Using border prints is an easy-to-sew, quick way to add visual interest to a simple dress design. With careful planning, a basic dress design can become interesting and unique. This can be done by choosing a border design, then considering the placement of the fabric pattern on the dress.
The blue floral on white fabric in this sketch was cut with both the skirt hemline and upper bodice shoulders placed along the selvage edge. Placing a dense border at the hem and shoulder creates the 'ombre' effect where the pattern is deeper at the top and bottom of the dress, while the middle area is open and less dense in pattern or color.
To create this effect, look for a skirt pattern that is cut straight, like a very wide 'tube' that is then gathered or pleated. Don't attempt an "A" line or flared skirt since the straight hem edge will be difficult to work with.
The two dresses here show how great a simple bodice can become when the border pattern is placed running down the center front line. This is especially successful with embroidered yardage such as eyelet on linen and cottons, but printed border prints are nice on the bodice too.
Sewing patterns for most retro style 1950's through 1970's dresses with fitted bodices will work well using the center front border technique. Although these two tops have a center front closure (with cute covered buttons), it is possible to have the border design 'meet' down a front seam line instead.
From the late 60's or early 70's, this tomato red shirt dress is a great example of how a simple border pattern can create an interesting look. The border is repeated on the collar and cuffs to balance out the design. Below are several examples from the 70's of border patterns used on both long and knee length dresses. All of the fabrics below are jersey knits, available today through vintage sellers.
Now when you look at vintage or modern fabrics, be sure to look for border designs, they have so much to offer!
Friday, February 24, 2012
Dress Patterns for Beginners: Easy to Fit and Sew
In locating dress patterns for curvey fit or larger sizes, McCall's 3129 shown above is a princess dress style that has a great 'fit and flare' silhouette. It skims the upper body, then flares out. If you want a short sleeves, you can have that too.
Don't let the fact that this dress style has four main pattern pieces (front, side front, back, side back) stop you. Once you machine baste those pieces together, have a fitting and you will notice how nicely the final fit can be achieved.
Fitting sample? If you really want to know: Woven, cotton gingham check is the preferred fabric to use when making a fitting sample. It is the easiest way to see if the grain line falls straight, that horizontals aren't crooked and that your pattern pieces are balanced.
Fitting? Make it easy by adding to the dress pattern seam allowances at the side and back seam lines to equal 1" (+ 3/8"). That way you can play with the extra fabric if you need it. Once you get a good fit, go back and make marks on your paper pattern that match your new seamlines. This way your paper pattern can be used again.
Fabric fitting pattern:
step 1: Add to pattern seam allowances so that side and back seams = 1" wide.
step 2: Use gingham for the fitting garment.
step 3: Cut only the dress, don't include facings or zipper.
step 4: Machine baste in the largest machine stitch using contrast color thread.
step 5: Wearing best bra and shoes, have a friend make the alterations. They can see the back, you can't.
step 6: After alterations are complete, remove dress and use pencil to mark the stitch line or pin line. Add horizontal marks on both sides of the seam line, so you know where to match up the pieces when you sew them together again.
step 7: Transfer the alterations back onto your paper pattern and add a new 5/8" seam allowance.
You could press your fabric pattern and use that. If you plan to do this, be sure fabric has been pre-shrunk. Also take care not to pull this fabric pattern off grain. Usually it's easiest to trace a new pattern from the fabric fitting pieces and add back the 5/8" seam allowances.
When choosing your fabric, both of these dresses will make up in simple woven summer fabrics very easily. The princess seam line style should have patterns of moderate size or smaller, so that the pieces don't cut up the print. The tunic dress would be great for larger, graphic or abstract prints.
I hope this series has helped you find the dress pattern that best combines your sewing ability and figure type. With the right combination, sewing a dress can be easy to do!
Here are a few more blog posts that also talk about sewing dresses:
7 Best Sheath Dress Patterns with Vintage Style: Easy to Sew
9 Best Dress Patterns for Beginners: Easy to Sew
6 Easy to Sew Shift Dresses
If you liked this blog post, follow me on Bloglovin to keep up with my most current articles,
You can also find me on:
Facebook - Pintucks
Pinterest - Pintuckstyle
Instagram - Pintuckstyle
Twitter - Pintucks
Tuesday, February 21, 2012
Sheath Dress Patterns for Beginners: Easy to Sew, Part 2
This very popular post has been recently updated in: 7 Best Sheath Patterns with Vintage Style: Easy to Sew, so you may want to go there to find more recent patterns to choose from and some updated sewing tips HERE.
What makes the sheath dresses shown here easy to sew?
1) no waistline seam, and they look great if belted
2) dress skims the body, but isn't super tight or super loose (like a shift dress)
3) no set in sleeve (but I found a great raglan sleeve instead)
4) most are still 2 main pattern pieces: front and back
The first dress shown above is Butterick 4386. This dress has a classic darted torso. It can be sewn into so many great styles, from a "little black dress" to a tropical summer dress, the fit will be slender. There is a back zip and hem vent.
New Look 6021, View B shows French darts. These are long tapered darts that fit the midriff nicely. French darts were popular during the 60's. This type of dart is also a good look if the fabric pattern is large and would be distorted by front darts or princess seam lines.
Fabric selection: In addition to the simple cottons mentioned for shift dresses (quilting cottons, cotton gingham, woven cotton plaids and stripes), we can add stretch wovens to our list. Keep your stretch manageable, don't select anything too 'wiggley' and out of control. When using a stretch, lay out the fabric so the stretch goes around the body (not 'up and down' or it will bag at the rear!).
Obviously, the classic sheath dress is a vintage look that an experienced sewist can whip up in almost any fabric, from wool flannel to brocade.
Fittings are more essential with the semi-fitted sheath style. Plan to do a trial fit before sewing your final seam lines. I suggest when cutting to making 1" wide seam allowances down the side and back seams lines. This will give room to alter for fit.
Slender fit: Look for slender darts. Don't take up extra width in the darts. Do your fitting from the side seams.
Curvey fit: These darts are wider and may be shaped towards the dart point. This fit may also need side and back seam line adjustments. Traditionally, the back seam was cut 'on grain' or very straight, but now it is common to use that seam line to fit the rear nicely.
Princess seam lines make curvey fittings much easier. Just distribute any alterations through the several seams, and you will notice that the fitting process is actually easy to achieve.
Zipper: Take note to make your zipper seam allowance (the back seamline) 1" wide. You will be soooo happy you have the extra fabric when you sew in your zipper. It sure helps to have the extra width.
Math: get a 1" wide seam allowance by adding 3/8" to your cutting line. Yes, you will have to draft that line onto your pattern tissue first, before you cut.
When sewing a zipper, be sure to clean finish the fabric edges first, so the cut edge won't unravel and get into your zipper. I use an overlock seam or I zig-zag over the fabric edge to bind that over and prevent it from unraveling.
Once you get the sewing of this dress style perfected, it could become your favorite: fast, great fit, and easy to sew.
Here are a few blog posts that also talk about sewing dresses:
7 Best Sheath Dress Patterns with Vintage Style: Easy to Sew
9 Best Dress Patterns for Beginners: Easy to Sew
6 Easy to Sew Shift Dresses
If you liked this blog post, follow me on Bloglovin to keep up with my most current articles,
You can also find me on:
Facebook - Pintucks
Pinterest - Pintuckstyle
Instagram - Pintuckstyle
Twitter - Pintucks
Friday, February 17, 2012
Dress Patterns for Beginners: EASY to SEW
Since I wrote this post, several patterns have been discontinued, I have an updated version of this same post titled: 9 Best Dress Patterns for Beginners, so you may want to click on this link to find more recent patterns.
What I look for when choosing an easy pattern are several elements that need to come together:
1) seam lines: few seam lines to sew - just the side seams please!
2) pattern pieces: two main pattern pieces - front and back
3) darts: few darts - bust darts are fine
4) zipper: nope!
5) sleeves: nada!
6) neckline: simple and round, I think facing is easier than bias edge, but that's me
7) hemline: machine sewn? yes please
8) fabric: smooth, medium weight cottons: these are easiest to sew - quilter's cottons, cotton gingham checks, cotton shirting plaids and stripes.
Here's a few patterns that would be EASY for a newbie, or FAST for those with experience.
Top View, McCalls 6117 (now discontinued) illustrated the type of pattern to look for with 2 side seam bust darts and a soft "A" line fit.
McCall's 9172 (also discontinues) shows a sleeveless style with optional dart or no dart, ‘relaxed fit’, neckline facing. This does not have a zipper, and is an easy "pull over" style to sew.
McCall's 6355 (available) is a basic shift pattern by Palmer/Pletch with neck binding and optional fitting darts. This pattern has suggestions for creating a good fit.
McCalls 6102 (available): View D is a shift style with 2 bust darts. It is a zipperless pull over style that comes in a wide size range.
McCall's 6465 (available): view E is also without zipper, a slip over style that is also sleeveless with bias tape around arm holes.
When looking at a pattern page online, look for the front and back views or line drawings (production flats) of the garment showing each seam line clearly. Fabric and notions should also be listed.
If you scroll down further on most websites, you will find the GARMENT MEASUREMENTS. This information can be compared with a similar garment you own and fit, so you know what the results will be. Use this to select hem width, hip and bustline ease (looseness). It is a great way to determine your pattern size, if you feel the size measurements may not be exactly your fit.
Here are a few blog posts that also talk about sewing dresses:
7 Best Sheath Dress Patterns with Vintage Style: Easy to Sew
9 Best Dress Patterns for Beginners: Easy to Sew
6 Easy to Sew Shift Dresses
If you liked this blog post, follow me on Bloglovin to keep up with my most current articles,
You can also find me on:
Facebook - Pintucks
Pinterest - Pintuckstyle
Instagram - Pintuckstyle
Twitter - Pintucks
Subscribe to:
Posts (Atom)
.jpg)

