 Vintage fashion scrapbooks are a gold mine of trends and ideas for inspiration. They are also a great way to see how accessories were worn, hem lengths, hair and makeup. For getting a good idea of fashion from a specific time period, they are perfect.
Showing posts with label vintage sewing patterns. Show all posts
Showing posts with label vintage sewing patterns. Show all posts
Wednesday, May 11, 2016
Spring 1967 Fashions: Butterick Patterns for Junior Styles
Vintage fashion scrapbooks are a gold mine of trends and ideas for inspiration. They are also a great way to see how accessories were worn, hem lengths, hair and makeup. For getting a good idea of fashion from a specific time period, they are perfect.Sunday, September 16, 2012
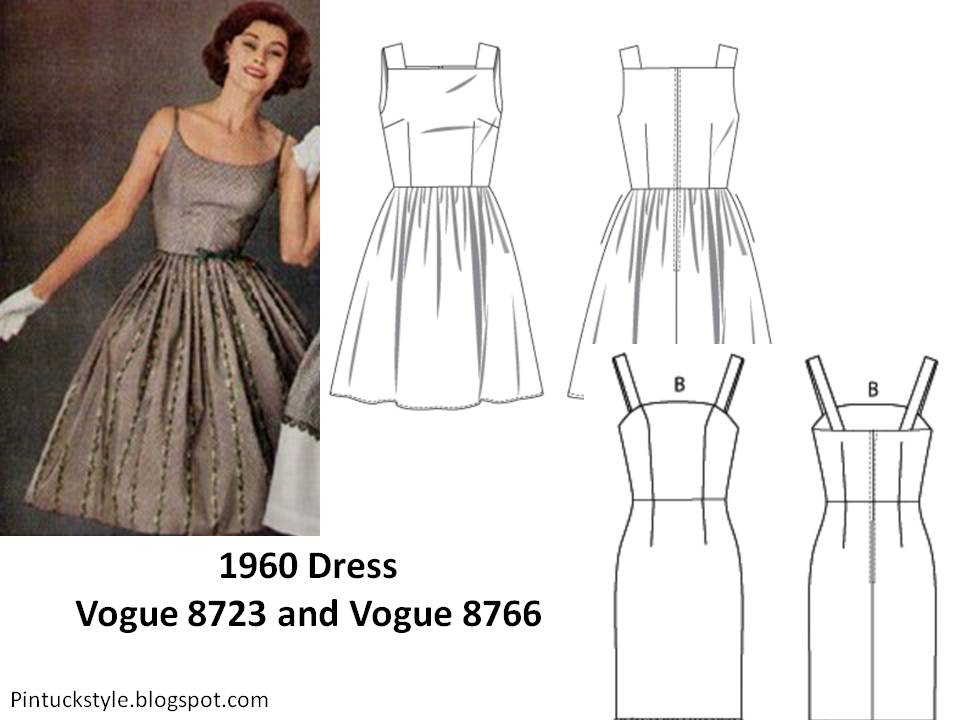
1960 Dress Style: How to Get That Look

Aren't these classic dresses from 1960 cute? They are from a Penney's department store advertisement. The dresses are cotton and use a black and white gingham check. What makes each one special are the details: pockets, borders and banding trims.
When you plan to sew a dress like this, designing the details are half the fun. This ad has very simple dresses when you look at the cut and style, yet the details make each one seem interesting and stylish. All of these elements would be easy to copy using a pattern that has the basic fit.

1960 Dresses: I found some current fashion patterns that could be used to sew up your own dress in this early 1960's style. What I looked for were fitted bodices with either simple darts or princess seam lines. For a curvy figure, those princess seams are best, since a clean fit can be shaped down the bodice dart in front. More slender figures can use the simple darted bodices.
It isn't easy to find a current dress pattern with a fitted bodice and gathered skirt. You may want to make your own full skirt. Many of the best full skirts are about 3 yards around, or 108". This was probably due to the fact that their cottons were sold in 36" widths. They would cut 3 panels that were the full fabric width and sew them together down the selvage edges for each skirt.
Some skirts are gathered, others are "knife pleated". These are the small pleats you see in dresses that tend to 'flatten' the skirt around the waistline. For many, this results in a more slender look at the waistline.
Yardage: How much fabric do we need for a full skirt?
1. Measure your length from waistline to hem.
2. We want about 108"(36" x 3)around for this skirt. If we use current 42" wide fabric, we need 3 panels. Two would be the full fabric width, but the third panel is going to be only 24" wide. If your fabric print is large, you may need to make adjustments to plan for the motif.
3. For each panel, add 2" for the hem and 1/2" for the seam allowance around the waistline. This means that yardage for a skirt with three panels would require: 3X length + 7.5".
Next we will look at how to get our details and trims to have the same cute look!
Monday, January 30, 2012
1972: Prom and Party Styles


The two Simplicity patterns shown here date from Spring, 1972 and include textile swatches suggested for each pattern style.
Simplicity 9725 was part of a young looking group called "Young Contemporary Fashion". It included styles that seemed to be currently selling in the market for juniors. Fabric suggestions include 50% polyester/50% rayon blend wovens in a sheer leno stripe weave. The midriff waistline with flutter sleeves was influenced by the vintage 1930's styles popular at that time.
Simplicity 9709 is a bit more mature, from the "Designer Fashion" collection (no name mentioned in this promotional group). It was suggested for patio parties and proms. The black bodice shows up often during this era, worn over bright abstract or floral patterns. The fabrics shown here are 75% acetate/25% nylon in a textured 'terry cloth' texture on a velour knit. Bright solids are paired with very graphic prints inspired by Pucci and patchwork quilts.
Sunday, November 6, 2011
1970's Vintage Sewing Patterns & California Fashion Designers

Collecting and selling vintage sewing patterns has heightened my awareness of “designer” brands from past decades. I have often wondered about some of the late 1970’s patterns. Why were there so many pattern designers from Los Angeles then? Like “Made in California”, there seemed to be more interest in west coast fashion back then than today. I did some digging around and came up with part of the story:
By 1979, the home sewing business was around $3.4 billion per year. About 125 million patterns were sold annually. The four major pattern companies at that time were: Vogue, Butterick, McCall’s and Simplicity. About 35 to 40 million home sewers were located in Southern California, the largest regional group in the US. The huge demand for home sewing patterns in California prompted the home sewing industry to release designs by popular local fashion designers. It was also hoped that the allure of the west coast life style would spread a demand for these young, unique and less European fashion designs throughout the country.
At that time it cost $25,000 to produce and issue one original designer pattern for the home sewing market. Featuring a designer meant that companies expected a good sell out to support their investment. Seeking life style branding, along with a middle class interest in a fashion that was more accessible, the designer patterns where hoped to be top selling designs not only on the west coast, but nationally as well.
In that year, eleven fashion designers from Los Angeles and two from San Francisco had sewing patterns featuring their labels. Seven of these designers were published by McCall’s. By May, 1979 that company featured designer patterns by Bob Mackie, Norma Fink’s “Theodore” label, Carol Little’s “St. Tropez West” label, “Singer and Spicer” and the “Strauss” label by Bonnie Strauss. In June, 1979 the “Ma Chemise” label by Dennis Goldsmith and Nancy Heller’s “Tea Shirts” designs would be added to the roster of California design talent at McCall’s.
In 1978, Simplicity patterns, the largest pattern company at that time, sought out a strong California identity. Their west coast design roster featured Holly Harp, Harriet Selwyn’s label “Fragments” and “Gunne Sax” by Jessica McClintock. Jessica McClintock would prove to be a profitable pattern label that continues to be part of the Simplicity pattern company designer roster.
The Vogue pattern company had always featured well known American fashion designers and is credited with being first to feature California labels (that’s debatable). In 1976 they started including local talent with Edith Head’s designs. As a movie costumer who didn’t design or manufacture, she was a legend of Hollywood glamour.
Butterick’s first California designer label was for Jane Tise in 1975 under the “Young Designer” title for her label “Sweet Baby Jane”. If a count were made, she would probably be one of the top designers creating sewing patterns during that decade. The California free spirit and inspiration buyers sought after were featured in Jane Tise designs. Lesser known Nancy Stolkin’s simple to sew yet fashionable designs were added in April, 1979.
What seems like a spontaneous display of interest in California fashion designers was brought about by two occurrences: an alarming downturn in pattern sales that began in 1976, and the realization that most home sewers thought high fashion designer labels were too complicated and difficult to sew. The companies hoped that these new California labels would seem inspiring without being intimidating. They also hoped the new looks would bring back a customer who was wearing more pants, fewer dresses and sewing for herself less often. Like Jessica McClintock, a few designer labels would be long term sellers, keeping some of the departing sewing masses in the fold.
Most information for this article came from an April 16, 1979 news article “Pattern Makers Heading West for Designs for Middle America” written by west coast fashion journalist, Marylou Luther, who wrote for the “Los Angeles Times”.
Below is an incomplete inventory of the California designer patterns, starting in the 1970’s. Most are currently available for sale online. If you have more pattern numbers to add to the lists, please feel free to leave them in the comment’s section, thanks!
McCalls:
Norma Fink “Theodore”: McCall’s: 6770
Bob Mackie: McCall’s: 6840 (1979)
Nancy Heller: McCall’s:, 8783, 9040 (80s), 9055 (1984)
Singer and Spicer: McCalls: 6756
Carol Little “Saint-Tropez West”: McCall’s: 6725, 6726, 7983(1982), 8816 (1983)
Simplicity:
Harriet Selwyn “Fragments”: Simplicity: 8648 (1978), 8905 (1979)
Dennis Goldsmith: Simplicity: 8589(1988), 9193 (1989), 9856 (1990), 9885 (1990, girl’s)
Holly’s Harp: Simplicity: 8645, 8646 (1978), 9177 (1979)
Nancy Heller: Simplicity: 8607
Jessica McClintock, “Gunne Sax”: Simplicity: 6270, 6271 (1983), 9350 (1979), 8907, 8947, 8223 (1987), 8224 (1987), 7563 (1991), 8985 (1989, girls), 8671, 9558, 9100, 6883, 6361 (1983)
Butterick:
Nancy Stolkin: Butterick: 6579, 6581
Jane Tise “Sweet Baby Jane”: Butterick: 4096, 4098, 4099, 4100, 4391, 4642, 5049, 5050, 5051, 5283, 5990, 5991, 5992, 5993, 6330, 6331, 6332, 6412, 6681, 6682, 6683, 6684
Vogue:
Edith Head: Vogue, American Designers: 1560, 1803, 1895, 1896, 2041, 2221, 2335, 2560, 2561, 2831, 2832, 2923
Wednesday, August 31, 2011
Vintage Detail: Red Silk Dress c. 1960


This dress is fully lined. The hem appears to have been shortened. All beaded has been sewn by hand around the neckline and wrists of the long sleeves. The waistline has piping to match. Small hooks and thread loops are sewn at the neckline and waist of the center back metal zipper.
click on the photos to enlarge themr
Friday, August 19, 2011
Vintage Simplicity Sewing Patterns: 1958
 Vintage sewing patterns are a great resource to have. Whether I am trying to date a dress, or looking for new ideas, I just can get enough of them!
Mena Trott of Sew Weekly recently found a Simplicity 1958 pattern book. She has posted page after page on flickr for all of us to see. It's great fun to view these, and what's even better, the back views are there too. How often do we need to get those details and they aren't available? I think you'll enjoy this new resource, and if you're unfamiliar with Sew Weekly you may want to check that out too.
(the Simplicity pattern shown in this post is from my own collection)
Tuesday, August 16, 2011
Sewing Vintage Fashion: Vogue Patterns, April 1960


Vogue 9967. Blue eyelet, embroidered with dots, great full sleeves on fitted shirt waist dress


Vogue 9991. Floral border on cotton with matching stole wrap, sleeveless bodice with deep "V" back


Vogue 4101. Small kimono sleeve bodice with 3.5 yards wide gathered skirt in mauve ribbed cotton
These three vintage Vogue patterns are all sewn in cottons. They appear in "Ladies Home Journal", April 1960 (the Kim Novak cover is so sadly damaged I couldn't include a photo for you). It is interesting to note how easy the dresses would be to sew. The seam lines are classic, so that they might be duplicated today using patterns available.
The slides below show some current sewing patterns from Vogue, Butterick and McCall's that I found online. These could provide the basic garment to work from. Gathered skirts are not common in today's patterns, so that style would need to be improvised (easy stuff to do).

A kimono sleeve bodice is not common today, but there is one vintage styled pattern from Butterick that is similar. This pattern also has a "V" back (remove the bow). Small cap sleeves will also get the 'look'. When sewing a "V" back, that diagonal cut seam will need to be stabilized with twill tape, a strip of interfacing or elastic. That way it won't gap or fall off the shoulders.

The fitted top with deep "V" back on the blue floral dress is very simple. When cutting a "V" back neckline, be sure that the front neckline stays high enough to keep the shoulders in place. If the front is also low cut, the shoulders slip down easily. Dressmakers would add little snaps inside that neckline so the bra strap could be fastened to the shoulder, keeping it in place.
Basic fit patterns are great for classic bodices such as this one. For the vintage sewist, this type of pattern is essential to own. It can be used for many styles once a true fit has been made. All three pattern companies carry a version of this pattern.
An alternative to simple darts is the princess bodice. Those vertical seam lines make for a better fit on curvy bodices. I show a princess pattern for each style.

This full skirted shirt dress with puffed sleeves can be duplicated in two ways: as a dress or as a blouse with gathered skirt (an easier fit for most). Those great gathered sleeves are probably easier to locate in a 1980's pattern, since current sleeves have a slender upper arm. I found a few blouses that might make a fitted bodice, and two have fuller sleeves.

Sunday, April 3, 2011
Under Tuscan Sun: Sewing Retro Style Dresses

"Under Tuscan Sun" from 2003 remains a popular chick flick, in part due to the vintage styles worn by the lead characters, designed by veteran costume designer Nicoletta Ercole. The 'white dress' that the lead character Frances (Diane Lane) wears created quite a scene when the movie was shown. It was a mini trend at the time. Women everywhere wanted to find that white dress.
Dresses featured in this film seem timeless: fitted bodice with longer tea length hemlines. This look couldn't be more current, as tea length styles are once again in fashion. I thought it might be fun to take a second glance at these costumes.
Eight years have passed since I wrote this blog post. At the time, little did I know that it would become one of the most popular posts ever for this blog. Out of respect for those of you that come here looking for these wonderful dresses, I thought it would be a good time to update the sewing patterns that I listed here. I'll share some new patterns with you at the end of the original post.

The white dress seen in a back view shows clearly the silhouette of this outfit. Below the neatly fitting surplice wrapped bodice, a semi-circle skirt is cut to a vintage 1950's 'ballet' or 'tea length' hem line.
The bodice fit is accented by a black belt which is the perfect way to note a slim waistline. I show a close-up view of the wrapped bodice, which crosses over to the front darts. The facing is wide, completely covering the bodice center front. It's my guess that the inside fastens on the front left at the dart to keep this from draping open, as surplice tops often do.
The sleeve is cut in a short kimono style to make this crepe dress look like it has short sleeves, but without a shoulder seam line. This gives it that late 1940's style.
It is important to notice that this is a mock wrapped dress because the skirt is not wrapped, having a half circle skirt instead. To get that look this dress should have a side zipper.
What makes this dress such a success is the fabric selection. I believe this is a quality crepe. During the late 1940's we see many similar dresses in this textile. At that time rayon, silk and wool were used to drape soft fold and body contoured silhouettes. Crepe would provide the necessary weight and hand to drape the front wrap, soft shoulder and graceful circle skirt. The bodice appears unlined, except for the facing.

A wedding scene has Frances appearing in yet another captivating dress. This one is probably Thai silk in luminescent peach. It has a great circle skirt, looking similar to that on the white dress.
The bodice of this dress is a classic cut: front and side darts create a smooth fit. This crisp fabric requires a set in sleeve, seen here with small cuffs. A narrow shawl collar and covered buttons on the front add soft, but not contrasting details. The one color accent is her wide belt. The skirt on this dress does not continue the center front buttons of the bodice. This would require a side zipper.

Katherine, played by Lindsay Duncan is an fanciful character whose references to Fellini are underscored by her wardrobe. Some of these gowns appear to be true vintage, others are close copies. This red dress coat dress and hat serve to give this character the eccentric drama she requires. Wide lapel details enhance the monochromatic theme of her red on red outfit.

In a Fellini moment, we see Katherine in the village fountain, wearing a dress very similar to Fellini's famous fountain scene. It is a slender strapless black sheath with a sheer overskirt lined in gray chiffon. Another black dinner dress with a lace overlay or yoke may be vintage, its delicate details certainly are classic for that era.
Now, where to find or re-create these styles? I have found a few sewing patterns that could be altered to reproduce the same look. Actually, the dress styles here are not difficult to sew. The challenge is in the fit instead, so find a willing assistant to pin your fit may be required.

What both of Frances's dresses have in common is a circle or semi-circle skirt sewn at the waistline to a fitted bodice. In both cases that makes the front closures decorative, because the real dress opening will be a side zipper.
These two wrap front sewing patterns have the essential bodice details of the white dress. The green style by Butterick 5030 is closest in cut (minus the collar and ruffled sleeves). The Butterick pattern has front bust darts and will fit a curvy body shape while the Vogue 6846 style is without darts, for a more slender figure. With both bodices, altering the pattern by drafting a wider shoulder cut from the bodice will create the type of sleeve seen on the white dress.
Because this should be a mock wrap dress, a circle skirt should be sewn to the bodice instead of wrapping the front skirt. This skirt was probably cut in a 1/2 circle.
When adding a circle skirt, completely fit the bodice first to get the waist measurement and skirt length. The skirt will be drafted from those measurements.
The real style challenge is to capture the skirt silhouette. In the movie versions, both were full or semi-circle skirts that were sewn to the fitted bodices, requiring a side seam zipper. While a circle skirt pattern can be found for sale, it is not impossible to cut an original version to fit the bodice.
When preparing to draft a circle skirt, the directions ask for a waist measurement. Use the bodice waistline measurement from a fitted garment. Be sure to draft a skirt with side seams. When doing this, I use an open floor space, chalk, yardsticks and even string to create the true arc.
Hemming circle skirts is most easily done with a very narrow double fold that is hand sewn or machine stitched. When using softer fabrics like crepe, before hemming the finished dress will need to hang for a week or so to let the hem 'hang out'. After that, have the length measured while wearing the dress. This will even out what is probably an uneven skirt length.
If you want more information on drafting circle skirts, the images I show here for the skirt draft are explained in full on the Sew News website for Drafting a Circle Skirt.

This concludes the original post. The sewing patterns shown above, Butterick 5030 and Vogue 8646 are still being sold, as of this posting.
To add to the wrap dress collection above, I found several more patterns from Vogue 8896, 8784 and 8379. When looking to match a pattern with your fabric, take care to see if the pattern is designed for a woven or stretch textile, as both are available.

The slender shirtwaist dress by McCalls 6891 has classic bodice darts to create a fitted torso, as well as set in sleeves. The collar is the traditional notch style, making this look close to the original seen in the film. McCall's 6696 is another option. For a pattern with bustline adjustments, try using McCalls 7185, but add the circle skirt instead. Probably the closest silhouette to the film's original is McCalls 7081, with the wrap front and wide hemline.

Katherine's outfits are much more vintage inspired. Her black strapless sheath with lace cover up can be seen in McCalls 7321, a dress that can be made with fitted bustier bodice, straight skirt and lace sleeves and neckline. There is a bustier dress with straight skirt that has a chiffon overskirt, which would give the same effect as the glamour seen in the original dress, by McCalls 6838. Butterick 6353 by Gertie also has a fitted bodice and skirt with floating chiffon train.
To create Katherine's red dress, the selection narrows down. Butterick 5747 has a wonderful portrait collar that would do the trick if you are willing to have short sleeves. Or you could use Vogue 8346, a coat pattern with wide lapels and a fitted princess seamline to create the dress (try a fitting muslin first to be sure it's not loose loose, as coat patterns tend to be that way).
I want to thank everyone who has contacted me or left comments over the past few years. It has been alot of fun seeing how this post really fills a need that women who sew have. Beautiful dresses that fit well. That isn't too much to ask, is it?
Like what you see here? Keep up with my blog posts on Bloglovin, and I am also on:
Facebook - Pintucks
Instagram - Pintuckstyle
Pinterest - Pintuckstyle
Twitter - Pintucks
Thursday, February 17, 2011
Vintage or Retro? Leaf Prints
 An early 1950's pottery company, Stengl, produced a trend setting design in 1954 called "Amber Glo". Part of the charm was the leaf print, almost like a flame with a brush stroke style. When I saw this newly released "Naturewalk" leaf print in 100% cotton fabric pattern by Cloud 9, I saw that same leaf style. This time the leaf is in repeat in an all over motif. What better fabric to sew into a crisp vintage style blouse or throw pillows for the Nelson style sofa?
 Simple fashion styles are perfect for busy cotton prints. These vintage sewing patterns are easy to make, and will work into any modern wardrobe. Busy prints need clean lines to show off the colors and details like these patterns do. Start now, and you'll be ready for the first spring day with a new blouse or dress!
A: Vogue 1002, c. late 1970's
B: Butterick 2475, c. early 1960's
C: McCall's 7608, c. early 1960's
Read more about Stengl: Amber Glo design c. 1954
Shop for Naturewalk fabric by Cloud 9: Bon Bon Atlier (also, don't miss their daily blog posts, always fun new things to see!)
Saturday, October 23, 2010
1960's MOD Fashions to Wear or Sew
Sewing dresses can be fun and easier than you think. 1960's fashions have such cute styles that seem very wearable right now. Yes, that center style has a divided skirt! I could see sewing up a few for spring, or even some in heavier fabrics for winter. How cute would these be with leggings and boots? These dresses are all from vintage BUTTERICK patterns of that era. With so many cool vintage patterns selling on Etsy and other sites online, I think it wouldn't be too hard to look them up for yourself. I find these older patterns have excellent pattern instructions that are easy to work from.
 Here are the back views with pattern numbers, so you can get a good idea about the styles.
 Would you use a 60's pattern to sew a dress like the ones here?
If you collect or wear vintage, this group of styles dates from Spring, 1967. Using patterns can be a great way to help with dating vintage garments too.
Tweet
Thursday, September 2, 2010
SEWING VINTAGE: 'S' Curve Darts & Flat Lining as Facing

Sewing vintage patterns from the 1940's, 1950's and early 1960's is fun, but getting the right look often requires sewing methods we don't see today. Learning how to sew the styles you like will make it easier to get the look you want. One method is flat lining, and here I want to show a fast and easy way to sew. Our modern fusible interfacings have made traditional flat lining unnecessary. It can have advantages though, and I thought I would share those with you.
Another out dated construction technique is the "S" shaped dart. A straight dart creates at flat curve. In some cases, that is what we want. However, if you are trying to get an hour glass fit to your bodice, than you might want to consider an "S" shaped dart. Glove fitting dresses like those produced by Lanz in the 1950's reveal this dart shape: it hugs the rib cage and curves around the bustline for a smooth body fit.

This light-weight summer cotton dress would wrinkle, and perhaps pull at the seams without this inner construction method. A cool cotton faces the fashion fabric, creating a stronger bodice to the flowing skirt.
FLAT LINING as FACING
Briefly, this method uses a cotton lining that is cut at the same time as the fashion fabric. This is sewn around the neckline and if it is sleeveless, the armholes. This bodice is then turned to the right side. At this point the darts can be sewn and the side seams completed.
 This is a fast method that eliminates the need for facing in most cases. The time spent cutting out facing and finishing those edges will be saved.
Open side seams allow for further fitting and adjustments in the future. The top edge at the armhole can be hand sewn to reinforce that upper edge. This method works for both sleeveless styles and bodices with sleeves.

'S' CURVE DART
The dart will have an smooth seam line up the rib cage, then curve around the bottom of the bust, tapering to a fine line at the end. An 'S' curved bodice dart will create a smooth fitting bodice. It has to be fitted on the body, and should be developed in the pattern stage. However, it can be pinned into place after the bodice is flat lined.
POINT OF BUST
This is the bustline center. Do not end darts here because that will make pointed darts. Imagine a Quarter sized circle around the point of bust (it's OK to draw this onto your lining). End the dart point at that circle perimeter line.
FITTING
1-BASTE the side darts, using your machine's largest stitch length
2-BASTE the side seams together
3-TRY ON the bodice
4-PIN the back seam together down the seam line
5-PIN in the front bodice darts, shaping them to the rib cage and around the bustline, creating an 'S' curve dart.
6-MARKING: after fitting, remove the bodice for marking. You may mark the dart position on the lining with chalk or pencil before you sew these darts. The two darts should be 'balanced' visually but they may not be exactly the same. As long as the bodice side seams are in the correct location (down your body sides), then they should be fine. No one is exactly the same on both sides of their body, so your darts may reflect that as well.
7-CLIPPING: some 'S' curve darts require clipping so that they can be pressed open. Trim away excess fabric to create a 1/2" seam allowance up the dart. If you have a serger, you can finish these cut seams to prevent unraveling (or zig-zag over the edges).
8-PRESSING: these darts can be pressed open, or towards the front. On this bodice the seams were overlocked together and pressed towards center front. Often the fabric bulk requires that they are pressed open.
-----------------------------------------
HOW TO FLAT LINE as FACING:
STEP-BY-STEP
LINING and FASHION FABRIC
On your cutting surface, lay out the fashion fabric 'face down'. Over this, lay on the cotton lining. Smooth out bubbles and align the selvage edges. Pin on pattern (this method will need a pattern for each part, as it doesn't have a center fold). Cut out the pattern.
SEWING
1-Separate the lining and fashion fabrics. Sew the lining fabric shoulder seams and bodice fabric shoulder seams. Press those seams open.
2-On the work surface: lay out the fashion fabric bodice, face up. Over this, lay the lining bodice, face down. The two layers will now be facing each other. Pin together, matching the shoulder seams, then smooth the fabric flat so that all edges meet.
3-SEW around the neckline and armholes. Clip the seam allowances around these curves.
4-TURN the bodices to the right side so the good sides are now facing out, press flat. Match all edges and pin together so that the fabric doesn't shift apart.
5-OVERLOCK unfinished edges, with both layers together: side seams, waistlines and back seams. If you do not have a serger, trim these edges neatly then zig-zag overcast with a wide stitch.
6-FITTING: (see notes above)
7-DARTS: sew bodice darts (see "S" curve dart)
8-SIDE SEAM: this seam will be sewn, then opened flat. The top edge can be reinforced by hand stitching to keep it open. This type of seam will allow for alterations in fit.
9-NECKLINE and ARMHOLE edges can be edge stitched to create a crisp, flat edge.
The bodice is now ready for the skirt to be sewn on to it.
------------------------------------------
I hope you can try this flat lining technique with your next project. I think you will really like the results. If you have had your own experience flat lining, let us know how that worked out.
note: I used a display form for these photos who is sizes smaller than the dresses shown. You will notice the fit isn't correct, try to imagine it is.
Tweet
Wednesday, July 28, 2010
Anatomy of a DRESS: Flat Lining in a 1960's Dress
 1960's Print Dress in a cotton screen print, I.Magnin label
Sewing vintage styles can be a new experience if you have been sewing crafts and modern fashions. One of the best ways to learn how-to sew dresses, especially vintage dresses, is to study examples. Trying to get the right effect usually means following the same, or similar sewing techniques along the way.
I am going to take you through a close look at this cute Mad Men era dress, to see what makes it 'tick' and how you can get the same professional results when you sew vintage.

This dress has two personalities, the fashion fabric exterior, and the technical interior. What makes this dress seem smooth and well fit is a simple process termed flat lining.
Flat lining
This technique is used for many (most?) dresses made before knits came into fashion during the late 1960's. Simply, it is a method where the fashion fabric is backed by a lining. Both are cut at the same time, stabilized by sewing around all edges to make them handle like one fabric, then sewn into the garment.
Darts and seams are sewn after the fashion fabric has been flat lined.
In this example, white cotton broadcloth has been used to flat line the cotton fashion fabric.
Why cotton broadcloth?
Since the fashion shell is cotton, using cotton in the lining will retain the cool property of the original fashion fabric. Cotton is also strong, and will prevent the seams from pulling out or the skirt from stretching while seated. It can also be washable, although this garment was not designed to be laundered.

This inside view shows the details of a bodice.
Flat lining: the white cotton can be seen as the inner layer that is sewn to the fashion fabric around all edges about 1/4" from those edges. It was trimmed with pinking shears.
Dart: the dart has been slashed and spread open to minimize bulk. In the preparation process both fabric layers were sewn 1/4" from the edge as shown
Waistline: to keep the waistline from ripping out or popping stitches, wide twill tape was sewn over the seamline where bodice meets skirt. Also notice that the skirt is flat lined. Sometimes the skirt is not flat lined if it is very full or gathered.

Hem tape: This close look at the hem shows how hem tape is sewn to the edge of the hem, then it is turned up and stitched to the flat lining. If done this way, the hem stitches will not show. Hem tape does two things: it keeps the hem edge from unraveling while it provides a non-bulky method of sewing it up. A hem that has been turned back and machine sewn before hemming has two layers, and will often leave a shadow or thickness. This way the hem is not 'pressed' forward into the skirt fabric where it will leave a mark when pressing.
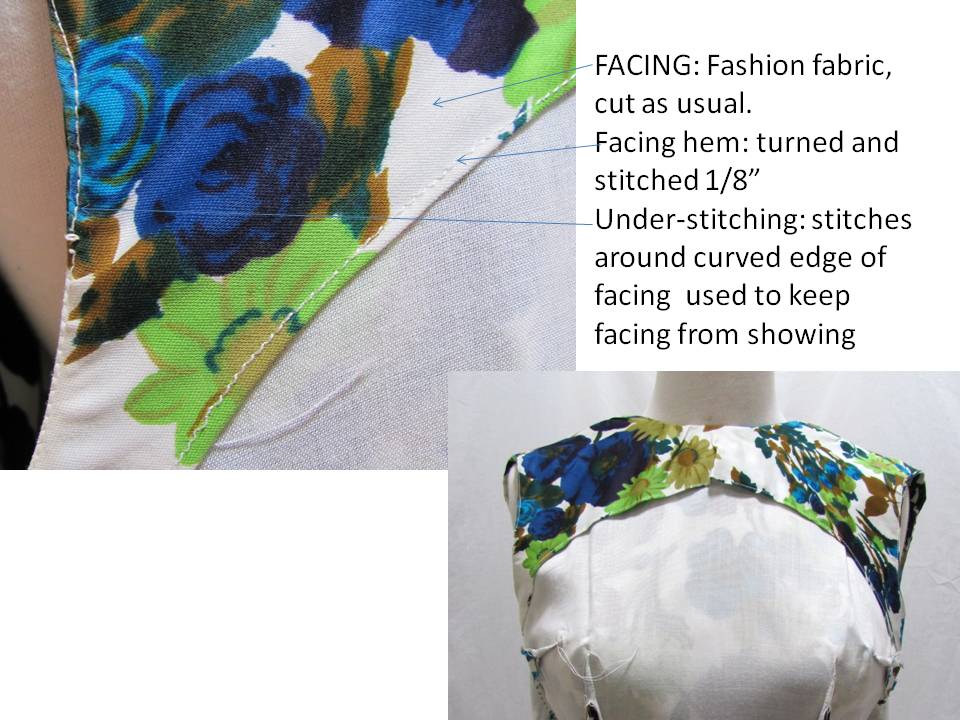
Facing: Facing will clean finish the neckline and armholes. The edge here has been turned and stitched to prevent unraveling.
Under-stitching: Stitching around the curved edges of the arm hole and neckline will prevent the lining from pulling and showing when worn. These stitches are around the seamline, but sewn only on the facing. This is different from top stitching.
HOW TO FLAT LINE
Getting started: Start with a big, smooth cutting surface (probably your floor).
#1--Lay out the flat lining fabric, be sure it is straight and on grain (not crooked).
#2--Spread the fashion fabric 'face' up over the lining, smooth it out to remove bubbles and wrinkles, be sure the grain lines match by aligning the selvage edges. If possible, press both layers. This will help to smooth them out and creates a 'bond' between them.
#3--Pin selvage edges together so they won't shift as you work.
#4--Layout pattern as usual. Because this method uses the fabric in an open layout, with out a center fold, you may need to flip some patterns to get both right and left sides. For the bodice front, tape tissue to the center front line of your pattern, fold down center front and cut around the cutting lines. When cut, open tissue and you should have a full front pattern with both left and right sides. While laying out the pattern, consider the print of your fabric as well, since you can see both left and right sides clearly during layout process.
#5--Pin pattern pieces to the fabric and cut through both layers. Keep shears perpendicular to the cutting surface. Cutting at an angle will make the layers different.
#6--Transfer pins when removing the paper pattern to pin only the fabric 'sandwich' piece. Pin away from edges to keep fabric from shifting.
#7--Machine sew around each fabric 'sandwich' piece using 1/4" seam lines and a medium length stitch. MODERN: use an overlock to clean finish all edges instead, but don't trim off fabric or you will reduce the pattern size (!!!)
#8--Your flat lining process is complete. Now proceed with marking your pattern and preparing to sew.
Sew your dress as usual, following pattern instructions and refering to your sewing books for more details. Remember to press the seams open because the extra layers will add up to more bulk.
I think you will be happy with the results. Let me know if you have further questions about this technique.
Tweet
Friday, June 18, 2010
Sew Classic: 1970's Vintage Sewing Books
Book Reviews:
Complete Guide to Sewing by Reader's Digest
The Vogue Sewing Book
Sewing Book by Better Homes and Gardens


How-to-sew books fall into a wide range of types, from those that cover project based sewing instructions, to specific tips on sewing. Probably the book with the widest coverage of sewing instructions and techniques is the Guide to Sewing by Reader's Digest. With excellent detailed drawings that show step-by-step instructions in nearly every type of sewing application, this is perhaps the best encyclopedia to refer to as you sew. The older editions are best, and can be found from the 1970's and 1980's. The version we show is dates from 1976. It has 410 pages on fashion sewing for women, men and children. This is followed by 74 pages of home dec. techniques and projects. Craft projects fill the final chapter.


Fashion sewing was defined for decades by the Vogue Sewing books in several editions. This thick, 464 page volume is full of suggestions and step-by-step instructions for better dressmaking as defined in the 1970's. Today it provides great insight into fashion sewing, with many methods that are common to dress design. It also includes a men's wear section with tailoring instructions.


The Better Homes and Gardens Sewing Book is a fun take on the sewing manual, as it has a ring binder style cover. This book was written for the home sewer, and contains many tips for family sewing and sewing crafts. If you sew vintage, the dresses you are making are probably shown in this simple but complete manual. It is arranged by topic, much like a cookbook.
Complete Guide to Sewing, Reader's Digest, 1976
The Vogue Sewing Book, Revised Edition, 1973
Sewing Book, Better Homes and Gardens, 1970
Subscribe to:
Posts (Atom)