Showing posts with label how to sew. Show all posts
Tuesday, November 1, 2016
Vintage 1950s Sewing: Pattern Measurement Chart for Women
If you want to learn how to sew vintage fashion, you will want to understand pattern measurements. Using vintage patterns will differ because 50s sizes aren't the same as current sizes. This 1950s measurement chart is from the same McCall's pattern magazine featured in my last post. I thought that this chart might help to give a better understanding of how dresses from the mid-1950s are a different fit from today's dresses.
Friday, April 29, 2016
Fashion Library: Most Loved Vintage Sewing Books
Thursday, September 3, 2015
Sewing Vintage Fashion: How to Flat LIne a Dress
What is 'flat lining and how is it sewn? Making vintage styles can be a new experience if you have only sewn crafts and easy modern fashions. One of the best ways to learn how-to sew dresses, especially vintage dresses, is to look at real examples. Trying to get the right effect usually means following the same, or similar sewing techniques along the way. In this post we'll look at 'flat lining' in fashion sewing.
Thursday, May 7, 2015
New Vintage Pattern Review: Butterick 6212 Pop Over Dress
New retro sewing pattern Butterick 6212 is a super cute 1950's style popover, or pullover dress pattern destined to become a popular model this summer. It has great details in the shaped sweetheart neckline, midriff waistband and double buttons in the skirt back, with an optional back waist tie.
These photos show the how the actual garment looks on a model. At this point, small details are more clearly seen. This pullover style is really a multi-fit house dress, with a mock blouse attached to the mock waistband of a contrast color skirt. The front bodice wraps around to the back where the skirt is buttoned to an 'inner back' panel. This panel can be seen in the gap between the skirt at center back.
In several ways this dress is alot like Butterick 4790, which wraps to the front, rather than the back. The schematic draft for that dress shows how one bodice is sewn to the skirt, while the other side of the body has a plain sheath style design. The sheath is worn to the front with Butterick 4790, while it is worn to the back with this pattern. Both have bodices that wrap around with diagonal edges where it meets: at the front with Butterick 4790, and in the back with buttons in Butterick 6212.
The back view photo above shows where the skirt wraps come together, and there's fabric strain at the waistline where it buttons in back. This view also shows that the 'inner back' is probably a 'sheath' shaped one piece pattern: from shoulders to hem, shaped with 2 vertical darts.
The flat drafts of this garment reveal the seam lines and darts. But the inner back piece of this dress is not shown. It is clear that the front bodice will wrap around to the back, and this bodice and waist band will be held in place by the button rows in back.
Looking closer at the back view, it seems that the 'inner back' sheath piece is not tightly fitted at the waistline, in fact the vertical darts used for shaping this piece are the only means used to create a snug waistline fit in back. Without a tight fight, the front of this dress will shift and hang loose.
The strain along the waistline in back results in horizontal wrinkles as seen in the back photo. This strain may cause the buttons to rip out or tear the fabric of the "inner back" sheath, unless the waistline area has interfacing (which does not seem likely).
The back can be made into a better fitting piece if that "inner back" pattern has some adjustments. I feel that it should have a true waistline seam across the back. Even better, a waistband could be inserted with the same width that the "outer back" panels have, so it matches across the back, rather than showing a gap between the buttoned skirt panels that are now seen.
A waistline would also make it possible for the "inner back" lower skirt area to be cut from fabric that matches the rest of the skirt (it doesn't match with the current pattern design).
How to add a waistline seam:
Using the top button placement on the back sheath pattern, draw a horizontal line across the back at the waistline button location as shown in the picture above.
Cut along this line.
Using a wide piece of paper or tissue cut into 3" wide strips the length of this cut edge. Tape a 3" wide strip along each edge, then mark a line that is 5/8" from the cut on the newly added strip. This will be the new seam allowance.
There is a tutorial for a similar process that shows an example of cutting apart a pattern, adding seam allowances and sewing it back together HERE from Craftsy that shows this method as used when creating color blocking pieces.
After two pattern pieces have been made, the lower pattern piece will become the 'skirt' and can be cut in fabric to match the skirt front. This will make the back view have a continuous color, rather than the gap between the buttons.
The upper piece can be cut from the bodice fabric.
Baste this seamline together for a fitting. The existing darts may need to be made deeper to shape the waistline and add curves for hips in back.
When sewing this seamline, it can be reinforced with a ribbon or seam tape to keep the seam from 'popping' or breaking when the skirt is wrapped around and buttoned along that seamline.
Other fitting finepoints: The bodice has bust darts that 'end' into the armhole wrap. This shouldn't gap or fall open when wrapped around to the back. If the arm hole seems too loose, the bust dart might need to be taken in more, making the loose armhole tighter.
Style alterations: If you want to see the back of the skirt meet, rather than show a gap, just extend the skirt pattern to meet in the middle of center back with a 1" overlap for buttons. By lengthening the back waistband and skirt, it will be possible for the center back of the skirt to button together, rather than expose the "inner back".
Once this pattern has been fit and any style alterations have been made, this will be an easy dress to sew and wear, especially in easy to sew summer cottons.
Thank you for dropping by. If you liked this post, don't miss my articles on vintage sewing and fashion by subscribing to Pintuck Style blog on "Bloglovin", HERE. I'd love to hear from you too if you have any questions or want to see a blog post on a specific topic.
Wednesday, July 2, 2014
Teach Yourself to Sew with Vintage Style Patterns
Learning to sew own your own can be fun when you work with patterns that fit your level of sewing skills. If you love vintage and retro styles, then carefully selecting vintage patterns can help to create new ‘vintage style’ looks. But authentic vintage pattern may be difficult to find in the right size, and often they need some alterations for a more modern fit.
Probably the easiest true vintage pattern group to look for are Simplicity sewing patterns from the 1960's forward with a "How to Sew" banner. These patterns have instructions that show details on sewing specific techniques. Often they were designed to be used in traditional home ec. classrooms, so the styles have few pattern pieces and involve simple or entry level sewing techniques.
Starting with a new pattern that is a modern copy of a vintage pattern is a short cut to getting that retro look you want to sew. Learning to sew means that the styles you choose shouldn’t be difficult for someone with beginning sewing skills. The blouses shown above are excellent examples of styles that have easy to sew design elements and limited techniques required.
If you want to sew a blouse or dress with buttons and button holes, prepare by doing some research in sewing books or online so that you understand how buttonholes are located. You may need to consult your sewing machine manual to learn how your machine settings can make those buttonholes for you.
I feature here two styles that have short kimono sleeves, making the bodices easier to sew since set-in sleeves are not required. The patterns in this post are just a small selection of retro or vintage style sewing patterns currently available through the major pattern companies. These patterns were selected for their very basic level of design, limited pattern pieces, simple darts, facings and ease of fit. Using vintage prints or stripes, cute retro styles are possible using these sewing patterns. Some of the patterns do require an entry level skill in fitting, so be sure if you are very new to sewing that you select a style with a looser fit.
Even dresses are possible, just seek out styles that have few pieces and can be easily fit to your size if that is required. Usually dresses have zippers, so that technique may be your main challenge in sewing a dress.
When looking further at sewing patterns, read the list below so that you have a good idea what sewing projects may be at your skill level. You might want to avoid the more advanced level projects, since those techniques or design elements may be too difficult to sew right now.
Level ONE: You are a new sewist, and need patterns that aren’t difficult or complicated. Look for:
Few pattern pieces
Loose fit “A” line shapes on dress or skirt
2 dart front: side seam darts or French darts
Sleeveles and collarless blouses or bodices
Wrap skirts (no zipper)
No waistband on skirt
Back zipper (no side or underarm zippers), with one side overlap (not centered)
Patch pockets
Fabrics that are stable, smooth and easy to cut, sew and press, such as light weight quilting cottons, woven stripes and plaids in cotton.
Level TWO: You have started sewing fashions and are ready to try some patterns that are a bit more difficult. You are ready for some of the more easy challenges in fitting patterns too. Look for:
Sheath dress: a more fitted one piece dress with 2 or 4 darts in front, 2 darts in back
Princess seamline dress: more fitted one piece dress with shaped vertical seamlines from underarm to hem, both front and back
Fitted bodice with darts in front (not tight fitting)
Fitted bodice with princess seamlines in front (not tight fitting)
Plain sleeves (no cuffs)
Sleeves with gathered shoulder or puff sleeves
Waistband on skirt
Side seam pocket
Loose pajama pants or elastic waist pants
Collar sewn in a dress neckline
Men’s bowling or Hawaiian style shirt (small collar, no back yoke, short sleeves)
Invisible zipper: hard to understand, easy to sew
Fabrics: add soft cottons or rayons to your selection, also consider embroidered fabrics and border prints
Level THREE: If you have been sewing for awhile, then projects that require good sewing techniques, fabric control and fitting are nice to work on. Look for:
Close fitting one piece dress with darts or princess seamlines
Close fitting bodice with 4 darts in front or princess seamlines, has skirt sewn to bodice at waistline
Collar on blouse, convertible collar
Straight skirt, fitted with darts or princess seam lines
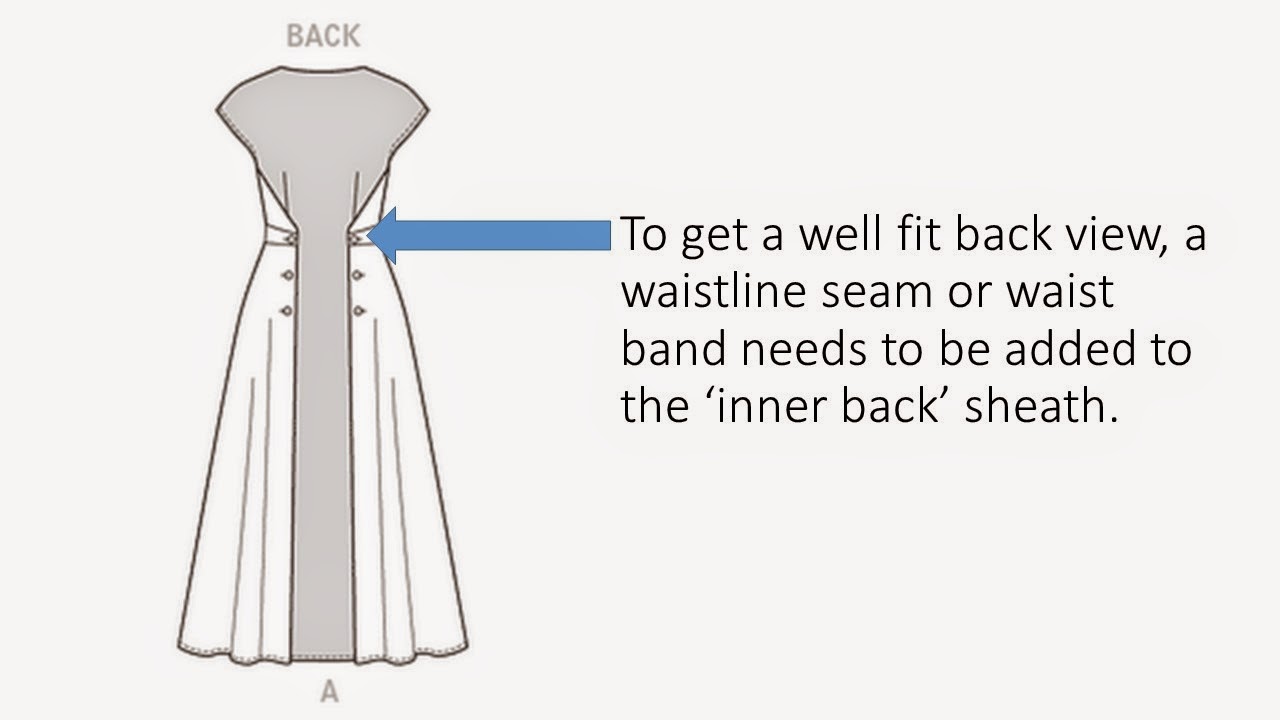
Dress with a waistline seam
Buttons and buttonholes
Pants with waistband or yoke, back or size zipper
Fabrics: wool flannel, velvet and velveteen and denim have the level difficulty that would be good to try sewing
Level FOUR: These projects are for the sewist who is ready to sew just about any style. Fitting and complicated techniques in sewing should be great for this skill level
Sleeves with cuffs
Men’s style shirt collars
Men’s style shirt with back yoke
Fly Front zippers on pant or skirt
Side zipper on dress with sleeves
Fitted bodices such as corsets and formal wear.
Difficult fabrics that might be slippery, thick or hard to work with.
In my next post, I'll go over a few sewing resources to help you problem solve and learn new techniques.
Friday, May 3, 2013
Get to Know your Serger Machine
If you are learning to use a serger or overlock machine, you may be a bit overwhelmed. Looking for help?
Try Serger Basics. It's easy to read, concise and full of good tips on how to use this type of machine.
This pdf file is also great for the experienced serger user. It has clear diagrams for trouble shooting tension adjustment so your stitches come out even. For the novice, there is a clear drawing of the average serger (shown above) with each part clearly labeled. If you use a serger, or plan to, I suggest that you print this pdf article, so you have something to refer to as you get started, or come across little questions when you sew.
This pdf article is part of a wide range of sewing instructions and tips by the University of Kentucky. It's really an entire sewing textbook available at no cost online.
Serger Basics, Level I: UK Cooperative Extension Service: University of Kentucky, College of Agriculture, written by Marjorie M. Baker, Extension Associate for Clothing and Textiles. A full list of articles is available online.
Monday, October 29, 2012
Pressing Wool
This is the second post on my wool coat project. I show the fabric and sketch for my coat sewing project (here) and I thought I would stop and demonstrate how I like to flatten 'puffy' seams in wool. It's lots of fun too! First off, here is the bodice front dart. The shadow of that seamline shows up, and it would be nicer if it didn't, so I need to press it flat. I use a water mister to dampen the wool fabric. How much water? Enough to bead up on the fabric surface should be fine. Next, I cover the area with a linen tea towel. If you have a press cloth, you can use that too, of course. I have used different linen or cotton fabrics as a press cloth, even a handkerchief can work in a pinch. You should be able to feel the sewn seam under this cloth. Now I set my hot iron on top. I use the wool setting. This method of pressing wool with water and press cloth is great for any type of wool garment, even sweaters. A vintage garment can be pressed this way and hung up damp to dry and it will look new again.
To continue flattening a seamline, I look for steam rising from the wool under it as it heats up. After maybe 15 seconds, I lift the iron and.... SLAM a brick down over the dart. Really? Yes!
Actually, I also have a nice wooden 'clapper' made for this task as well. You can use a short length of a pine 2X4, or a brick. Slamming down this instrument forces the steam through the wool fabric. It also flattens the seam. Here you can see the brick imprint (hahaha) When I lift the linen, notice how nicely the dart has flattened down. It looks so smooth and clean now. You may have noticed that this is a different seam. I used this technique for all darts and seamlines on this wool coat.
I hope you get a chance to try steaming wool. It is amazing how nicely wool will press, if you take the time to get it damp and use a press cloth too.
MATCHING woven lines in a diagonal seamline. When I sew with pinstripes, or any fabric with woven lines, I pin baste along the seam line first. Then I open it up like you see here to be sure the pin stripes meet up. If they match, the lines will create a chevron down the seam line. This is the shoulder seam for the kimono sleeve. I won't be able to match the side seams because the geometry changes and the grain lines are not equal.
Thursday, October 4, 2012
Sewing Tip: Cutting out a Pattern
I was cutting out a fitting muslin and thought I would share a few tips for making the cutting and marking go faster. First and foremost, I use weights to hold my pattern down when I cut. I think getting away from the labor of pinning is essential! I make my own by filling cute containers and even cups with coins. It's a nice way to use the odd gift mug that you have sitting around unused. I also like tins with lids. If you haven't tried this method, you are in for a big treat, it's sooo easy!
I am making a fitting sample of this 50's inspired coat, Butterick 5824, that is part of a group sew-along at Gertie's New Blog for Better Sewing. I'll be sharing more of this with you as I go along. It's a fun looking coat, and should be easy to sew (no sleeves to set-in!).
Tomorrow I will share a few marking techniques that I like to use. Everyone seems to have their own way of getting those pattern markings on to their fabric, and I will show you how I like to work that out.
Wednesday, August 1, 2012
Easy to Sew: Make your own Dress
Do you want to try sewing a dress that is easy to sew and looks great, but don't know where to start? Here's a few ideas to start with. The first two patterns are vintage, and the third is a modern take on vintage styles. All are easy to sew up in this gorgeous pink cotton floral print. All are available in the shop this week.
On the first pattern, the "A" line shaping just skims over the figure. This pink dress with the bias cut collar is a silhouette that is very flattering on figures with curvey hips. It is a vintage pattern by Simplicity 7625 from 1968. When finding patterns, look for "A" line shift styles like this that have simple darts and 2 main pattern pieces.
Hate to sew zippers? This second pattern is a super straight shift style that has only side bust darts. Chances are you may be able to get away without sewing in a back zipper if the dress slips on over your head! Look for vintage pattern Simplicity 4471 from 1964.
For a modern fit, I like this third pattern, a discontinued McCall's 4768. Although it has only 2 main pattern pieces, the upper body is shaped by princess seam lines. Princess seams are the best way to fit a curvey bustline because you can make adjustments for a perfect look. The flutter hem detail is optional, so this pattern is perfect for a slender sheath dress project.
When it comes to sewing, this pink floral fabric is an easy to sew cotton sateen that has a smooth finish. This is a recent textile with a vintage look, and it would be perfect for sewing any of these dresses.
You may have noticed that I selected sleeveless styles for this group. That will save you time and energy spent sewing in sleeves. When fall arrives, just throw on a cardigan and tights, and you'll wear your dress into the cooler weather.
Friday, February 17, 2012
Dress Patterns for Beginners: EASY to SEW
Since I wrote this post, several patterns have been discontinued, I have an updated version of this same post titled: 9 Best Dress Patterns for Beginners, so you may want to click on this link to find more recent patterns.
What I look for when choosing an easy pattern are several elements that need to come together:
1) seam lines: few seam lines to sew - just the side seams please!
2) pattern pieces: two main pattern pieces - front and back
3) darts: few darts - bust darts are fine
4) zipper: nope!
5) sleeves: nada!
6) neckline: simple and round, I think facing is easier than bias edge, but that's me
7) hemline: machine sewn? yes please
8) fabric: smooth, medium weight cottons: these are easiest to sew - quilter's cottons, cotton gingham checks, cotton shirting plaids and stripes.
Here's a few patterns that would be EASY for a newbie, or FAST for those with experience.
Top View, McCalls 6117 (now discontinued) illustrated the type of pattern to look for with 2 side seam bust darts and a soft "A" line fit.
McCall's 9172 (also discontinues) shows a sleeveless style with optional dart or no dart, ‘relaxed fit’, neckline facing. This does not have a zipper, and is an easy "pull over" style to sew.
McCall's 6355 (available) is a basic shift pattern by Palmer/Pletch with neck binding and optional fitting darts. This pattern has suggestions for creating a good fit.
McCalls 6102 (available): View D is a shift style with 2 bust darts. It is a zipperless pull over style that comes in a wide size range.
McCall's 6465 (available): view E is also without zipper, a slip over style that is also sleeveless with bias tape around arm holes.
When looking at a pattern page online, look for the front and back views or line drawings (production flats) of the garment showing each seam line clearly. Fabric and notions should also be listed.
If you scroll down further on most websites, you will find the GARMENT MEASUREMENTS. This information can be compared with a similar garment you own and fit, so you know what the results will be. Use this to select hem width, hip and bustline ease (looseness). It is a great way to determine your pattern size, if you feel the size measurements may not be exactly your fit.
Here are a few blog posts that also talk about sewing dresses:
7 Best Sheath Dress Patterns with Vintage Style: Easy to Sew
9 Best Dress Patterns for Beginners: Easy to Sew
6 Easy to Sew Shift Dresses
If you liked this blog post, follow me on Bloglovin to keep up with my most current articles,
You can also find me on:
Facebook - Pintucks
Pinterest - Pintuckstyle
Instagram - Pintuckstyle
Twitter - Pintucks
Thursday, September 2, 2010
SEWING VINTAGE: 'S' Curve Darts & Flat Lining as Facing
Sewing vintage patterns from the 1940's, 1950's and early 1960's is fun, but getting the right look often requires sewing methods we don't see today. Learning how to sew the styles you like will make it easier to get the look you want. One method is flat lining, and here I want to show a fast and easy way to sew. Our modern fusible interfacings have made traditional flat lining unnecessary. It can have advantages though, and I thought I would share those with you.
Another out dated construction technique is the "S" shaped dart. A straight dart creates at flat curve. In some cases, that is what we want. However, if you are trying to get an hour glass fit to your bodice, than you might want to consider an "S" shaped dart. Glove fitting dresses like those produced by Lanz in the 1950's reveal this dart shape: it hugs the rib cage and curves around the bustline for a smooth body fit.
This light-weight summer cotton dress would wrinkle, and perhaps pull at the seams without this inner construction method. A cool cotton faces the fashion fabric, creating a stronger bodice to the flowing skirt.
FLAT LINING as FACING
Briefly, this method uses a cotton lining that is cut at the same time as the fashion fabric. This is sewn around the neckline and if it is sleeveless, the armholes. This bodice is then turned to the right side. At this point the darts can be sewn and the side seams completed.
Open side seams allow for further fitting and adjustments in the future. The top edge at the armhole can be hand sewn to reinforce that upper edge. This method works for both sleeveless styles and bodices with sleeves.
'S' CURVE DART
The dart will have an smooth seam line up the rib cage, then curve around the bottom of the bust, tapering to a fine line at the end. An 'S' curved bodice dart will create a smooth fitting bodice. It has to be fitted on the body, and should be developed in the pattern stage. However, it can be pinned into place after the bodice is flat lined.
POINT OF BUST
This is the bustline center. Do not end darts here because that will make pointed darts. Imagine a Quarter sized circle around the point of bust (it's OK to draw this onto your lining). End the dart point at that circle perimeter line.
FITTING
1-BASTE the side darts, using your machine's largest stitch length
2-BASTE the side seams together
3-TRY ON the bodice
4-PIN the back seam together down the seam line
5-PIN in the front bodice darts, shaping them to the rib cage and around the bustline, creating an 'S' curve dart.
6-MARKING: after fitting, remove the bodice for marking. You may mark the dart position on the lining with chalk or pencil before you sew these darts. The two darts should be 'balanced' visually but they may not be exactly the same. As long as the bodice side seams are in the correct location (down your body sides), then they should be fine. No one is exactly the same on both sides of their body, so your darts may reflect that as well.
7-CLIPPING: some 'S' curve darts require clipping so that they can be pressed open. Trim away excess fabric to create a 1/2" seam allowance up the dart. If you have a serger, you can finish these cut seams to prevent unraveling (or zig-zag over the edges).
8-PRESSING: these darts can be pressed open, or towards the front. On this bodice the seams were overlocked together and pressed towards center front. Often the fabric bulk requires that they are pressed open.
-----------------------------------------
HOW TO FLAT LINE as FACING:
STEP-BY-STEP
LINING and FASHION FABRIC
On your cutting surface, lay out the fashion fabric 'face down'. Over this, lay on the cotton lining. Smooth out bubbles and align the selvage edges. Pin on pattern (this method will need a pattern for each part, as it doesn't have a center fold). Cut out the pattern.
SEWING
1-Separate the lining and fashion fabrics. Sew the lining fabric shoulder seams and bodice fabric shoulder seams. Press those seams open.
2-On the work surface: lay out the fashion fabric bodice, face up. Over this, lay the lining bodice, face down. The two layers will now be facing each other. Pin together, matching the shoulder seams, then smooth the fabric flat so that all edges meet.
3-SEW around the neckline and armholes. Clip the seam allowances around these curves.
4-TURN the bodices to the right side so the good sides are now facing out, press flat. Match all edges and pin together so that the fabric doesn't shift apart.
5-OVERLOCK unfinished edges, with both layers together: side seams, waistlines and back seams. If you do not have a serger, trim these edges neatly then zig-zag overcast with a wide stitch.
6-FITTING: (see notes above)
7-DARTS: sew bodice darts (see "S" curve dart)
8-SIDE SEAM: this seam will be sewn, then opened flat. The top edge can be reinforced by hand stitching to keep it open. This type of seam will allow for alterations in fit.
9-NECKLINE and ARMHOLE edges can be edge stitched to create a crisp, flat edge.
The bodice is now ready for the skirt to be sewn on to it.
------------------------------------------
I hope you can try this flat lining technique with your next project. I think you will really like the results. If you have had your own experience flat lining, let us know how that worked out.
note: I used a display form for these photos who is sizes smaller than the dresses shown. You will notice the fit isn't correct, try to imagine it is.
Tweet
Wednesday, July 28, 2010
Anatomy of a DRESS: Flat Lining in a 1960's Dress
Sewing vintage styles can be a new experience if you have been sewing crafts and modern fashions. One of the best ways to learn how-to sew dresses, especially vintage dresses, is to study examples. Trying to get the right effect usually means following the same, or similar sewing techniques along the way.
I am going to take you through a close look at this cute Mad Men era dress, to see what makes it 'tick' and how you can get the same professional results when you sew vintage.
This dress has two personalities, the fashion fabric exterior, and the technical interior. What makes this dress seem smooth and well fit is a simple process termed flat lining.
Flat lining
This technique is used for many (most?) dresses made before knits came into fashion during the late 1960's. Simply, it is a method where the fashion fabric is backed by a lining. Both are cut at the same time, stabilized by sewing around all edges to make them handle like one fabric, then sewn into the garment.
Darts and seams are sewn after the fashion fabric has been flat lined.
In this example, white cotton broadcloth has been used to flat line the cotton fashion fabric.
Why cotton broadcloth?
Since the fashion shell is cotton, using cotton in the lining will retain the cool property of the original fashion fabric. Cotton is also strong, and will prevent the seams from pulling out or the skirt from stretching while seated. It can also be washable, although this garment was not designed to be laundered.
This inside view shows the details of a bodice.
Flat lining: the white cotton can be seen as the inner layer that is sewn to the fashion fabric around all edges about 1/4" from those edges. It was trimmed with pinking shears.
Dart: the dart has been slashed and spread open to minimize bulk. In the preparation process both fabric layers were sewn 1/4" from the edge as shown
Waistline: to keep the waistline from ripping out or popping stitches, wide twill tape was sewn over the seamline where bodice meets skirt. Also notice that the skirt is flat lined. Sometimes the skirt is not flat lined if it is very full or gathered.
Hem tape: This close look at the hem shows how hem tape is sewn to the edge of the hem, then it is turned up and stitched to the flat lining. If done this way, the hem stitches will not show. Hem tape does two things: it keeps the hem edge from unraveling while it provides a non-bulky method of sewing it up. A hem that has been turned back and machine sewn before hemming has two layers, and will often leave a shadow or thickness. This way the hem is not 'pressed' forward into the skirt fabric where it will leave a mark when pressing.
Facing: Facing will clean finish the neckline and armholes. The edge here has been turned and stitched to prevent unraveling.
Under-stitching: Stitching around the curved edges of the arm hole and neckline will prevent the lining from pulling and showing when worn. These stitches are around the seamline, but sewn only on the facing. This is different from top stitching.
HOW TO FLAT LINE
Getting started: Start with a big, smooth cutting surface (probably your floor).
#1--Lay out the flat lining fabric, be sure it is straight and on grain (not crooked).
#2--Spread the fashion fabric 'face' up over the lining, smooth it out to remove bubbles and wrinkles, be sure the grain lines match by aligning the selvage edges. If possible, press both layers. This will help to smooth them out and creates a 'bond' between them.
#3--Pin selvage edges together so they won't shift as you work.
#4--Layout pattern as usual. Because this method uses the fabric in an open layout, with out a center fold, you may need to flip some patterns to get both right and left sides. For the bodice front, tape tissue to the center front line of your pattern, fold down center front and cut around the cutting lines. When cut, open tissue and you should have a full front pattern with both left and right sides. While laying out the pattern, consider the print of your fabric as well, since you can see both left and right sides clearly during layout process.
#5--Pin pattern pieces to the fabric and cut through both layers. Keep shears perpendicular to the cutting surface. Cutting at an angle will make the layers different.
#6--Transfer pins when removing the paper pattern to pin only the fabric 'sandwich' piece. Pin away from edges to keep fabric from shifting.
#7--Machine sew around each fabric 'sandwich' piece using 1/4" seam lines and a medium length stitch. MODERN: use an overlock to clean finish all edges instead, but don't trim off fabric or you will reduce the pattern size (!!!)
#8--Your flat lining process is complete. Now proceed with marking your pattern and preparing to sew.
Sew your dress as usual, following pattern instructions and refering to your sewing books for more details. Remember to press the seams open because the extra layers will add up to more bulk.
I think you will be happy with the results. Let me know if you have further questions about this technique.
Tweet
Friday, June 18, 2010
Sew Classic: 1970's Vintage Sewing Books
Book Reviews:
Complete Guide to Sewing by Reader's Digest
The Vogue Sewing Book
Sewing Book by Better Homes and Gardens


How-to-sew books fall into a wide range of types, from those that cover project based sewing instructions, to specific tips on sewing. Probably the book with the widest coverage of sewing instructions and techniques is the Guide to Sewing by Reader's Digest. With excellent detailed drawings that show step-by-step instructions in nearly every type of sewing application, this is perhaps the best encyclopedia to refer to as you sew. The older editions are best, and can be found from the 1970's and 1980's. The version we show is dates from 1976. It has 410 pages on fashion sewing for women, men and children. This is followed by 74 pages of home dec. techniques and projects. Craft projects fill the final chapter.


Fashion sewing was defined for decades by the Vogue Sewing books in several editions. This thick, 464 page volume is full of suggestions and step-by-step instructions for better dressmaking as defined in the 1970's. Today it provides great insight into fashion sewing, with many methods that are common to dress design. It also includes a men's wear section with tailoring instructions.


The Better Homes and Gardens Sewing Book is a fun take on the sewing manual, as it has a ring binder style cover. This book was written for the home sewer, and contains many tips for family sewing and sewing crafts. If you sew vintage, the dresses you are making are probably shown in this simple but complete manual. It is arranged by topic, much like a cookbook.
Complete Guide to Sewing, Reader's Digest, 1976
The Vogue Sewing Book, Revised Edition, 1973
Sewing Book, Better Homes and Gardens, 1970
Complete Guide to Sewing by Reader's Digest
The Vogue Sewing Book
Sewing Book by Better Homes and Gardens
How-to-sew books fall into a wide range of types, from those that cover project based sewing instructions, to specific tips on sewing. Probably the book with the widest coverage of sewing instructions and techniques is the Guide to Sewing by Reader's Digest. With excellent detailed drawings that show step-by-step instructions in nearly every type of sewing application, this is perhaps the best encyclopedia to refer to as you sew. The older editions are best, and can be found from the 1970's and 1980's. The version we show is dates from 1976. It has 410 pages on fashion sewing for women, men and children. This is followed by 74 pages of home dec. techniques and projects. Craft projects fill the final chapter.
Fashion sewing was defined for decades by the Vogue Sewing books in several editions. This thick, 464 page volume is full of suggestions and step-by-step instructions for better dressmaking as defined in the 1970's. Today it provides great insight into fashion sewing, with many methods that are common to dress design. It also includes a men's wear section with tailoring instructions.
The Better Homes and Gardens Sewing Book is a fun take on the sewing manual, as it has a ring binder style cover. This book was written for the home sewer, and contains many tips for family sewing and sewing crafts. If you sew vintage, the dresses you are making are probably shown in this simple but complete manual. It is arranged by topic, much like a cookbook.
Complete Guide to Sewing, Reader's Digest, 1976
The Vogue Sewing Book, Revised Edition, 1973
Sewing Book, Better Homes and Gardens, 1970
Subscribe to:
Posts (Atom)


