Showing posts with label how to sew vintage. Show all posts
Tuesday, November 3, 2015
1949 Fashions: Simplicity Sewing Patterns
This vintage 1949 August brochure for Simplicity sewing patterns shows diverse new silhouettes available to home sewers that year, for 25 cents each. The company provided a wide range of styles suitable for it's readers who would be making their own clothes for summer and fall.
Wednesday, September 16, 2015
How to sew a Vintage 1950's Capri Set: Quadriga Cloth Advertisement
This capri set from 1956 was used to advertise a fabric called "Quadriga" cloth, available for home sewing in prints and solids. This outfit is a fun 50's retro look that could be sewn today using contemporary patterns that are easy to find.
Thursday, July 30, 2015
Vintage 1950's Playset: Simplicity 1605 and How to Sew Your Own Playset
Sewing a 1950's vintage style summer play suit set is not has difficult as that may seem. When making vintage styles, sometimes you have to copy an idea, rather than use a pattern. This Simplicity Pattern 1605 dates from the 1950's. It has has a classic detachable skirt worn over a short playsuit.
The wrapped bodice seems strongly influenced by Claire McCardell and other American designers who were creating styles with an Indian sari influence. The jumpsuit image shows how the edge of a sari or border print could be used to create a dramatic diagonal on the one shoulder top.
For a sewing project, this outfit is worth taking a second look, especially for the wrapped neckline which can be made with or without the second shoulder panel. The easy to sew gathered skirt is accented by a detachable cummerbund. The skirt fastens in front and it acts as a cover-up for going indoors at the country club.
The back of the pattern shows how the pieces are cut. Even though this pattern is no longer available, it is possible to re-create the same look with a gathered skirt over a jumpsuit or shorts and halter top. Probably the easiest way to get a similar pattern is to create your own pattern hack. Using two Butterick patterns, this look could be created.
To sew your own wrap bodice and skirt, start with Butterick 6582. It has a great version of this wrapped bodice, but attached to a gathered skirt. Using this pattern, the surplice top could be used. When fitting it, be sure to determine your waistline, since that is where the shorts will be attached. If you want to make this a 'crop top' and not attach the shorts, that would be even easier to fit. Use this pattern for making the detachable skirt by sewing the fabric to a straight waistband that meets in the front. There should be a wide sash too that wraps around the waistline.
To make your shorts, use Butterick 5895. It is a well fit pant with a high 'natural' waistline. A fitting muslin would be the next step so that the best length for shorts can be drawn on the leg and transferred to the paper pattern. It would also be important to pin the bodice to the waistline so that the correct waistline is determined. You may want to lengthen or shorten the pant waistline at this time too.
This outfit would duplicate the one we see here, making it a great 50's style play suit for the summer!
This "Throw-back Thursday" post was adapted from the original posted July 13, 2011.
Saturday, January 25, 2014
Ceeb of Miami: Gold Lame Jumpsuit
This super glam gold jumpsuit was made by "Ceeb of Miami", and probably dates from the late 1950's.
It was recently sold by my friend Holly at her "French Laundry Co." shop on Etsy. But before it left her shop, I was able to get to see it up close, and thought I would share what I found with you.
This bustier plus capri pant combo is made from a very stretch lame fabric. The lame fabric is stiff, yet flexible, with stretch in the cross-wise grain. The capri pants are simple, with traditional darting and slits at the ankles. It has a deep metal zipper with inside placket up the center back seamline.
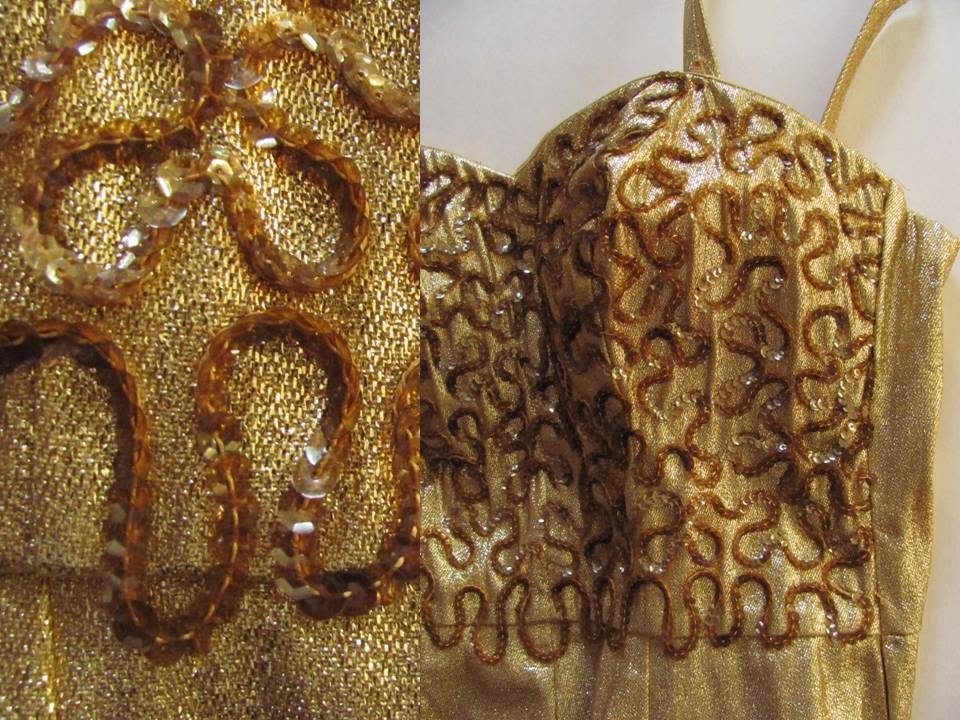
The bustier is sewn with all-over sequin trim in a serpentine pattern. The bodice shaping is princess seamlines, with a back zipper.
The bustier is constructed with a full bra sewn into the top. There are small removeable stays at the sides of the built in bra to keep it 'up'.
There is a fold-over edge facing around the edges. This fold-over edge is backed with elastic to be sure it fits tightly. A wide nylon fabric fly backs the zipper opening to prevent any skin pinches. Buttons are sewn into the top edge of the bustier for removable straps.
The sequin design was applied after the bodice was sewn, using a chain stitch machine. It appears that the bodice front was sewn to the pant front across the waistline seam first. At this point the sequins were applied. After that the side seams were sewn.
The center back zipper is a strong metal type. This slide shows that zipper, both open to expose that fly fabric, and zipped up. A heavy snap secures the top edge.
Overall, this jumpsuit has a surprisingly simple pattern design and uses construction methods that are not difficult. The type of boning and lining that we often expect to see in a bustier is not present here. Perhaps this is because most women would be wearing their own strapless bra, often in a 'long line' design to the waist. This would then mean that the garment does not need to provide support or 'molded' bustline shaping.
The garment label lists this as a size 12 / 34.
Garment Measurements:
Bust: 34 inches
Waist 28 inches
Hips: 42 inches
Inseam crotch to hem: 25 inches
Underarm to waist: 8 inches
If you want to sew a glam jumpsuit like this for yourself, I think it would not be difficult. By working with a good pant pattern to start, a princess seamline bustier can be sewn to that around the waistline.
Pants: try Butterick B5895, a pant with 'high' waistline and back zipper (omit the pockets), or Vogue pant fitting pattern, V1003, a classic pant that has all the right darts.
Bustier: Butterick B5419, a long line bustier that can be altered to stop at the waistline. The bodice for McCalls M6646, is perfect.
On the Ceeb website they state that they have been in business since 1942 in southern Florida. Their main product is swimwear, I'm also interested in finding out more about jumpsuits of this type from the "Ceeb" label. Feel free to share what you know in the comment section.
Tuesday, February 12, 2013
A Closer View: Navy Silk Sheath, c. 1955
One of the best ways to learn fine dress making is to study examples of the craft. This silk sheath dress from the mid-1950's is a great example. It is clearly a custom made dress, with many hand sewn details. By looking at it in detail, we can learn more about the design and drape of this wrapped 'sarong style' dress, along with tips on how to sew a feather weight dress like this that holds its shape well when worn.
This gorgeous navy dress of silk twill has a blue floral pattern that is probably Italian silk. It is backed by lining that is sewn 'in one' with the outer fashion fabric. I use the term 'flat lining' for this process. The lining is also used as a base to hold the drapery in place. It is probable that the customer had a fitting wearing the lining, while the dress designer wrapped the silk fashion fabric around the body, pleating it into the side seams as shown below.
The right and left sides are patterned and sewn differently, creating the signature sarong effect. This sarong skirt is sewn into the sheath side seam on the right, but it wraps around the left without a side seam, hanging open at the center back.
Looking inside the dress we can see the construction techniques. These are classic points. The scarf weight fashion fabric was 'backed' by a lining. The two layers were stitched together, then cut with pinking shears. When pressed open, the stitching shows clearly that this was 'flat lined'.
The transfer marks used to place the darts shows as little white dots. These would have been part of the custom or couture process. Seam tape is sewn along the waistline seam to stablize it and keep it from ripping apart. This tape was also used to edge the hem. Using hem tape is an easy way to provide a clean edge that is easy to sew through.
The bodice of this dress was cut with princess seam lines in the back, while the front had conventional darts. The fashion fabric was draped on top of this and sewn in place. This same lining was used in the skirt, but only to the knee level. This would keep the hips smooth, but allow the hem area to drape nicely.
This wonderful dress is listed in my shop on Etsy where you will find more photos of it. If you like this style, look for designs by Dorothy O'Hara, Helen Rose, and Peggy Hunt among others from that era who specialized in draped dresses. (this dress does not have a label)
Subscribe to:
Posts (Atom)


