Wednesday, May 13, 2015

1950 Fashion: Sewing Patterns for Dresses


Vintage fashion for January 1950: a new decade with new styles.  Women were cutting and sewing a whole new silhouette that year.  My sister has kept me well stocked with vintage sewing pattern brochures. This newsprint catalog she gave me has several punched up color pages that I'm sharing with you here.


In 1950 dresses sported the newer sloping shoulders, 3/4 sleeve length and wide hemlines. For many girls it was a good time to sew up new clothes, departing from the tired and well-worn ones that had gotten them through the post war era.


An hourglass silhouette with tiny peplum is accented by turn-back cuffs and standing collars.


Circle and flared skirts with small waisted wide belts.  The rounded shoulders and tiny collars with high necklines keep the bodice demure, except for the bold white turned-back cuffs.


For more mature customers, the top two dresses carry over the diagonal draping and crepe textiles worn during the last decade. The perky red checked gingham number and the red dress are half size with a modern style spin.

Whether trying to date a vintage dress, sew up retro style copy, or just get inspired by fashion from 65 years ago, these pages with over a happy dozen dress patterns are great in both their differences and similarities.

Pattern Numbers shown here: Simplicity
3057
3058
3059
3060--Junior sizes
3061--Junior sizes
3064--Junior sizes
3065
3066
3067--Half sizes
3068--Half sizes
3069
3075--Junior sizes
3076--Junior sizes

Thursday, May 7, 2015

New Vintage Pattern Review: Butterick 6212 Pop Over Dress


New retro sewing pattern Butterick 6212 is a super cute 1950's style popover, or pullover dress pattern destined to become a popular model this summer. It has great details in the shaped sweetheart neckline, midriff waistband and double buttons in the skirt back, with an optional back waist tie.


These photos show the how the actual garment looks on a model. At this point, small details are more clearly seen. This pullover style is really a multi-fit house dress, with a mock blouse attached to the mock waistband of a contrast color skirt.  The front bodice wraps around to the back where the skirt is buttoned to an 'inner back' panel.  This panel can be seen in the gap between the skirt at center back.


In several ways this dress is alot like Butterick 4790, which wraps to the front, rather than the back. The schematic draft for that dress shows how one bodice is sewn to the skirt, while the other side of the body has a plain sheath style design.  The sheath is worn to the front with Butterick 4790, while it is worn to the back with this pattern.  Both have bodices that wrap around with diagonal edges where it meets: at the front with Butterick 4790, and in the back with buttons in Butterick 6212.

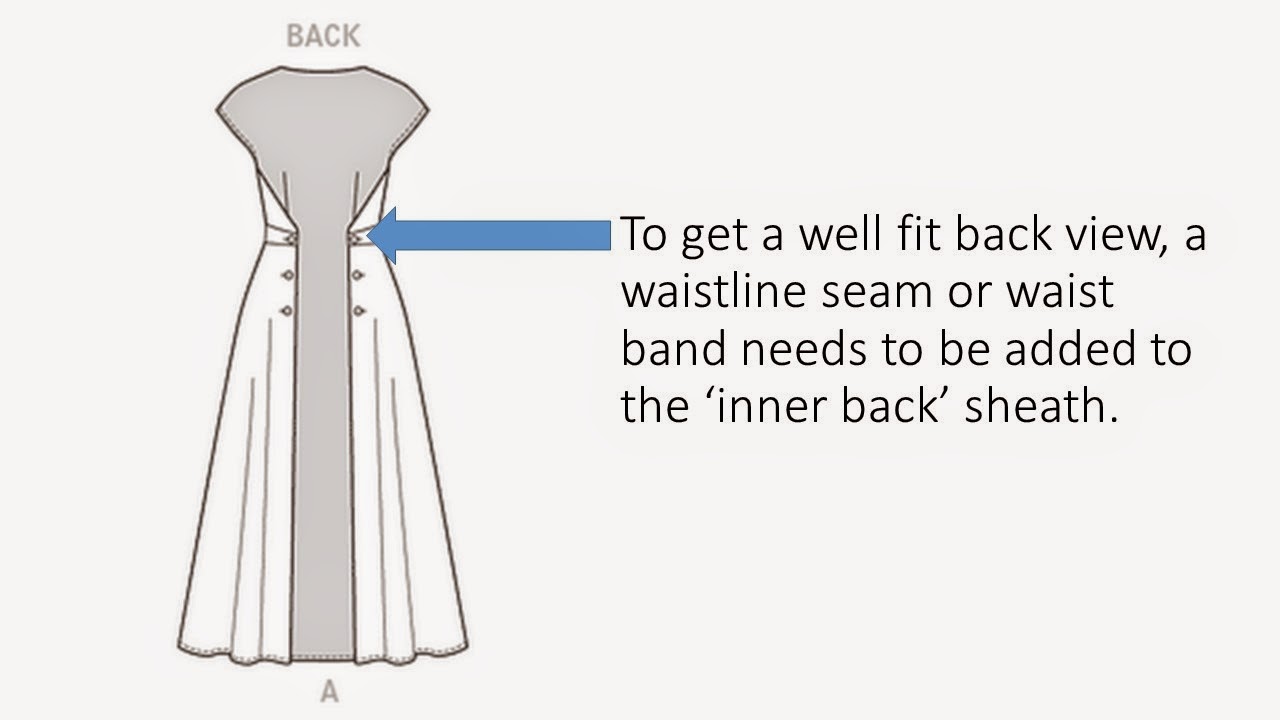
The back view photo above shows where the skirt wraps come together, and there's fabric strain at the waistline where it buttons in back. This view also shows that the 'inner back' is probably a 'sheath' shaped one piece pattern: from shoulders to hem, shaped with 2 vertical darts.


The flat drafts of this garment reveal the seam lines and darts.  But the inner back piece of this dress is not shown. It is clear that the front bodice will wrap around to the back, and this bodice and waist band will be held in place by the button rows in back.


Looking closer at the back view, it seems that the 'inner back' sheath piece is not tightly fitted at the waistline, in fact the vertical darts used for shaping this piece are the only means used to create a snug waistline fit in back.  Without a tight fight, the front of this dress will shift and hang loose.

The strain along the waistline in back results in horizontal wrinkles as seen in the back photo. This strain may cause the buttons to rip out or tear the fabric of the "inner back" sheath, unless the waistline area has interfacing (which does not seem likely).


The back can be made into a better fitting piece if that "inner back" pattern has some adjustments. I feel that it should have a true waistline seam across the back. Even better, a waistband could be inserted with the same width that the "outer back" panels have, so it matches across the back, rather than showing a gap between the buttoned skirt panels that are now seen.

A waistline would also make it possible for the "inner back" lower skirt area to be cut from fabric that matches the rest of the skirt (it doesn't match with the current pattern design).

How to add a waistline seam:

Using the top button placement on the back sheath pattern, draw a horizontal line across the back at the waistline button location as shown in the picture above.

Cut along this line.

Using a wide piece of paper or tissue cut into 3" wide strips the length of this cut edge. Tape a 3" wide strip along each edge, then mark a line that is 5/8" from the cut on the newly added strip. This will be the new seam allowance.

There is a tutorial for a similar process that shows an example of cutting apart a pattern, adding seam allowances and sewing it back together HERE from Craftsy that shows this method as used when creating color blocking pieces.

After two pattern pieces have been made, the lower pattern piece will become the 'skirt' and can be cut in fabric to match the skirt front.  This will make the back view have a continuous color, rather than the gap between the buttons.

The upper piece can be cut from the bodice fabric.

Baste this seamline together for a fitting. The existing darts may need to be made deeper to shape the waistline and add curves for hips in back.

When sewing this seamline, it can be reinforced with a ribbon or seam tape to keep the seam from 'popping' or breaking when the skirt is wrapped around and buttoned along that seamline.


Other fitting finepoints: The bodice has bust darts that 'end' into the armhole wrap. This shouldn't gap or fall open when wrapped around to the back. If the arm hole seems too loose, the bust dart might need to be taken in more, making the loose armhole tighter.

Style alterations: If you want to see the back of the skirt meet, rather than show a gap, just extend the skirt pattern to meet in the middle of center back with a 1" overlap for buttons. By lengthening the back waistband and skirt, it will be possible for the center back of the skirt to button together, rather than expose the "inner back".

Once this pattern has been fit and any style alterations have been made, this will be an easy dress to sew and wear, especially in easy to sew summer cottons.

Thank you for dropping by.  If you liked this post, don't miss my articles on vintage sewing and fashion by subscribing to Pintuck Style blog on "Bloglovin", HERE.   I'd love to hear from you too if you have any questions or want to see a blog post on a specific topic.

Monday, April 20, 2015

Digital Fashion and Costume Libraries: The Casey Fashion Plates, Los Angeles Public Library


Researching the history of fashion and costume online has taken grand leaps recently. In part to sort out the best from the rest, I have a short series of posts here on digital costume and fashion image collections now available to the public online. I thought I'd start with the Los Angeles public library, because a girl has to have some loyalty to her home base.

The Casey Collection of Fashion Plates consists of original fashion plates, spanning the years from 1780 to 1880. This huge collection has over 6,200 images, and that's alot to sort through, but the search engine is easy to use when looking for a specific year's costume plates. The images come from both American and British publications.

Overall review: I found this huge site to be well organized and easy to search. The images are easy to enlarge using a touch screen and the quality of those enlargements is excellent. I would recommend this to anyone needing a large body of images for research on a specific year or era between 1780 and 1880.

Improvements: I would have liked each image to be dated in the general search pages, as they are not in chronological order. The search is by year only, terms and other details cannot be searched. I would like to be able to search by decade, rather than having to enter 10 searches in order to see a decade of plates.

How it works:

Images per page: setting from 10 to 50 are available

Text per image on the search page: none

Text per image on the detail page: date, title, collection and item I.D. This does not include notes on apparel or other details in the image

Enlargement: (+) icon on upper right of page brings up the image in large scale on page. This can be further enlarged by using a touch screen, or the ctrl/+ keyboard

Search: "search collection for" box will bring up images by YEAR only. Does not search by decade or garment type.

Return: "return to search browser" brings user back to first page to start a new search

Speed: I found this to search and load quickly.

Copy: no, images cannot be reproduced

Tuesday, March 17, 2015

7 Best Sheath Dress Patterns with Vintage Style: Easy to Sew

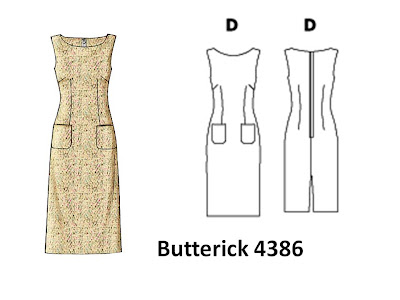
Butterick 4386
Ever wanted to make your own Little Black Dress? This article will review fitted sheath dress patterns that are easy to sew.  This is a second post on easy to sew dress patterns with vintage style, following "9 Best Dress Patterns for Beginners: Easy to Sew". After mastering the super easy shift style dress, it's time to sew a classic sheath dress. This article is edited from a very popular article from three years ago, so the patterns shown are current and available

What makes the sheath dresses shown here easy to sew?

1) no waistline seam, and they look great if belted

2) dress skims the body, but isn't super tight or super loose (like a shift dress)

3) no set in sleeve (but this pattern does have sleeves if you want them)

4) most are still 2 main pattern pieces: front and back

This is Butterick 4386, a dress with a classic darted torso. It can be sewn into so many great styles, from a "little black dress" to a tropical summer dress, the fit will be slender. There is a back zip and hem vent.


Now that you know what pattern style to look for when you want a smooth fit, here are more sheath style patterns that will create that silhouette. The patterns include New Look: 6261, Butterick, See and Sew: 5235, and two from McCalls: 2401, 7085. All of these patterns have vertical darts to shape the waistline and back views, and most have sleeves as well.

.


Curvey fit? A princess seam line pattern is the best for creating a good fit. Those long seam lines provide an opportunity to fit the bust line, torso and hips more carefully. There are six seam lines to work with, and each one can be let in or out only a little bit to affect the fit. Butterick "Fast and Easy" 5554 and Simplicity "Amazing Fit" 1586 both have armhole princess seams, so a good fit can be achieved with fuller bustlines.  Both include sleeves, if that is something you want to include in your dress.


This style of shaping is a vintage feature, having both the angular French dart and the side bust dart. This will create a smooth 'fit and flare' silhouette.  A French dart is sewn at an angle, and trims away the waistline without having the usual vertical dart showing in front.  This is a good choice for bold patterns that shouldn't be cut up with vertical arts.

Once a good sheath pattern is selected, there will be a few things to consider.

Question: What fabrics are best for sheath dresses?

Answer: In addition to the simple cottons mentioned in the previous dress article for shift dresses (quilting cottons, cotton gingham, woven cotton plaids and stripes), we can add stretch wovens to our list. Keep your stretch manageable, don't select anything too 'wiggley' and out of control. When using a stretch, lay out the fabric so the stretch goes around the body (not 'up and down' or it will bag at the rear!).

If the fabric is soft or thin (like a brocade, lace or satin) I would suggest using a cotton or taffeta to 'back' that fashion fabric using a 'flat lining' or 'interlining' method shown in an earlier blog post HERE.

Obviously, the classic sheath dress is a vintage look that an experienced sewist can whip up in almost any fabric, from wool flannel to brocade.

Question: How can I make the sheath pattern fit me?

Answer: Make a fitting sample before cutting out the fashion fabric. This process is more essential with the semi-fitted sheath style. Plan to do a trial fit sample dress in a 'muslin' or similar cotton test fabric before cutting out your dress pattern.

If you feel you are an easy fit and don't need a fitting muslin, then when you cut your fashion fabric, I suggest using 1" wide seam allowances down the side and back seams lines. This will give room to alter for fit in case you need 'more room'. Math: get a 1" wide seam allowance by adding 3/8" to your cutting line if you are using standard US pattern's 5/8" wide seam allowances. Yes, you will have to draft that line onto your pattern tissue first, before you cut.

Slender fit: For a figure with small curves, look for slender darts. Don't take up extra width in the darts. Do your fitting from the side seams.

Curvey fit: For a figure with larger curves, the darts will be wider and may be shaped towards the dart point. This fit may also need side and back seam line adjustments. Traditionally, the back seam was cut 'on grain' or very straight, but now it is common to use that seam line to fit the back view more closely.

Princess seam lines make curvey fittings easier. Just distribute any alterations through the several seams, and you will notice that the fitting process is actually easy to achieve.

Question: How can I make the zipper easier to sew?

Answer: Add 1" wide seam allowances down the seamline where your zipper will be sewn. You will be soooo happy you have the extra fabric when you put in the zipper. It helps to have the extra width when trying to fold the fabric under. Before your start, be sure to clean finish the fabric edges. Doing that will make sure that the edge won't unravel and snag into the zipper. I use an overlock seam or I zig-zag over the fabric edge to bind that over and prevent it from unraveling.

Once you perfect sewing a sheath to fit, it could become your favorite: fast, great fit, and easy to sew.

Thank you for dropping by.  If you liked this post, don't miss my articles on sewing and vintage fashion by subscribing to Pintuck Style blog on "Bloglovin", HERE .   I'd love to hear from you too if you have any questions or want to see a blog post on a specific topic.

(This article was first published Feb. 21, 2012)

Monday, March 9, 2015

Fashion Bookshelf: Therese de Deillmont and the Encyclopedia of Needlework


Therese de Dillmont is the mother of all needlework crafts, having begun her instructional book during the 1880's: The Encyclopedia of Needlework. This book is still available, a tiny volume crammed with illustrations and 'how to' on many techniques that seem lost and forgotten today. My own volume shown here dates back at least a century, a gift that was found in Europe.

Alabama Channin has profiled Mme. De Dillmont in an article with just enough information to get you started on a search for your own copy. For me, this was one of the first books on my sewing self, and it is still a stand out today, black and while illustrations included.


Thursday, February 26, 2015

9 Best Dress Patterns for Beginners: Easy to Sew


This is the first is a short series on sewing patterns that are EASY to sew or EASY for new sewists (beginners). Because these styles tend to be shift dresses (loose with bust darts) or "A" line in shape, they are perfect for summer. This is the season to best sew for warm weather, the timing is right to make one of these styles.


This post is the first of a series on easy to sew dresses that I first published three years ago.  As one of my most popular series, it has always generated alot of interest.  Many of those patterns are no longer available, so I thought it was a good time to re-post the original article with new and current patterns from the 'big 4' companies.  If you have a good pattern to recommend, just leave your comment below.

The shift dresses pictured above have an "A" line or loose fit, while the sheath dresses pictured below tend to fit the waistline more closely, and can be smooth over the hips.  The sheath dresses all show back darts to trim out excess fabric in the back waistline area.  Often this style has a back zipper, but the looser "A" line shifts can usually be sewn without a zipper for a 'pull over' style.

Both types of dresses shown here have bust darts in the side seam lines.  This dart creates a smooth fit in the underarm and reduces bulk in the side seam area.


What I look for when choosing an easy pattern are several elements that need to come together:

1) seam lines: few seam lines to sew - just the side seams please!

2) pattern pieces: two main pattern pieces - front and back

3) darts: few darts - bust darts are fine

4) zipper: nope!

5) sleeves: nada!

6) neckline: simple and round, I think facing is easier than bias edge, but that's me

7) hemline: machine sewn? yes please

8) fabric: smooth, medium weight cottons: these are easiest to sew - quilter's cottons, cotton gingham checks, cotton shirting plaids and stripes.

Here's a few patterns that would be EASY for a newbie, or FAST for those with experience.

Easy Palmer Pletch McCalls 6355
McCall's 6355: basic shift pattern by Palmer/Pletch, neck binding, optional fitting darts. This pattern has options for creating a good fit.

easy to sew McCalls 6102
McCalls 6102: View D, shift style, 2 bust darts, pull over, large size range, neckline facing


easy to sew McCalls 6465
McCall's 6465: view E, slip over, sleeveless bias tape arm holes, loose A line shape

FINDING YOUR SIZE:

READ the measurement section for the company that you are buying the pattern from.  Each one will require the following: Bust, Waist, Hip.  Be sure to measure without clothing for accuracy.  If you are not the same size as the patterns listed, for this style of dress, choose your bustline to find the best size.  You can add to the hip area if you need more room there, and the waistline measurement should have little effect on the pattern.

HOW WILL THE DRESS FIT?  If you scroll down or click the tab on most pattern websites, you will find the GARMENT MEASUREMENTS. This information lists what a dress will measure after it has been sewn.  These measurements can be compared with a similar dress or top you own, so that way you'll know what the results will be. Use this to select hem width, hip and bustline ease (the term 'ease' means looseness). It is a great way to find your pattern size for that specific dress, if you feel the size measurements may not be exactly your fit.


(the original version of this article was published February 17, 2015)

Thursday, February 12, 2015

Make Your Own Vintage Gloves: Free Pattern


Make your own gloves from a 1950's free vintage pattern in pdf file format. This file has patterns to enlarge and tutorials to get you through the sewing process. I can see this used for awesome glove and costume projects, so save yourself a copy now because you never know when you'll want to use it! You'll find that free pdf file HERE on PatternPatter.blogspot.com. The pdf file alone is HERE.

While I'm at it, I want to credit the original designer of these gloves, Edith M. Hummel, who wrote about making gloves in her book: "You can make your own gloves", 1946 and about accessories in: "You can make your own bags and accessories", 1952 and 1957. This pattern appeared in the January 1956 issue of Workbasket Magazine. Her books may still be available in long established libraries.


Friday, February 6, 2015

The Pendleton Mystery Shirt: Guide Shirt or Buckaroo Style?


Pendleton wool plaid shirts are an American classic, and as such it can be difficult to determine the age of one, when it seems like all the others. This older Pendleton shirt, while sporting a well known black and red wool plaid check, has an unusual feature that is a design style new to me. When I first saw this shirt, my well-trained daughter (by me) had found it at the Goodwill, among all of the other wool shirts on the rack. She recognized the plaid, but what caught my eye when she waved it aloft ("Eureka!") was the uniquely curved center front and hemline.

Hemlines in men's shirts are funny because they have remained mostly hidden over time, carefully tucked into pants. Pendleton shirts worn outside the pants is a style preference that came into fashion after they had earlier been designed as a tuck-in sporting shirt. So when was this shirt made? The wool has a hard finish, without loft, spongey depth or fuzziness of some wools.  It has the old label style and it is well worn.

After searching online, and not finding any mention of this hemline, I found a 1927 catalog page on the Pendleton site that shows the debut this same shirt. On the left side of the page, #572, appears worn by a man with a gun, but his version "Guide" has a 2-button cuff. This shirt has the same small breast pockets and clean fit of this shirt. In a color view of three folded shirts, the same plaid is shown for # 533 styles, and a one-button cuff as described. This is very similar to the "Buckeroo" featured on the opposite page, but in a different plaid (the Buckeroo is listed has being available in a 'tan plaid'). And finally, the garment label appears in the upper right corner of the right page, and this is the same graphic design. Here is a larger scale version of the catalog page.

So the question remains, do shirts from 1927 have this same hemline shape? When did this curved front phase out?

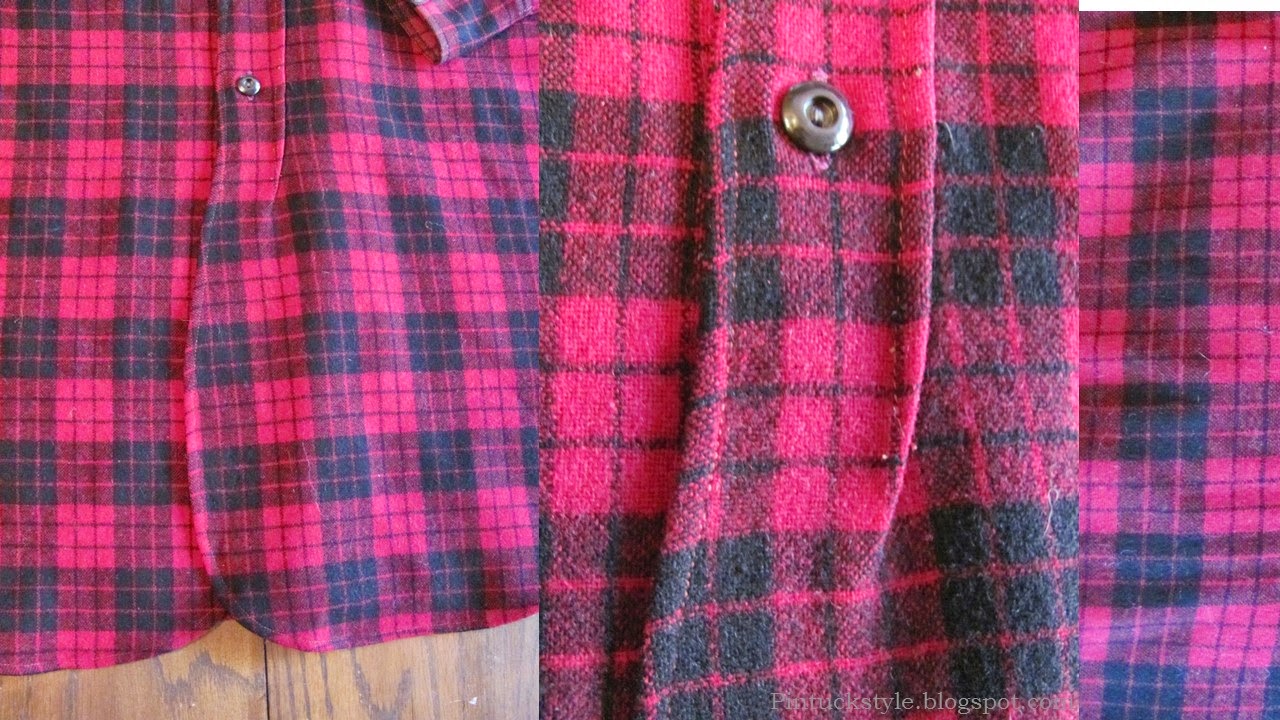
Below are more views of this shirt, showing how the front placket is shaped and lined. These clearly show a rather innovative method of pinching a tuck to created the front placket (rather than sewing on a separate long piece of fabric to create the button placket). These button plackets are lined, rather than faced with wool.

If you have suggestions or answers, let us know here so we can solve the mystery of when this shirt was made!


This close-up view shows how the center front lines swings wide to create a curved front overlapped edge.


The reverse side of the button plackets are lined and show the 'tucking' technique that created the placket, and also a small tuck release.


While the wool is still strong, the lined collar and label show signs of deep wear, and are becoming thread bare. This close up view also shows a twill lining that seems to show up on the very old shirts, and probably earlier than the usual 'satin' or twill versions in beige or other colors shown. I have also noticed on later shirts that chain stitching can be found on the back side of top stitching, which may be a later use than single needle top stitching.

HERE is a Buckaroo recently featured in the Pendleton Facebook page.

HERE is a catalog page featuring the Buckaroo shirt advertised as by "Levi" of Pendleton wool in 1938: Saddle and Western Gear, page 121

HERE is my Pendleton Pinterest file, I'll keep adding 'em as I find 'em!

HERE: a taxonomy poster showing the main styles in Pendleton shirts

Monday, January 12, 2015

Davidow Suit from the mid-1960's: A Closer Look


This Davidow suit I has been in my collection for awhile. The classic silhouette and rich texture make it as wearable today as it was when it was sold, probably in the mid-1960's when the longer jacket was popular. I thought it might be good to take a closer look, in part to show details used in this type of tailoring, and also to help identify a similiar suit if the label is missing.


When looking at a Davidow suit, one of the first aspects of the design is it's similar silhouette and texture to a Chanel. Davidow advertising and brochures mention this as well because they purchased those toile designs to use in their own company. For many women, while the Davidow label was expensive, it was much more affordable than the Chanel label.

Pockets, another Chanel inspired feature, are also influenced by military or safari styles in this jacket. The lower pocket with flap is actually a patch pocket with the flap attached, creating a more flattering look that is easier to use. The breast pockets are actually mock flaps and lay flat without a pocket under that flap.

The signature single layer collar Davidow had patented is not seen here, so the collar is conventional, having a facing to back the collar and lapels. These are soft and not tailored with heavy canvas, being more like a blouse in fit and weight. The front shows five textured gold metal buttons which is a departure from the covered buttons found on earlier jackets. Very narrow bound buttonholes are used.


The back view is smooth, with shoulder darts for fit across the back. The body is tapered at the waistline by the side panels that are set at the side body, under the arms. The collar fits flat and low around the center back, being cut on a curve to fit around the neckline.

Two piece sleeves have mock vents, secured with a single button. The shoulders are only lightly padded to retain a soft and natural silhouette. This jacket features the use of textured wool, much like Chanel during that time. This textile has aqua, turquoise, bronze and white yarns which appear to be heavy, but are actually very light weight. Both jacket and skirt are lined in aqua crepe.


This view shows the skirt waistband, with lining, hooks and eyes. There is a narrow waistband that is not crisp or heavily interfaced. The waistband fastens on the left side with a nylon zipper. Two hanging loops with the Davidow logo shown here, are sewn into the waistband at each side. The hem has been released, so it is hanging un-hemmed in these photos. The skirt lining is much shorter, perhaps taken up when hemlines grew shorter as the decade moved on into the 1970's.


This suit was sold by Bullock's Pasadena, probably at a trunk show where a model would have shown the suit to a customer, or the customer might have tried that one sample on. She would have waited for this custom made order to arrive back at the store. This location served clients not only in Pasadena, but also San Marino and all points east of there, since no department stores of this quality were located further east of Los Angeles. Customers from 40 and 50 miles away would have traveled to this store when there was a trunk show with new suits each season.

I have another article on Davidow, with examples of suits from the early 1960's HERE. I also posted an example of suits from 1944, HERE. In the 1944 suit illustration is is easy to see the signature looks that Davidow suits would be known for. It is also interesting to consider that Chanel did not start producing her suits until 1954, at a time when Davidow suits were already well known.