Wednesday, February 29, 2012
1920's Flapper Styles: How to Dress like a Flapper
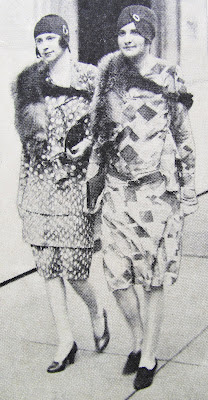
You might think that current fashion bloggers invented 'street fashion' photos, but that's not so. These photos were taken on the streets of New York to show current fashion trends in 1929. If you want to dress like a flapper, then here are some great styles to try.
Top-Jacket suits of light weight wool worn with fur stole and cloche hats worn low. The suits have pleated skirts, note:. Mrs. Cornelius Vanderbilt Whitney is on the right.
Second- Flappers wear silk printed dresses with felt hat and fox stole around the shoulder. Their low cloche hats each have a pin brooch accent on one side.
,,,,,,,,,,,,,,,,,,,,,,,,,,,,,,,,,,,,,,,,
This is part of a series of blog posts on women's fashions from 1929.
Most illustrations come from the magazine "Fashionable Dress", August 1929.
Tuesday, February 28, 2012
1929 Hairstyles: How to Look like a Flapper
How to look like a 1920s flapper can be a challenge when it comes to hairstyle selection. Getting that perfect wave and spit curl can be easier if you find the right picture to copy. Here are some great hairstyle illustrations from 1929. Hairstyles were changing in the summer of 1929. These illustrations appear in an article titled "the Twilight of the Bob: Longer hair ascends into the limelight".
On this topic, the author gives pointers for growing hair longer from the shorter length bob. Length is important, especially in the back. She suggests getting a perm, since fashion was moving in a wavey direction as these drawings show.
,,,,,,,,,,,,,,,,,,,,,,,
This is the second post in a series on women's fashions from 1929.
Most images appear in a magazine from that year titled "Fashionable Dress"
Monday, February 27, 2012
Actresses in Flapper Fashions from 1929: How to Dress Like a Flapper
If you want to look like a flapper from the 1920s, then seeing real women wearing the styles in 1929 should be a great help. These pictures come from the wonderful fashion magazine, "Fashionable Dress" which showcases mid-summer fashions for August.
To get the best idea of how to dress like a 1920s flapper, it also seems appropriate to take a look at real actresses from that year. What did they really look like? How did they wear the current trends?
This is Helen Mencken, and she wears a two piece frock edged in scallops. Her cloche hat is pulled down to her eyebrows, which is what we should expect. Both a stage and film actress, she had married Humphrey Bogart in 1926, but divorced him a year later.
Next is Peggy Bancroft, from "Whoopee". She is wearing a youthful afternoon frock with lace and georgette. Notice how the hem line is uneven, not unlike our current hem line trends. If you look closely at her, you'll notice she has a spit curl in the center of her forehead.
Leneta Lane is our third actress from "Congratulations". Her ensemble was designed by "Joseph". It is an aquamarine crepe coat with wide collar.
Friday, February 24, 2012
Dress Patterns for Beginners: Easy to Fit and Sew
This is the third part in a series on easy to sew dress patterns. This post looks at a princess pattern that can be easily fit using gingham. The second pattern has mock sleeves for a fast and easy to sew dress style.
In locating dress patterns for curvey fit or larger sizes, McCall's 3129 shown above is a princess dress style that has a great 'fit and flare' silhouette. It skims the upper body, then flares out. If you want a short sleeves, you can have that too.
Don't let the fact that this dress style has four main pattern pieces (front, side front, back, side back) stop you. Once you machine baste those pieces together, have a fitting and you will notice how nicely the final fit can be achieved.
Fitting sample? If you really want to know: Woven, cotton gingham check is the preferred fabric to use when making a fitting sample. It is the easiest way to see if the grain line falls straight, that horizontals aren't crooked and that your pattern pieces are balanced.
Fitting? Make it easy by adding to the dress pattern seam allowances at the side and back seam lines to equal 1" (+ 3/8"). That way you can play with the extra fabric if you need it. Once you get a good fit, go back and make marks on your paper pattern that match your new seamlines. This way your paper pattern can be used again.
Fabric fitting pattern:
step 1: Add to pattern seam allowances so that side and back seams = 1" wide.
step 2: Use gingham for the fitting garment.
step 3: Cut only the dress, don't include facings or zipper.
step 4: Machine baste in the largest machine stitch using contrast color thread.
step 5: Wearing best bra and shoes, have a friend make the alterations. They can see the back, you can't.
step 6: After alterations are complete, remove dress and use pencil to mark the stitch line or pin line. Add horizontal marks on both sides of the seam line, so you know where to match up the pieces when you sew them together again.
step 7: Transfer the alterations back onto your paper pattern and add a new 5/8" seam allowance.
You could press your fabric pattern and use that. If you plan to do this, be sure fabric has been pre-shrunk. Also take care not to pull this fabric pattern off grain. Usually it's easiest to trace a new pattern from the fabric fitting pieces and add back the 5/8" seam allowances.
Looking for something easier to fit and sew? With only two main pattern pieces (front and back), Butterick 5211 is easy to lay out, cut and sew. It is a nice summer look with a mock sleeves. This is a tunic dress that can be belted too. The extended shoulder make the sleeve look a breeze to sew (it's just a wider shoulder seam line). There is a 'key hole' slit in back, rather than a zipper. A zipper could be added instead.
When choosing your fabric, both of these dresses will make up in simple woven summer fabrics very easily. The princess seam line style should have patterns of moderate size or smaller, so that the pieces don't cut up the print. The tunic dress would be great for larger, graphic or abstract prints.
I hope this series has helped you find the dress pattern that best combines your sewing ability and figure type. With the right combination, sewing a dress can be easy to do!
Here are a few more blog posts that also talk about sewing dresses:
7 Best Sheath Dress Patterns with Vintage Style: Easy to Sew
9 Best Dress Patterns for Beginners: Easy to Sew
6 Easy to Sew Shift Dresses
If you liked this blog post, follow me on Bloglovin to keep up with my most current articles,
You can also find me on:
Facebook - Pintucks
Pinterest - Pintuckstyle
Instagram - Pintuckstyle
Twitter - Pintucks
Tuesday, February 21, 2012
Sheath Dress Patterns for Beginners: Easy to Sew, Part 2
This is a second post on easy to sew dress patterns. The first post looked at loose fitting shift dresses. After mastering the super easy shift style dress, it's time to sew a classic sheath dress.
This very popular post has been recently updated in: 7 Best Sheath Patterns with Vintage Style: Easy to Sew, so you may want to go there to find more recent patterns to choose from and some updated sewing tips HERE.
What makes the sheath dresses shown here easy to sew?
1) no waistline seam, and they look great if belted
2) dress skims the body, but isn't super tight or super loose (like a shift dress)
3) no set in sleeve (but I found a great raglan sleeve instead)
4) most are still 2 main pattern pieces: front and back
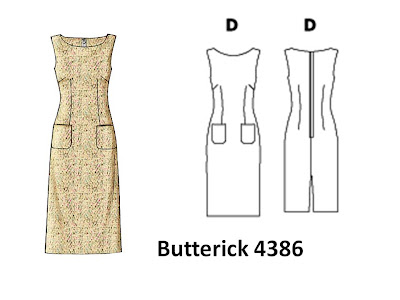
The first dress shown above is Butterick 4386. This dress has a classic darted torso. It can be sewn into so many great styles, from a "little black dress" to a tropical summer dress, the fit will be slender. There is a back zip and hem vent.
Curvey fit? This is the best pattern style for getting a good fit. Butterick 5638 has well placed 'princess seam lines'. Those long seam lines provide an opportunity to fit the bustline, torso and hips. There are six seam lines to work with, and each one can be let in or out only a little bit to affect the fit.
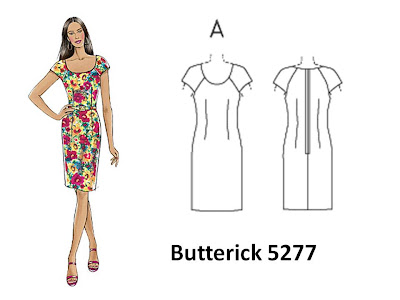
Want Sleeves? Butterick 5277 is a short sleeved silhouette that is easy to sew, since raglan sleeves are used, rather than the more difficult 'set in' sleeve style. Long torso darts fit the body and there is a zipper down the back.
For a looser fitting dress, here are two styles. New Look: View A is available in two patterns, 6049 and 6095 (they seem to be identical). This dress has back darts to create a smooth fit. Side seams create the torso fit, if you don't want a close fit across the midriff. There is an optional back zipper.
New Look 6021, View B shows French darts. These are long tapered darts that fit the midriff nicely. French darts were popular during the 60's. This type of dart is also a good look if the fabric pattern is large and would be distorted by front darts or princess seam lines.
Fabric selection: In addition to the simple cottons mentioned for shift dresses (quilting cottons, cotton gingham, woven cotton plaids and stripes), we can add stretch wovens to our list. Keep your stretch manageable, don't select anything too 'wiggley' and out of control. When using a stretch, lay out the fabric so the stretch goes around the body (not 'up and down' or it will bag at the rear!).
Obviously, the classic sheath dress is a vintage look that an experienced sewist can whip up in almost any fabric, from wool flannel to brocade.
Fittings are more essential with the semi-fitted sheath style. Plan to do a trial fit before sewing your final seam lines. I suggest when cutting to making 1" wide seam allowances down the side and back seams lines. This will give room to alter for fit.
Slender fit: Look for slender darts. Don't take up extra width in the darts. Do your fitting from the side seams.
Curvey fit: These darts are wider and may be shaped towards the dart point. This fit may also need side and back seam line adjustments. Traditionally, the back seam was cut 'on grain' or very straight, but now it is common to use that seam line to fit the rear nicely.
Princess seam lines make curvey fittings much easier. Just distribute any alterations through the several seams, and you will notice that the fitting process is actually easy to achieve.
Zipper: Take note to make your zipper seam allowance (the back seamline) 1" wide. You will be soooo happy you have the extra fabric when you sew in your zipper. It sure helps to have the extra width.
Math: get a 1" wide seam allowance by adding 3/8" to your cutting line. Yes, you will have to draft that line onto your pattern tissue first, before you cut.
When sewing a zipper, be sure to clean finish the fabric edges first, so the cut edge won't unravel and get into your zipper. I use an overlock seam or I zig-zag over the fabric edge to bind that over and prevent it from unraveling.
Once you get the sewing of this dress style perfected, it could become your favorite: fast, great fit, and easy to sew.
Here are a few blog posts that also talk about sewing dresses:
7 Best Sheath Dress Patterns with Vintage Style: Easy to Sew
9 Best Dress Patterns for Beginners: Easy to Sew
6 Easy to Sew Shift Dresses
If you liked this blog post, follow me on Bloglovin to keep up with my most current articles,
You can also find me on:
Facebook - Pintucks
Pinterest - Pintuckstyle
Instagram - Pintuckstyle
Twitter - Pintucks
Monday, February 20, 2012
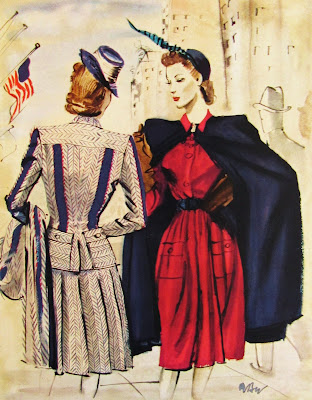
President's Day: RBW fashion illustration, late 1930's
This RBW (Count Rene Bouet-Willaumez) illustration from the late 1930's or 1940's has a patriotic flair. As an illustrator, he employed color washed emphasized with brush strokes to show the figure and fabric.
The suit and dress shown are detailed with patch pockets that sport fold over top flaps with buttons. The suit coat has a fun back pocket that plays up the back interest seen in fashion during the late 1930's. The shoulders are broad, with sharp emphasis at the sleeve top. This was probably before the US went to war, since there seems to be excess fabric folds and a longer skirt length, and those would be restricted during the war years.
Of special interest are the hats worn on the top or back of the head, they provide a fun and amusing detail to the overall outfit.
Sunday, February 19, 2012
Pricing Fashion: Costing a New Shirt
The Wall Street Journal recently ran an article that detailed the journey one new fashion start-up went through to produce their initial product: a polo shirt. What they found were costs that resulted in a $155 price tag.
The new business owners are Katherine and Jared MacLane, both entered the manufacturing arena after sufficient experience in retail. It was their goal to create a company that offered the most perfect polo shirt: in fit, style, comfort and performance.
The article follows their journey to source the best textile, trims and labor to produce their design. This wasn't easy, as simple cotton became expensive cotton, and performance issues were many in the selection of that textile and the trims to put on it. Would you believe that the knit cotton yardage they wanted was $9.00 per yard, and mother of pearl buttons were $1.00 each? Clearly, adaptions had to be made.
Another hurdle was locating a manufacture in the U.S. This turned out to have its own barriers to entry. After that were the little details, hang tags, garment tags and packaging: each one requiring costs beyond what you might imagine.
As for that $155 price tag: The cost to actually produce the top was $29.57, with labor costs just a fraction over $11. The retail price is a bit more than double that, $65. The profits are used to cover other expenses, such as marketing, shipping, product development and the owner's salaries. The retail store more than doubled that cost to cover their expenses, so the final price the consumer pays is $155.
Right now, fashion is an easy 'whipping' child for several groups who feel their viewpoint is politically correct. There is the 'why is fashion so poorly made?' group, and the 'Why can't I find ____ made in the US?' and finally 'Fashion is so overpriced, those designers are making huge profits' group.
If anything, this article dispels any notions of grandeur on the part of the higher priced manufacturer. Good quality materials, local labor, manufacturing and retail have their costs. The consumer has recently been treated to apparel at costs far below any in the history of the peopled world. With this has come an expectation that everything should reflect this cost downturn.
Part of turning around the consumer's way of thinking, along with their buying habits, is educating them to see that US made products will cost more. Having them accept that reality is another thing entirely! As a start, this article is a great intro to costing and product pricing.
The full Wall Street Journal article, "Polo Puzzle: What Goes Into a $155 Price Tag?", Feb. 2, 2012 by Christina Brinkley is HERE
Friday, February 17, 2012
Dress Patterns for Beginners: EASY to SEW
This is the first is a short series on sewing patterns that are EASY to sew or EASY for new sewists (beginners). Because these styles tend to be shift dresses (loose with bust darts) or "A" line in shape, they are perfect for summer. This is the season to best sew for warm weather, the timing is right to make one of these styles.
Since I wrote this post, several patterns have been discontinued, I have an updated version of this same post titled: 9 Best Dress Patterns for Beginners, so you may want to click on this link to find more recent patterns.
What I look for when choosing an easy pattern are several elements that need to come together:
1) seam lines: few seam lines to sew - just the side seams please!
2) pattern pieces: two main pattern pieces - front and back
3) darts: few darts - bust darts are fine
4) zipper: nope!
5) sleeves: nada!
6) neckline: simple and round, I think facing is easier than bias edge, but that's me
7) hemline: machine sewn? yes please
8) fabric: smooth, medium weight cottons: these are easiest to sew - quilter's cottons, cotton gingham checks, cotton shirting plaids and stripes.
Here's a few patterns that would be EASY for a newbie, or FAST for those with experience.
Top View, McCalls 6117 (now discontinued) illustrated the type of pattern to look for with 2 side seam bust darts and a soft "A" line fit.
McCall's 9172 (also discontinues) shows a sleeveless style with optional dart or no dart, ‘relaxed fit’, neckline facing. This does not have a zipper, and is an easy "pull over" style to sew.
McCall's 6355 (available) is a basic shift pattern by Palmer/Pletch with neck binding and optional fitting darts. This pattern has suggestions for creating a good fit.
McCalls 6102 (available): View D is a shift style with 2 bust darts. It is a zipperless pull over style that comes in a wide size range.
McCall's 6465 (available): view E is also without zipper, a slip over style that is also sleeveless with bias tape around arm holes.
When looking at a pattern page online, look for the front and back views or line drawings (production flats) of the garment showing each seam line clearly. Fabric and notions should also be listed.
If you scroll down further on most websites, you will find the GARMENT MEASUREMENTS. This information can be compared with a similar garment you own and fit, so you know what the results will be. Use this to select hem width, hip and bustline ease (looseness). It is a great way to determine your pattern size, if you feel the size measurements may not be exactly your fit.
Here are a few blog posts that also talk about sewing dresses:
7 Best Sheath Dress Patterns with Vintage Style: Easy to Sew
9 Best Dress Patterns for Beginners: Easy to Sew
6 Easy to Sew Shift Dresses
If you liked this blog post, follow me on Bloglovin to keep up with my most current articles,
You can also find me on:
Facebook - Pintucks
Pinterest - Pintuckstyle
Instagram - Pintuckstyle
Twitter - Pintucks
Thursday, February 16, 2012
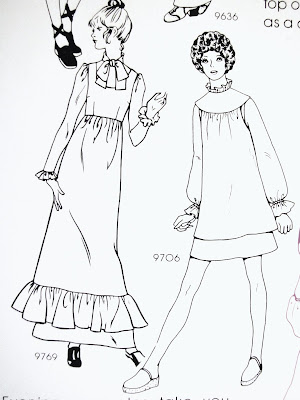
Early 1970's Fashion Illustrations: Styles and Silhouettes
Simplcity Sewing Patterns, Spring, 1972
These simple line drawings were probably drawn using strong black India ink and a quill pen or Rapideograph pen (an early for-runner of ink pens, with an inner reservoir for ink). They tend to run 9.5 heads in height which was beginning to show popularity at the time, over the more realistic 8.5 heads.
Tuesday, February 14, 2012
Valentine Romance: late 1930's Fashion Illustration
All of the Victorian revival seen during the late 1930's seems to come together in these illustrations. Especially romantic, the long red dress with lace shawl and pouf skirt is a great look. The description for this dress is "fichu ball dress, out of a historical romance, cotton tulle and cotton lace".
Monday, February 13, 2012
Vintage Wedding Gowns: Sew One For Your Own
These are a few of the most popular wedding gown styles to walk through a church or movie setting. Dating from the 1950's, they have style and grace. Designing and sewing a wedding gown is fun, yet daunting! Starting with a classic like these can help to focus on a look that has drama with a classic twist.
From Top to Bottom:
Audrey Hepburn: "Funny Face", 1957, gown by Givenchy
Grace Kelly: marriage to Prince Rainier III, of Monaco, April 1956, gown by Helen Rose
Liz Taylor: marriage to Conrad Hilton, 1950 and "Father of the Bride", 1950, gown by Helen Rose
Jacqueline Kennedy: marriage to John F. Kennedy, 1953, gown by Ann Lowe, New York
Make it Yours:
The 1950's home sewing patterns shown here are collectable and often difficult to locate. But take a close look. You may recognize the style lines in other more available gown patterns from the 1980's forward. More recently, the popular gown worn by Princess Grace has inspired variations, and several are now available from the pattern companies as listed in the lower slides.
1950's sewing patterns seen in the top slide, from left to right: McCall's 6605, Simplicity 4511, McCall's 9677.
Wednesday, February 8, 2012
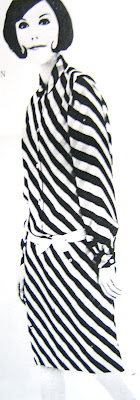
Rudi Gernreich California Fashion Designer: early 1960s fashion designs
Early on, California fashion designer Rudi Gernreich was associated with the young fashion innovators. In these early 1960's designs, his look was clean cut, easy to wear and popped with bright contrast or graphics. The silhouettes forecast the shirt or "A" line shapes that would be widely worn later in the 1960s
These styles show that even common fabrics such as table cloth checks found new fashion meaning under his genius. Although he was working with wovens, during this time many of his designs were wool double knits for Harmon Knitwear.
Prices were above average, with the little striped Harmon Knitwear sailor dress and jacket selling for $65.
Tuesday, February 7, 2012
Fall 1961: Fashion Illustrations for Evening
Monday, February 6, 2012
Fashion Illustration by RBW, late 1930's or 1940's
"RBW" is the signature for Count Rene Bouet-Wilaumez whose illustrations during the 1930's through 1950's were a signature look for "Vogue" magazine. He would become popular both in advertising and editorials commissioned to support written magazine articles.
RBW used pen and ink to create the look he was known for. Often brush strokes are seen along with both color and ink washes. Like most illustrators, he used live models wearing the gowns as he worked. Hence, his textile work is gorgeous, such as the drapery seen in the illustration shown here.
Sunday, February 5, 2012
Bonnie Cashin: Brass Twist Locks on Vintage Coats and Jackets
This 1970's kid skin leather short coat by Bonnie Cashin sports her signature twist locks that she adapted from canvas boat fastenings in the 1950's. This illustration is from a brochure published by Gene Burton shop on Lake Ave. in Pasadena, CA during the 1970's. From it we find that this leather coat retailed for $200 and came in white, sand, redwing red, navy, lemon yellow or sandstone.
Shown below are some examples of the twist locks used on many of her coat designs. You will also notice the extensive use of leathers in her fabrications.
Here's a peak at the inside:
Shown below are some examples of the twist locks used on many of her coat designs. You will also notice the extensive use of leathers in her fabrications.
Here's a peak at the inside:
Subscribe to:
Posts (Atom)