Showing posts with label 1950's vintage fashion. Show all posts
Tuesday, February 12, 2013
A Closer View: Navy Silk Sheath, c. 1955
One of the best ways to learn fine dress making is to study examples of the craft. This silk sheath dress from the mid-1950's is a great example. It is clearly a custom made dress, with many hand sewn details. By looking at it in detail, we can learn more about the design and drape of this wrapped 'sarong style' dress, along with tips on how to sew a feather weight dress like this that holds its shape well when worn.
This gorgeous navy dress of silk twill has a blue floral pattern that is probably Italian silk. It is backed by lining that is sewn 'in one' with the outer fashion fabric. I use the term 'flat lining' for this process. The lining is also used as a base to hold the drapery in place. It is probable that the customer had a fitting wearing the lining, while the dress designer wrapped the silk fashion fabric around the body, pleating it into the side seams as shown below.
The right and left sides are patterned and sewn differently, creating the signature sarong effect. This sarong skirt is sewn into the sheath side seam on the right, but it wraps around the left without a side seam, hanging open at the center back.
Looking inside the dress we can see the construction techniques. These are classic points. The scarf weight fashion fabric was 'backed' by a lining. The two layers were stitched together, then cut with pinking shears. When pressed open, the stitching shows clearly that this was 'flat lined'.
The transfer marks used to place the darts shows as little white dots. These would have been part of the custom or couture process. Seam tape is sewn along the waistline seam to stablize it and keep it from ripping apart. This tape was also used to edge the hem. Using hem tape is an easy way to provide a clean edge that is easy to sew through.
The bodice of this dress was cut with princess seam lines in the back, while the front had conventional darts. The fashion fabric was draped on top of this and sewn in place. This same lining was used in the skirt, but only to the knee level. This would keep the hips smooth, but allow the hem area to drape nicely.
This wonderful dress is listed in my shop on Etsy where you will find more photos of it. If you like this style, look for designs by Dorothy O'Hara, Helen Rose, and Peggy Hunt among others from that era who specialized in draped dresses. (this dress does not have a label)
Tuesday, September 18, 2012
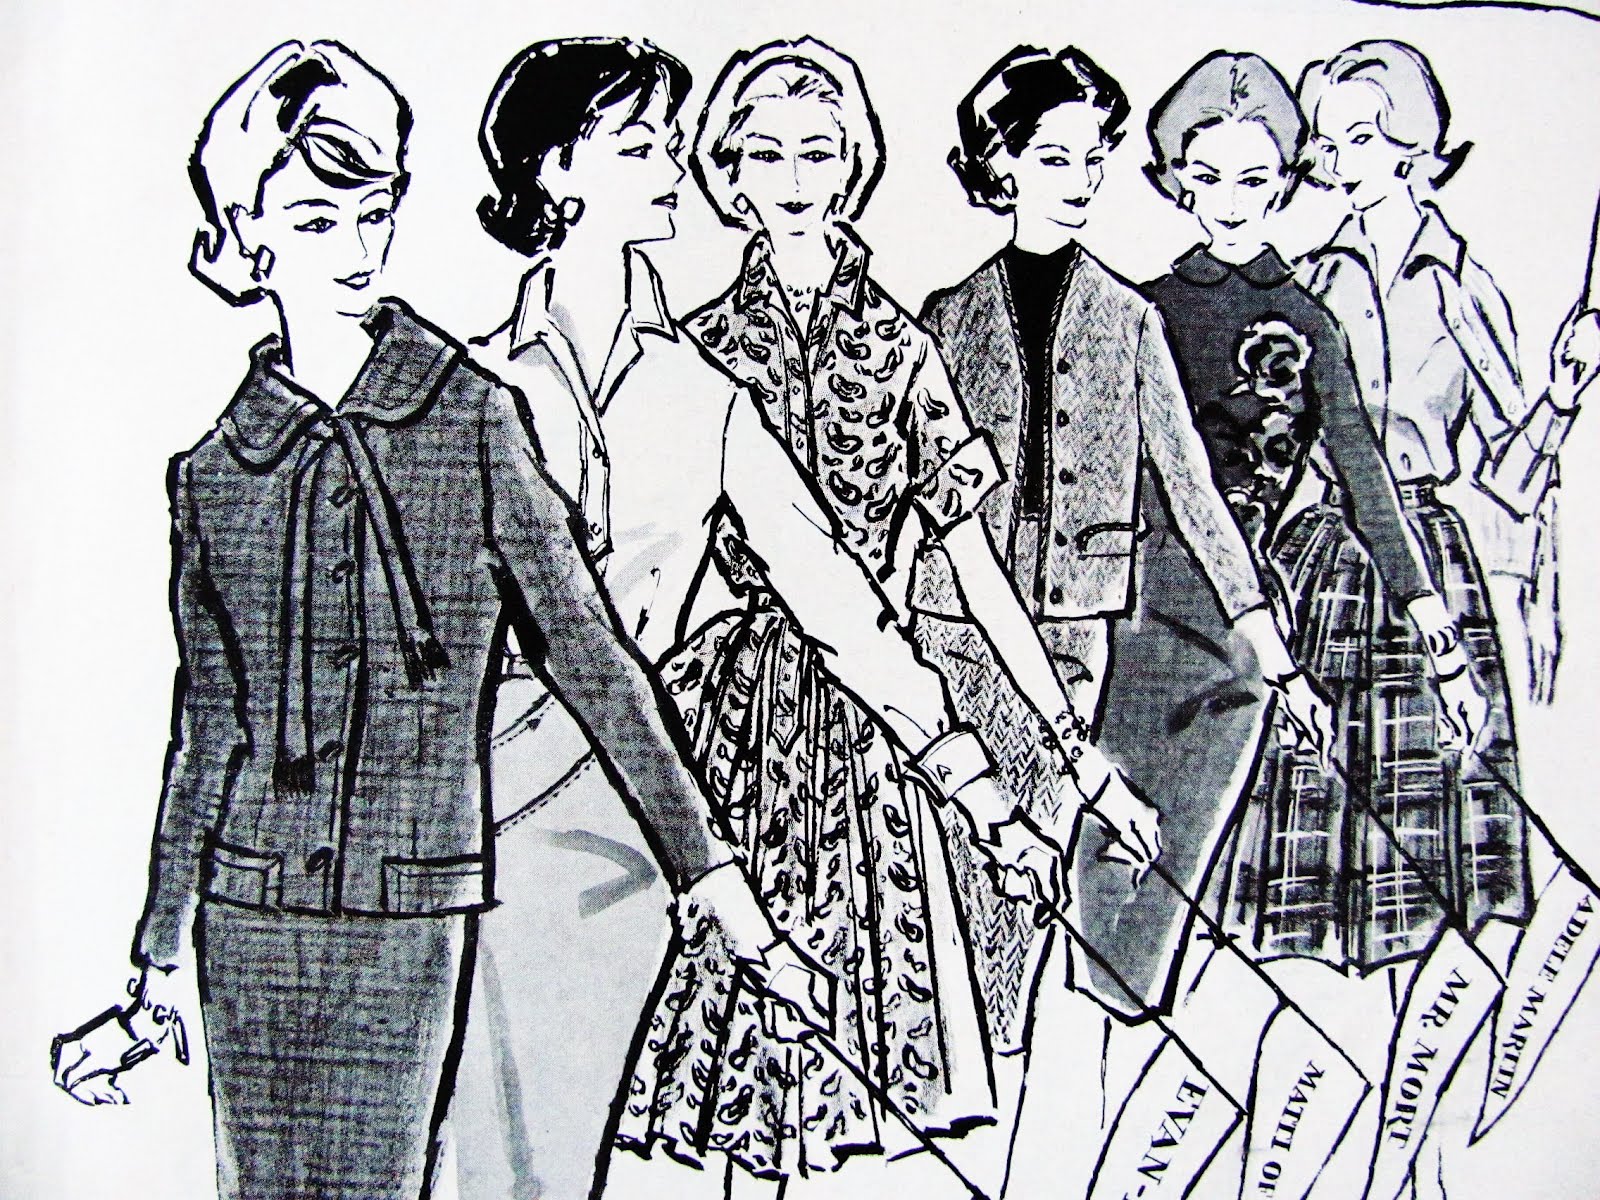
Back to School Fashions, 1959
Gotta love how the 1950's and 60's were so excited about 'back to school' and fall fashions in general. That was always the thickest magazine issue of the year. I guess after a summer of old cotton dresses, new wool Chanel-style suits, crisp paisleys and plaids were a sight for sore eyes.
Tuesday, April 3, 2012
Cole of California: 1950's Swimsuits
Cole of California, c. 1952 swimwear with elastic stretch.
Doesn't this set look pin-up perfect? For the first swim suit of the season these styles are great. A bit covered up against the spring chill, but uncovered enough to catch a few rays!
Tuesday, January 10, 2012
Asian Inspired: Bonnie Cashin Coat, June 1950
description from "Vogue", June, 1950:
"Sawed-off Chinese coolie coat--new length: white Irish linen, frog closings: three-quarter length sleeves. A summer coat with more than one life to share. First and foremost, a life with a bathing suit; then, perhaps, over a slender skirt in town, slacks at home. Coat by Bonnie Cashin, $30, At Lord & Taylor; Garfinckel's; Neiman-Marcus."

This photo of Bonnie Cashin shows her wearing the same coat, worn casually with pushed up sleeves (a style she favored).
The second image shown here is from the UCLA Special Collections website on Bonnie Cashin
Tuesday, November 22, 2011
Preview: 1950's dresses
Here is a preview of a few "fresh vintage" dresses that will debut at the pop-up shop for Pintuck Style this coming Saturday, Nov.26.
More info on this sale: HERE. Drop by/ say hi!
Sunday, August 21, 2011
Asher Fabrics: Couture Fashion, 1958
Ascher, London has posted five couture fashion portfolios from 1958. These scrapbooks with photos showcase designs using the original textiles by Zika Ascher, including mohair fabrics that Ascher was developing. It is wonderful to look through each collection. They captures the couture look from that year so well.
Also on this site is a gorgeous gallery of Ascher Scarves from the mid-1940's that were designed by known artists of the day.
Ascher Fabric Couture Collections, 1958
Haute Couture, Paris: Spring and Winter
Cardin
Desses
Givenchy
Griffe
Heim
Lanvin-Castillo
Laroche
Matta
Riviere
Rouff
Haute Couture, London: Winter
Cavanagh
Cardin
Paterson
Riviere
Alta Moda, Florence: Spring and Winter
Antonelli
Baratta
Capucci
Carosa
De Luca
Fabiani
Simonetta
(a special thanks to BonBon Atelier for reminding me of this collection)
Tuesday, August 16, 2011
Sewing Vintage Fashion: Vogue Patterns, April 1960
Vogue 9967. Blue eyelet, embroidered with dots, great full sleeves on fitted shirt waist dress
Vogue 9991. Floral border on cotton with matching stole wrap, sleeveless bodice with deep "V" back
Vogue 4101. Small kimono sleeve bodice with 3.5 yards wide gathered skirt in mauve ribbed cotton
These three vintage Vogue patterns are all sewn in cottons. They appear in "Ladies Home Journal", April 1960 (the Kim Novak cover is so sadly damaged I couldn't include a photo for you). It is interesting to note how easy the dresses would be to sew. The seam lines are classic, so that they might be duplicated today using patterns available.
The slides below show some current sewing patterns from Vogue, Butterick and McCall's that I found online. These could provide the basic garment to work from. Gathered skirts are not common in today's patterns, so that style would need to be improvised (easy stuff to do).
A kimono sleeve bodice is not common today, but there is one vintage styled pattern from Butterick that is similar. This pattern also has a "V" back (remove the bow). Small cap sleeves will also get the 'look'. When sewing a "V" back, that diagonal cut seam will need to be stabilized with twill tape, a strip of interfacing or elastic. That way it won't gap or fall off the shoulders.
The fitted top with deep "V" back on the blue floral dress is very simple. When cutting a "V" back neckline, be sure that the front neckline stays high enough to keep the shoulders in place. If the front is also low cut, the shoulders slip down easily. Dressmakers would add little snaps inside that neckline so the bra strap could be fastened to the shoulder, keeping it in place.
Basic fit patterns are great for classic bodices such as this one. For the vintage sewist, this type of pattern is essential to own. It can be used for many styles once a true fit has been made. All three pattern companies carry a version of this pattern.
An alternative to simple darts is the princess bodice. Those vertical seam lines make for a better fit on curvy bodices. I show a princess pattern for each style.
This full skirted shirt dress with puffed sleeves can be duplicated in two ways: as a dress or as a blouse with gathered skirt (an easier fit for most). Those great gathered sleeves are probably easier to locate in a 1980's pattern, since current sleeves have a slender upper arm. I found a few blouses that might make a fitted bodice, and two have fuller sleeves.
Tuesday, July 12, 2011
1930's Bridal Bias Cut Gowns
As you look at these, don't miss the men's attire. Wouldn't it be lovely if fathers, attendants and grooms once again wore morning coats to daytime weddings? The longer, tapered coat is so elegant, and it creates a wonderful look to the bridal party 'scene'.
Monday, June 27, 2011
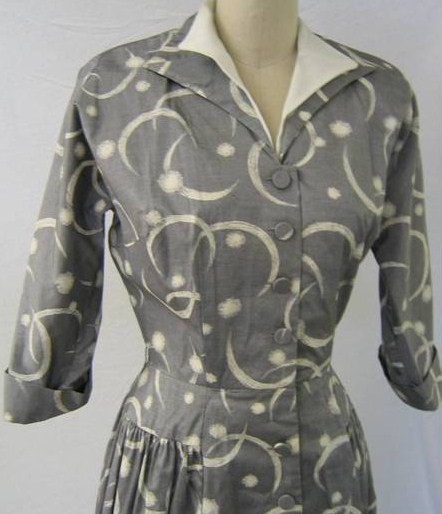
1950's Dress by Anjac Fashions of California
A slender body silhouette is achieved by having the fitted torso with dropped waistline. This is a silhouette similar to what we see in Givenchy's designs for Audrey Hepburn ("Love in the Afternoon" and "Funny Face", 1957). By lowering a gathered skirt to the hip bone, the waistline doesn't look bulky and full. The unique fabric pattern is screen printed in white on what seems to be an acetate textile with some shine in soft gray. The fabric texture enhances the dress design, creating emphasis for the skirt folds.
The dress's label is designed to promote California fashion. This marketing technique was popular among companies in the region who hoped to see their products displayed in "California boutiques" at department stores throughout the US.
The dress label reads: Anjac fashions
Made in California
Styled by Jack Needleman
ANJAC story
The Anjac label was designed in Los Angeles for over 30 years. The company was founded by Jack Needleman, who named his new apparel company by combining his name with his wife Annette’s. Needleman had moved to Los Angeles with his wife in 1943 from New York City. In New York he worked in the apparel industry as a jobber. Although Anjac was begun to produce dresses, his business focus would later center on more profitable real estate transactions in the Garment District. By the 1960’s this was to become the force of his business.
Anjac designer, Ilse Metchek, joined the company in 1967. She arrived from Catalina, having worked there designing sportswear. At Anjac her profitable styles financed Needleman’s property expansions in the garment district where he would build an empire that exists today and includes many important historical buildings in the area. He would pass away in 1999, the properties now managed by his family.
Needleman maintained the Anjac label until 1984, when he sold it to Metchek. Under her leadership the company was renamed “Ilse M. Inc”. Metchek designed for her label until 1990 when she gave it up to take a position as president at White Stag. Today Ilse Metchek is president of the California Fashion Association in Los Angeles, which she formed in 1994 to promote unity and compliance within the local apparel industry.
REFERENCES
Fit to a T: from modeling to management, Ilse Metchek taps into her decades in the apparel business to guide the California Fash, by Maya Meinert: Los Angeles Business Journal, March 23, 2009, http://www.entrepreneur.com/tradejournals/article/197105816_1.html
Jack Needleman, OBIT, by Myrna Oliver: Los Angeles Times: May 4, 1999, http://articles.latimes.com/1999/may/04/news/mn-33753
Orpheum Owner Steve Needleman Is Bringing Life Back to Broadway, by Jason Mandell: LA Downtown News: Sept. 24, 2004, http://www.ladowntownnews.com/articles/2004/09/27/news/news03.txt
Tuesday, May 24, 2011
1930's Vintage Fashion: Turn Around to See the Back View
Fashion during the 1930's was cut with diagonal bias seams to be smooth and slinky. The back view of a dress was often its best feature. These illustrations are from an old scrap book of mine, so I can't give you the exact dates, however most are from the early half of this decade. These fashion illustrations are just a peek into the wide range of back views seen during that time.
If you are dating a vintage dress that seems to be from this era, check out the back, that may help determine what decade it is from even more than the front view. And if you are going to sew for summer, why not consider adding some back interest to your project, that could make it something special.
Tuesday, March 1, 2011
1950's Vintage Fashion: Little Cover Ups
Little cover ups for spring and summer dresses during the 1950's came in many styles that included bolero and small capelets. The looks shown here are from sewing patterns that give both the dress and cover up views. There is an amazing variety of styles that were worn over dresses during this decade. From simple shapes to trims with buttons, collars and turned back cuffs. Today we tend to wear cardigans over dresses, but why not plan to sew a cover up when you make your next vintage styled dress? It's such a cute look!
Top view: Butterick 7243
Middle view: Simplicity 2501
Lower view: McCall's 9330
The little bolero shown here features turned back cuffs on the short sleeves and a winged collar. Mock buttons on the front are a cute accent. For most outfits, this shape really is figure flattering, creating a nice hour glass silhouette.
Black bolero with matching skirt
Saturday, November 13, 2010
Mad Men Era: Green Silk Cocktail Coat
Vintage fashion from the late 1950's or early 1960's can be created in silhouettes that stop traffic. Mad Men style, it's something to wear this winter.
Sometimes something perfect comes along, and this emerald green cocktail coat from Sak's Fifth Avenue is one of those moments in fashion history. Sculptural and refined, it's waiting for an evening on the town or keeping off the sea breeze when you admire the view of Hollywood from a hillside terrace.
Green Silk Satin Cocktail Coat: Sak's Fifth Avenue
Thursday, September 2, 2010
SEWING VINTAGE: 'S' Curve Darts & Flat Lining as Facing
Sewing vintage patterns from the 1940's, 1950's and early 1960's is fun, but getting the right look often requires sewing methods we don't see today. Learning how to sew the styles you like will make it easier to get the look you want. One method is flat lining, and here I want to show a fast and easy way to sew. Our modern fusible interfacings have made traditional flat lining unnecessary. It can have advantages though, and I thought I would share those with you.
Another out dated construction technique is the "S" shaped dart. A straight dart creates at flat curve. In some cases, that is what we want. However, if you are trying to get an hour glass fit to your bodice, than you might want to consider an "S" shaped dart. Glove fitting dresses like those produced by Lanz in the 1950's reveal this dart shape: it hugs the rib cage and curves around the bustline for a smooth body fit.
This light-weight summer cotton dress would wrinkle, and perhaps pull at the seams without this inner construction method. A cool cotton faces the fashion fabric, creating a stronger bodice to the flowing skirt.
FLAT LINING as FACING
Briefly, this method uses a cotton lining that is cut at the same time as the fashion fabric. This is sewn around the neckline and if it is sleeveless, the armholes. This bodice is then turned to the right side. At this point the darts can be sewn and the side seams completed.
Open side seams allow for further fitting and adjustments in the future. The top edge at the armhole can be hand sewn to reinforce that upper edge. This method works for both sleeveless styles and bodices with sleeves.
'S' CURVE DART
The dart will have an smooth seam line up the rib cage, then curve around the bottom of the bust, tapering to a fine line at the end. An 'S' curved bodice dart will create a smooth fitting bodice. It has to be fitted on the body, and should be developed in the pattern stage. However, it can be pinned into place after the bodice is flat lined.
POINT OF BUST
This is the bustline center. Do not end darts here because that will make pointed darts. Imagine a Quarter sized circle around the point of bust (it's OK to draw this onto your lining). End the dart point at that circle perimeter line.
FITTING
1-BASTE the side darts, using your machine's largest stitch length
2-BASTE the side seams together
3-TRY ON the bodice
4-PIN the back seam together down the seam line
5-PIN in the front bodice darts, shaping them to the rib cage and around the bustline, creating an 'S' curve dart.
6-MARKING: after fitting, remove the bodice for marking. You may mark the dart position on the lining with chalk or pencil before you sew these darts. The two darts should be 'balanced' visually but they may not be exactly the same. As long as the bodice side seams are in the correct location (down your body sides), then they should be fine. No one is exactly the same on both sides of their body, so your darts may reflect that as well.
7-CLIPPING: some 'S' curve darts require clipping so that they can be pressed open. Trim away excess fabric to create a 1/2" seam allowance up the dart. If you have a serger, you can finish these cut seams to prevent unraveling (or zig-zag over the edges).
8-PRESSING: these darts can be pressed open, or towards the front. On this bodice the seams were overlocked together and pressed towards center front. Often the fabric bulk requires that they are pressed open.
-----------------------------------------
HOW TO FLAT LINE as FACING:
STEP-BY-STEP
LINING and FASHION FABRIC
On your cutting surface, lay out the fashion fabric 'face down'. Over this, lay on the cotton lining. Smooth out bubbles and align the selvage edges. Pin on pattern (this method will need a pattern for each part, as it doesn't have a center fold). Cut out the pattern.
SEWING
1-Separate the lining and fashion fabrics. Sew the lining fabric shoulder seams and bodice fabric shoulder seams. Press those seams open.
2-On the work surface: lay out the fashion fabric bodice, face up. Over this, lay the lining bodice, face down. The two layers will now be facing each other. Pin together, matching the shoulder seams, then smooth the fabric flat so that all edges meet.
3-SEW around the neckline and armholes. Clip the seam allowances around these curves.
4-TURN the bodices to the right side so the good sides are now facing out, press flat. Match all edges and pin together so that the fabric doesn't shift apart.
5-OVERLOCK unfinished edges, with both layers together: side seams, waistlines and back seams. If you do not have a serger, trim these edges neatly then zig-zag overcast with a wide stitch.
6-FITTING: (see notes above)
7-DARTS: sew bodice darts (see "S" curve dart)
8-SIDE SEAM: this seam will be sewn, then opened flat. The top edge can be reinforced by hand stitching to keep it open. This type of seam will allow for alterations in fit.
9-NECKLINE and ARMHOLE edges can be edge stitched to create a crisp, flat edge.
The bodice is now ready for the skirt to be sewn on to it.
------------------------------------------
I hope you can try this flat lining technique with your next project. I think you will really like the results. If you have had your own experience flat lining, let us know how that worked out.
note: I used a display form for these photos who is sizes smaller than the dresses shown. You will notice the fit isn't correct, try to imagine it is.
Tweet
Subscribe to:
Posts (Atom)