Sunday, April 3, 2011

Under Tuscan Sun: Sewing Retro Style Dresses


"Under Tuscan Sun" from 2003 remains a popular chick flick, in part due to the vintage styles worn by the lead characters, designed by veteran costume designer Nicoletta Ercole. The 'white dress' that the lead character Frances (Diane Lane) wears created quite a scene when the movie was shown. It was a mini trend at the time. Women everywhere wanted to find that white dress.

Dresses featured in this film seem timeless: fitted bodice with longer tea length hemlines. This look couldn't be more current, as tea length styles are once again in fashion. I thought it might be fun to take a second glance at these costumes.

Eight years have passed since I wrote this blog post. At the time, little did I know that it would become one of the most popular posts ever for this blog. Out of respect for those of you that come here looking for these wonderful dresses, I thought it would be a good time to update the sewing patterns that I listed here. I'll share some new patterns with you at the end of the original post.


The white dress seen in a back view shows clearly the silhouette of this outfit. Below the neatly fitting surplice wrapped bodice, a semi-circle skirt is cut to a vintage 1950's 'ballet' or 'tea length' hem line.

The bodice fit is accented by a black belt which is the perfect way to note a slim waistline. I show a close-up view of the wrapped bodice, which crosses over to the front darts. The facing is wide, completely covering the bodice center front. It's my guess that the inside fastens on the front left at the dart to keep this from draping open, as surplice tops often do.

The sleeve is cut in a short kimono style to make this crepe dress look like it has short sleeves, but without a shoulder seam line. This gives it that late 1940's style.

It is important to notice that this is a mock wrapped dress because the skirt is not wrapped, having a half circle skirt instead. To get that look this dress should have a side zipper.

What makes this dress such a success is the fabric selection. I believe this is a quality crepe. During the late 1940's we see many similar dresses in this textile. At that time rayon, silk and wool were used to drape soft fold and body contoured silhouettes. Crepe would provide the necessary weight and hand to drape the front wrap, soft shoulder and graceful circle skirt. The bodice appears unlined, except for the facing.


A wedding scene has Frances appearing in yet another captivating dress. This one is probably Thai silk in luminescent peach. It has a great circle skirt, looking similar to that on the white dress.

The bodice of this dress is a classic cut: front and side darts create a smooth fit. This crisp fabric requires a set in sleeve, seen here with small cuffs. A narrow shawl collar and covered buttons on the front add soft, but not contrasting details. The one color accent is her wide belt. The skirt on this dress does not continue the center front buttons of the bodice. This would require a side zipper.


Katherine, played by Lindsay Duncan is an fanciful character whose references to Fellini are underscored by her wardrobe. Some of these gowns appear to be true vintage, others are close copies. This red dress coat dress and hat serve to give this character the eccentric drama she requires. Wide lapel details enhance the monochromatic theme of her red on red outfit.


In a Fellini moment, we see Katherine in the village fountain, wearing a dress very similar to Fellini's famous fountain scene. It is a slender strapless black sheath with a sheer overskirt lined in gray chiffon. Another black dinner dress with a lace overlay or yoke may be vintage, its delicate details certainly are classic for that era.

Now, where to find or re-create these styles? I have found a few sewing patterns that could be altered to reproduce the same look. Actually, the dress styles here are not difficult to sew. The challenge is in the fit instead, so find a willing assistant to pin your fit may be required.


What both of Frances's dresses have in common is a circle or semi-circle skirt sewn at the waistline to a fitted bodice. In both cases that makes the front closures decorative, because the real dress opening will be a side zipper.

These two wrap front sewing patterns have the essential bodice details of the white dress. The green style by Butterick 5030 is closest in cut (minus the collar and ruffled sleeves). The Butterick pattern has front bust darts and will fit a curvy body shape while the Vogue 6846 style is without darts, for a more slender figure. With both bodices, altering the pattern by drafting a wider shoulder cut from the bodice will create the type of sleeve seen on the white dress.

Because this should be a mock wrap dress, a circle skirt should be sewn to the bodice instead of wrapping the front skirt. This skirt was probably cut in a 1/2 circle.

When adding a circle skirt, completely fit the bodice first to get the waist measurement and skirt length. The skirt will be drafted from those measurements.

The real style challenge is to capture the skirt silhouette. In the movie versions, both were full or semi-circle skirts that were sewn to the fitted bodices, requiring a side seam zipper. While a circle skirt pattern can be found for sale, it is not impossible to cut an original version to fit the bodice.

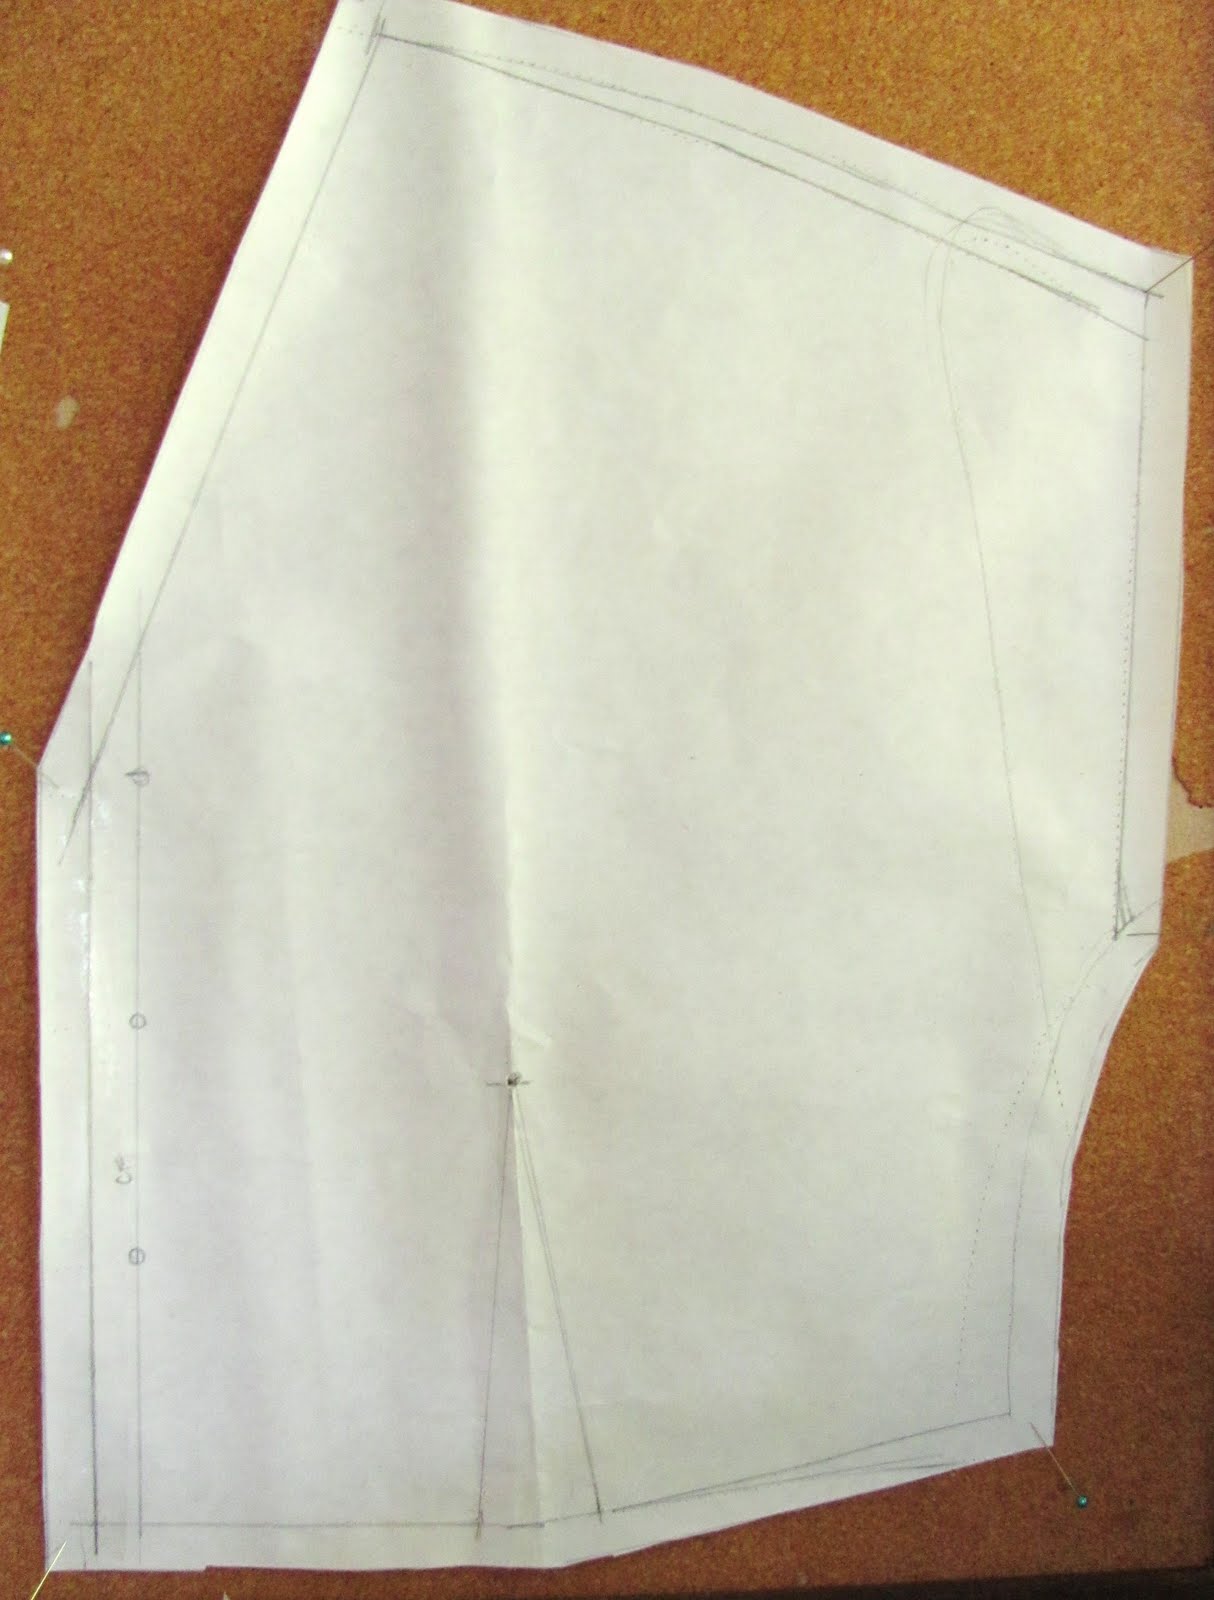
When preparing to draft a circle skirt, the directions ask for a waist measurement. Use the bodice waistline measurement from a fitted garment. Be sure to draft a skirt with side seams. When doing this, I use an open floor space, chalk, yardsticks and even string to create the true arc.

Hemming circle skirts is most easily done with a very narrow double fold that is hand sewn or machine stitched. When using softer fabrics like crepe, before hemming the finished dress will need to hang for a week or so to let the hem 'hang out'. After that, have the length measured while wearing the dress. This will even out what is probably an uneven skirt length.

If you want more information on drafting circle skirts, the images I show here for the skirt draft are explained in full on the Sew News website for Drafting a Circle Skirt.


This concludes the original post. The sewing patterns shown above, Butterick 5030 and Vogue 8646 are still being sold, as of this posting.

To add to the wrap dress collection above, I found several more patterns from Vogue 8896, 8784 and 8379. When looking to match a pattern with your fabric, take care to see if the pattern is designed for a woven or stretch textile, as both are available.


The slender shirtwaist dress by McCalls 6891 has classic bodice darts to create a fitted torso, as well as set in sleeves. The collar is the traditional notch style, making this look close to the original seen in the film.  McCall's 6696 is another option.  For a pattern with bustline adjustments, try using McCalls 7185, but add the circle skirt instead.  Probably the closest silhouette to the film's original is McCalls 7081, with the wrap front and wide hemline.


Katherine's outfits are much more vintage inspired.  Her black strapless sheath with lace cover up can be seen in McCalls 7321, a dress that can be made with fitted bustier bodice, straight skirt and lace sleeves and neckline.  There is a bustier dress with straight skirt that has a chiffon overskirt, which would give the same effect as the glamour seen in the original dress, by McCalls 6838.  Butterick 6353 by Gertie also has a fitted bodice and skirt with floating chiffon train.

To create Katherine's red dress, the selection narrows down.  Butterick 5747 has a wonderful portrait collar that would do the trick if you are willing to have short sleeves. Or you could use Vogue 8346, a coat pattern with wide lapels and a fitted princess seamline to create the dress (try a fitting muslin first to be sure it's not loose loose, as coat patterns tend to be that way).

I want to thank everyone who has contacted me or left comments over the past few years. It has been alot of fun seeing how this post really fills a need that women who sew have. Beautiful dresses that fit well. That isn't too much to ask, is it?

Like what you see here?  Keep up with my blog posts on Bloglovin, and I am also on:

Facebook - Pintucks
Instagram - Pintuckstyle
Pinterest - Pintuckstyle
Twitter - Pintucks

Saturday, March 12, 2011

1930's Women's Pants: Polka Dots and Sailor Styles

1930's <br />Deco Beach Pants
1930's Nautical Jumpsuit
1930's Sailor style pants
1930's Woman's suit
1930's Sailor styleWide leg pants are showing up in fashion again, affected by the 1970's influences currently affecting trends. The sailor styles we saw during the 1970's had their origins in the 1930's when women began to wear 'beach pajamas' and men's tailored trousers.

The women's beach pajamas illustrated here date from the early 1930's (some are dated 1931), and show how women were able to choose from a wide variety of style details and looks. Most interesting to me is the white double breasted suit. Who says YSL was the first to put women in pant suits? Here's a great example from nearly 40 years earlier!

So be inspired, this silhouette has alot to offer and is a great change of pace from the skinny jeans we have seen for the past few years.

Tuesday, March 1, 2011

1950's Vintage Fashion: Little Cover Ups

bolero jacket, Butterick 7243
Simplicity 2501
McCall's 9330
Little cover ups for spring and summer dresses during the 1950's came in many styles that included bolero and small capelets. The looks shown here are from sewing patterns that give both the dress and cover up views. There is an amazing variety of styles that were worn over dresses during this decade. From simple shapes to trims with buttons, collars and turned back cuffs. Today we tend to wear cardigans over dresses, but why not plan to sew a cover up when you make your next vintage styled dress? It's such a cute look!

Top view: Butterick 7243
Middle view: Simplicity 2501
Lower view: McCall's 9330


The little bolero shown here features turned back cuffs on the short sleeves and a winged collar. Mock buttons on the front are a cute accent. For most outfits, this shape really is figure flattering, creating a nice hour glass silhouette.

Black bolero with matching skirt

Thursday, February 17, 2011

Vintage or Retro? Leaf Prints

Amber GloAn early 1950's pottery company, Stengl, produced a trend setting design in 1954 called "Amber Glo". Part of the charm was the leaf print, almost like a flame with a brush stroke style. When I saw this newly released "Naturewalk" leaf print in 100% cotton fabric pattern by Cloud 9, I saw that same leaf style. This time the leaf is in repeat in an all over motif. What better fabric to sew into a crisp vintage style blouse or throw pillows for the Nelson style sofa?

vintage sewing patternsSimple fashion styles are perfect for busy cotton prints. These vintage sewing patterns are easy to make, and will work into any modern wardrobe. Busy prints need clean lines to show off the colors and details like these patterns do. Start now, and you'll be ready for the first spring day with a new blouse or dress!
A: Vogue 1002, c. late 1970's
B: Butterick 2475, c. early 1960's
C: McCall's 7608, c. early 1960's


Read more about Stengl: Amber Glo design c. 1954

Shop for Naturewalk fabric by Cloud 9: Bon Bon Atlier (also, don't miss their daily blog posts, always fun new things to see!)

Friday, February 11, 2011

Gloria Swanson: A 20th century 'New Woman'


Gloria Swanson was an early film actress, born in 1899, she lived through the boom years of the film industry. By today's standards, Gloria was far ahead of most women in her day. Her acting career brought fame and wealth to her, giving her the flexibility to work on many projects that would benefit women and others. One of these was her ongoing design partnership with an American fashion company, Puritan Fashion Corp, from 1950 through 1982 (she would have been 83 years old at the time). For Purtain, Gloria designed for the "Forever Young" label, traveling around the country showcasing her styles and giving women advice on style and beauty.


Gloria Swanson's interests were wide: the arts, politics and inventions are included in her roster or achievements. A champion of natural foods, she campaigned in the 1950's for product labeling and food additive legislation. She also championed women on many levels. Politically she would protest tax rates for single people (1972) and supported the rights of senior citizens (1980's).

Overall, many of her achievements are unknown. In the end, she was obviously an amazing 'New Woman' of the 20th century!

The "Forever Young" labeled dresses seen here show Gloria's best fashion design technique: have texture and visual interest at the neckline, and widen the shoulders so that the hips appear more narrow. Add to that a flared skirt or hipline pockets as artful drapery. The pink lace dress above has a trim in bias cording that is scrolled around the neckline and around a flared skirt hem. The blue linen dress has a neckline trim of dyed to matched textured lace with rhinestone details.

Gloria would design dresses to flatter the average woman's figure. She didn't try to cinch in a waist to tightly or cut sleeve too short. These flattering dresses have a great fit for most women, and continue today to be sought after for their 1950's vintage styling that fit a modern contemporary figure.

Find out more about Gloria Swanson:
Harry Ransom Humanities Research Center, University of Texas, Austin:

The Blue dress is currently offered for sale in our shop.
The Pink dress has been sold.

Tuesday, February 8, 2011

Edwardian Corsets, styles from 1900


Here are a few corset ads from the early 1900's to inspire you. There are many ideas to use when sewing summer tops, garden party dresses or even an awesome Steam Punk gown! As spring approaches, wedding, prom and summer styles borrow so much from these lingerie looks.


Sunday, January 9, 2011

Great VINTAGE FASHION blogs

Jacques Tiffeau
Here's a few Vintage Fashion blogs that I think are great fun.
See one you haven't visited before?
Cruise by and say "hi".

Couture Allure Vintage Fashion
Such eye candy! I just love to see what beauties she's found. They are always gorgeous.

Wearing History
Neat articles about fashion history, along with sewing projects.
It's a fun read.

Vestedbee Vintage
I love the way she styles and wears her vintage finds.
This is a great jumping off point into fashion trends with vintage pieces.


Image photo: Fall/Winter 1960
Both outfits are in plaid wool by Jacques Tiffeau, who won his first Coty Award that year as an American designer.

Friday, January 7, 2011

How to: COPY a DRESS or KNOCK-OFF a PATTERN

How can you copy a dress? How can you make a pattern from your favorite fashion? If you have ever loved a vintage dress and wanted to sew another, then knowing some basic techniques for copying garments would be helpful.

This tutorial will show you how I made a pattern from this vintage mid-1950's cotton dress. I chose a very simple style, one with short kimono style sleeves that are cut in one with the bodice. I also used a style with only one simple bodice dart in both front and back.

The details in this bodice are a simple wing collar with sleeve cuff to match. There is a button front as well.


The back view is 'clean', without details, showing a one piece construction with darts to make the fit.

As you follow these photos, you may want to 'click' on the image to see an enlarged version, as some details are small.

tools and materials:

Cork Board: I use a large old bulletin board

Paper: I use plain white butcher paper, because that is easy to find. Using the BACK side of old gift wrap in a wide width can work as well. If you have access to pattern 'dot' paper, then that is best. But I will show you how to work without that grid.

Ruler: A 12" or 18" ruler and a yard stick

Pins: I prefer pearl head pins because they are easy to use and see.

Pattern Wheel: This is ideal, but I will also show you how to use a pin to create marks if you don't have this tool.

Pencil: sharp

Dress: Pressed and smooth

TERMS: I will use the following terms

Grainline and On Grain: this is the 'up and down' direction that follows the yarns (warp) that would have been tied to the loom. It is a perfect vertical line.

Cross Grain: This is the 'side to side' yarn direction, that follows the yarns (weft or fill) that would have been woven across the loom. It is a perfect horizontal line that is exactly perpendicular to the Grainline.

Bias: This is a perfect diagonal line (45 degrees) created when the vertical grainline and horizontal cross grain line are folded together. This is the same line that is created when a bandana is folded to create a triangle. This diagonal has stretch properities.

Selvage: This is the fabric edge. Traditionally it is woven when the cross grain yarns (weft or fill) turn and weave back across the fabric. More modern wide with textiles may have a 'fringey' selvage.

Center front (CF): This is the front line of a garment. It can be found when the sides of the garment are evenly matched together, creating a fold (center front fold). In most garments, this is on grain and oriented perfectly vertical on the textile.

Center back (CB): This is the perfect back line of a garment and is determined the same way as center front.

This project will begin with the back view because it is the least complex.

Step 1: Find the center back line on the bodice
Work from the inside of the garment, match up the dart seams, side seams and neckline, pinning those together. This will produce a center back fold. You may press this flat

Step 2: Draft the center back line on paper
Lay a length of paper about 18" long on your cork board, pin the corners down.
Use your ruler to draw a sharp line that is about 18" long with at least 15" of paper width on one side. I turn the board sideways, and will work that way in the photos.

Step 3: Align the center back line
Lay your back bodice that is pinned so that the center back fold is exactly on the drafted line. Here I use my ruler to guide me. I then pin the fabric from waist to neckline on this fold.

Run the pattern wheel down the edge of your CB fold.
Run the pattern wheel along the waistline and neckline as far as you can without getting into any pulled areas.
Alternative method: using a long pin (corsage pin works well), run a length of 'stab' punches down the fold line. I just 'hop' the pin down the line, creating a length of pin dots.


NOTE: When I pin, I use a technique where two pins are in a "V" position. This helps to keep them fixed in place and not pull out.


Step 3: Draft the Dart: In this photo you can see how the dart tip is also pinned down. It is important to keep the grain of the fabric straight. The yarns should stay in a perfect 'grid' orientation, and not be stretched towards a bias or diagonal.

Run the pattern wheel up the dart seam line from waistline seam to the point. Accent that point with a cross mark to create a bulls eye "T".

Step 4: Bodice side and shoulder seams: It may be necessary to remove the CB pins as you smooth the garment towards the side seams. Smooth a perfect horizontal out from the point of bust and pin that point.

SUGGESTION: Work out from the dart's point to smooth out the fabric towards each seam line. Think of this like the center of a clock with the hands radiation outwards. This will maintain the dart's position, and the fabric grainline more easily.

You will need to release the dart pins that are in place from the waistline to the point below the dart point. As you smooth the fabric, the dart should pivot a bit away from that original location. This is forming the dart's tuck of excess fabric.

Pin out the remaining waistline seam, side seams, neckline, shoulder and sleeve.


Edges: Run the tracing wheel to mark those edges. You may need to release some pins that are pulling the shape in order to get the sleeve and neckline shape. Just take care to
- work flat and smooth
- keep the fabric on grain, don't stretch it on the bias or make it 'crooked'.

When you remove the garment, this is what the back view should resemble. Reinforce the pattern wheel punched lines with a pencil and ruler. The CB line can be folded, so that your draft has both sides.

This is the front pattern that was drafted in the same way.


Button front: Where is center line if there are buttons? This line usually runs down the center of the button line (or the dot where each button is sewn in place). You can make a pin 'punch' where each button is centered.

NOTE: I worked the front pattern from the good side of the garment. You can see that the fabric pattern and details are facing out. I did this to make the buttons, collar and cuff easier to see.

When using this method, I did not pre-draft the CF line because it is under my dress front and I can't see it. I drafted the CF line after removing the dress from the paper. I had a row of pin punches to denote that CF line, so it was easy to find.

Front Neckline: This is pinned, then traced down that line. You can add pin 'punch' marks at each end to note the exact length.


Collars and Cuffs: How can I draft these shapes? These are the easiest pieces to work with. Just flatten each onto the paper, and pin flat and smooth. You can trace the outside edges with a pencil, and use the pattern wheel to outline the seam where it is sewn into the dress.


NOTE: As you draft, remember that these are seam lines, and you will need to add your seam allowances to this pattern. Generally these are 1/2" in the fashion industry, and 5/8" for home sewing patterns.

NOTE:
A seasoned patternmaker once told me "There's more than one way to skin a cat".
Meaning: This is only one method to produce similar results. As you work and gain experience, you may develop different techniques. Or perhaps you will be taught a different method by someone else. Regardless, as long as the technique produces the desired results, any way is OK.

Going Further:

Fit Sample:
Cut a fitting sample from the same type of fabric as your vintage dress. My dress is simple cotton, so any cotton or plain muslin will work in this case. I will add side seam allowance to make a 1" seam allowance at each side. I recommend this in case you need more room during the fitting.

Draw the seam lines from your pattern onto the muslin in a red sharpie or marker, and it will be easy to follow. With the fitting, use a 2nd color marker to show new alterations. Transfer those new seamlines into a 2nd pattern. If you don't need to make many changes, this 2nd pattern should be ready to use with your fashion fabric.

SEWING the DRESS:
The following vintage sewing posts may help you to sew your dress:

How to sew Flat Lining

How to sew a Fitted Bust Dart