
 1960's Print Dress in a cotton screen print, I.Magnin label
Sewing vintage styles can be a new experience if you have been sewing crafts and modern fashions. One of the best ways to learn how-to sew dresses, especially vintage dresses, is to study examples. Trying to get the right effect usually means following the same, or similar sewing techniques along the way.
I am going to take you through a close look at this cute Mad Men era dress, to see what makes it 'tick' and how you can get the same professional results when you sew vintage.

This dress has two personalities, the fashion fabric exterior, and the technical interior. What makes this dress seem smooth and well fit is a simple process termed flat lining.
Flat lining
This technique is used for many (most?) dresses made before knits came into fashion during the late 1960's. Simply, it is a method where the fashion fabric is backed by a lining. Both are cut at the same time, stabilized by sewing around all edges to make them handle like one fabric, then sewn into the garment.
Darts and seams are sewn after the fashion fabric has been flat lined.
In this example, white cotton broadcloth has been used to flat line the cotton fashion fabric.
Why cotton broadcloth?
Since the fashion shell is cotton, using cotton in the lining will retain the cool property of the original fashion fabric. Cotton is also strong, and will prevent the seams from pulling out or the skirt from stretching while seated. It can also be washable, although this garment was not designed to be laundered.

This inside view shows the details of a bodice.
Flat lining: the white cotton can be seen as the inner layer that is sewn to the fashion fabric around all edges about 1/4" from those edges. It was trimmed with pinking shears.
Dart: the dart has been slashed and spread open to minimize bulk. In the preparation process both fabric layers were sewn 1/4" from the edge as shown
Waistline: to keep the waistline from ripping out or popping stitches, wide twill tape was sewn over the seamline where bodice meets skirt. Also notice that the skirt is flat lined. Sometimes the skirt is not flat lined if it is very full or gathered.

Hem tape: This close look at the hem shows how hem tape is sewn to the edge of the hem, then it is turned up and stitched to the flat lining. If done this way, the hem stitches will not show. Hem tape does two things: it keeps the hem edge from unraveling while it provides a non-bulky method of sewing it up. A hem that has been turned back and machine sewn before hemming has two layers, and will often leave a shadow or thickness. This way the hem is not 'pressed' forward into the skirt fabric where it will leave a mark when pressing.
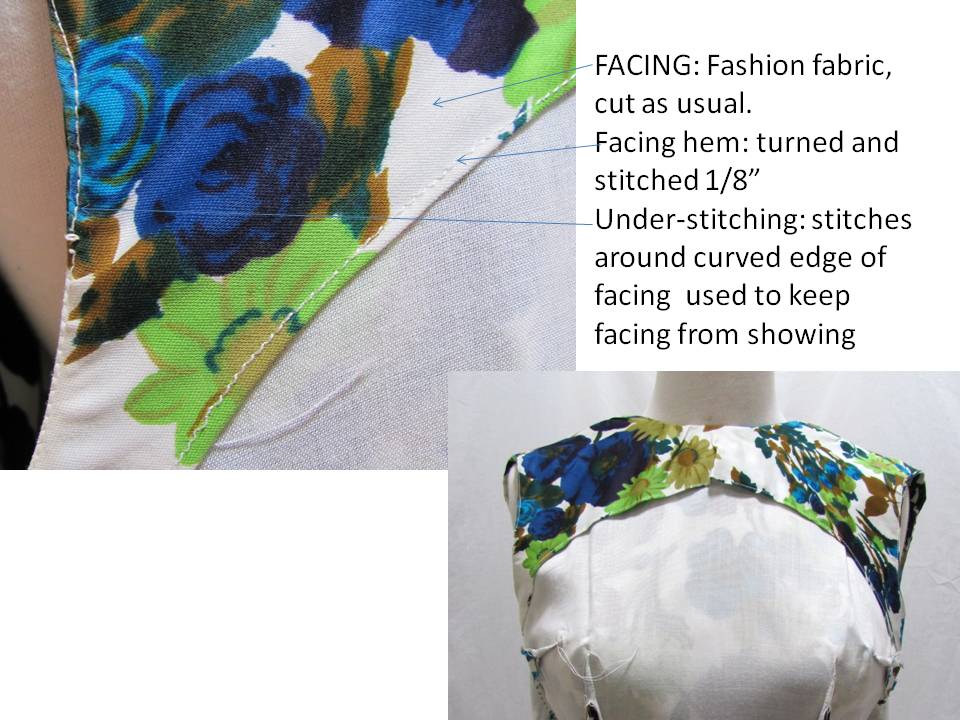
Facing: Facing will clean finish the neckline and armholes. The edge here has been turned and stitched to prevent unraveling.
Under-stitching: Stitching around the curved edges of the arm hole and neckline will prevent the lining from pulling and showing when worn. These stitches are around the seamline, but sewn only on the facing. This is different from top stitching.
HOW TO FLAT LINE
Getting started: Start with a big, smooth cutting surface (probably your floor).
#1--Lay out the flat lining fabric, be sure it is straight and on grain (not crooked).
#2--Spread the fashion fabric 'face' up over the lining, smooth it out to remove bubbles and wrinkles, be sure the grain lines match by aligning the selvage edges. If possible, press both layers. This will help to smooth them out and creates a 'bond' between them.
#3--Pin selvage edges together so they won't shift as you work.
#4--Layout pattern as usual. Because this method uses the fabric in an open layout, with out a center fold, you may need to flip some patterns to get both right and left sides. For the bodice front, tape tissue to the center front line of your pattern, fold down center front and cut around the cutting lines. When cut, open tissue and you should have a full front pattern with both left and right sides. While laying out the pattern, consider the print of your fabric as well, since you can see both left and right sides clearly during layout process.
#5--Pin pattern pieces to the fabric and cut through both layers. Keep shears perpendicular to the cutting surface. Cutting at an angle will make the layers different.
#6--Transfer pins when removing the paper pattern to pin only the fabric 'sandwich' piece. Pin away from edges to keep fabric from shifting.
#7--Machine sew around each fabric 'sandwich' piece using 1/4" seam lines and a medium length stitch. MODERN: use an overlock to clean finish all edges instead, but don't trim off fabric or you will reduce the pattern size (!!!)
#8--Your flat lining process is complete. Now proceed with marking your pattern and preparing to sew.
Sew your dress as usual, following pattern instructions and refering to your sewing books for more details. Remember to press the seams open because the extra layers will add up to more bulk.
I think you will be happy with the results. Let me know if you have further questions about this technique.
Tweet